50
Adjusting and testing installed tail lift
10 Adjusting and testing installed tail lift
When you have installed your PALFINGER Tail Lifts tail lift, you
must then adjust it and test that it is functioning properly. This entails
the following jobs:
• adjust the tilt switch b13 (see chapter 10.1 on page 50)
• air bleeding hydraulic cylinders (see chapter 10.2 on page 51)
• checking horizontal position on ground (see chapter 10.3 on
page 51)
• performing oil level check (see chapter 10.4 on page 52),
• checking all screw connections (see chapter 10.5 on
page 53),
• attaching warning strips and type plate (see chapter 10.6 on page
54)
• performing acceptance test as per test book
(see chapter 10.8 on page 56).
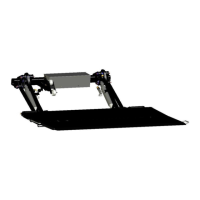
10.1 Set tilt switch b13
Move the platform to the horizontal position as shown above,
approx. 250 mm above the floor.
Release the screw on tilt switch b13 on the right torsion arm.
Adjust tilt switch b13 so that it is horizontal.
Retighten the screw on tilt switch b13.
Observe the torque of 9 Nm.
Fold back the safety plate.
NOTE
When the tilt sensor b15 is present on the lift arm of your tail lift, this adjustment is
not required.
approx. 250
Switch b13
Safety plate
horizontal
 Loading...