EasyManuals Logo

Panasonic Lumix DC-GX9 User Manual

Panasonic Lumix DC-GX9
343 pages
To Next Page IconTo Next Page
To Previous Page IconTo Previous Page
Page #32 background imageLoading...
Page #32 background image
32
Preparations
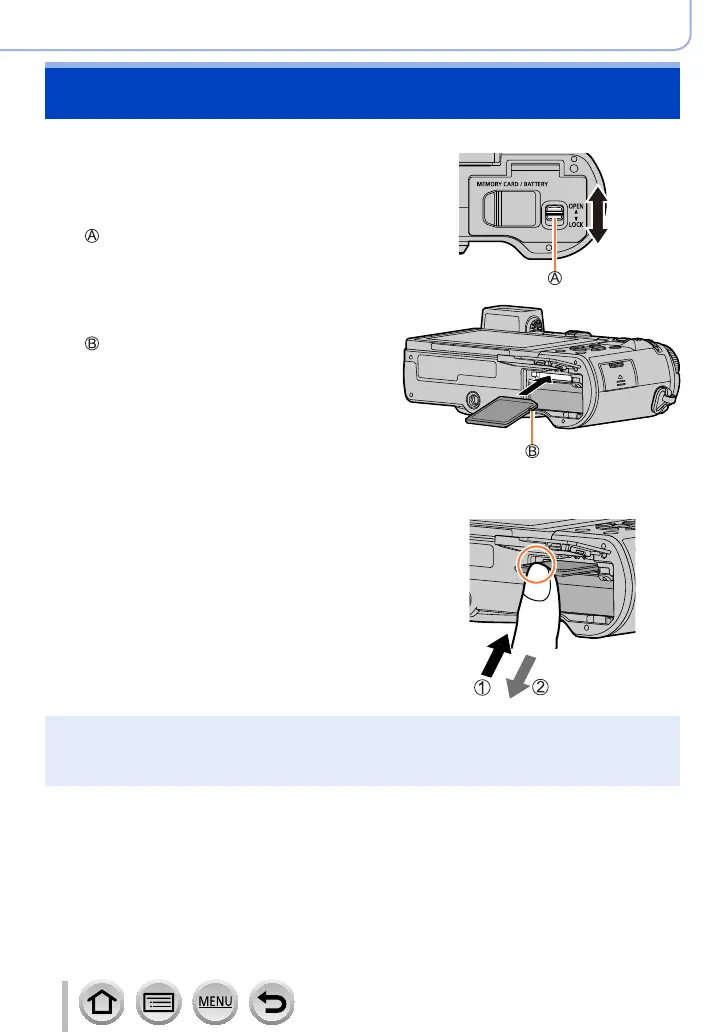
Inserting and removing the card (optional)
Make sure that the camera is turned off.
1
Slide the release lever to the
[OPEN] position and open the
card/battery door
Release lever
[OPEN]
[LOCK]
2
Insert the card all the way
Do not touch the terminal
Check the orientation of a card.
Insert the card all the way firmly until
it clicks.
3
Close the card/battery door
and slide the release lever to
the [LOCK] position
To remove card
Press the centre of the card.
Press
Pull out
Keep the memory card out of reach of children to prevent swallowing.
To remove the card, turn the camera off and wait until the LUMIX indicator on the screen goes
off. (Failure to wait may cause the camera to malfunction and may damage the card or recorded
data.)

Table of Contents

Other manuals for Panasonic Lumix DC-GX9

Questions and Answers:

Question and Answer IconNeed help?

Do you have a question about the Panasonic Lumix DC-GX9 and is the answer not in the manual?

Panasonic Lumix DC-GX9 Specifications

General IconGeneral
Camera TypeMirrorless
Sensor TypeLive MOS
Effective Pixels20.3 MP
Image ProcessorVenus Engine
Continuous Shooting9 fps
LCD Screen Size3.0 inches
Screen TypeTilting Touchscreen
Built-in FlashYes
Wireless ConnectivityWi-Fi, Bluetooth
Dimensions124 x 72.1 x 46.8 mm
Lens MountMicro Four Thirds
Sensor Size17.3 x 13.0 mm
ISO Range200-25600 (extendable to 100)
Shutter Speed60 sec
Autofocus SystemContrast Detection
Image Stabilization5-axis
Viewfinder TypeElectronic
Viewfinder Resolution2, 760, 000 dots
LCD Screen Resolution1, 240, 000 dots
Video Recording4K UHD at 30p
BatteryDMW-BLG10
Battery Life260 shots (CIPA standard)
Weight407 g (with battery and SD card)

Related product manuals