Initiating the scanning process Operation
37
4522 207 12671 * 2021-06-17
Pathology Scanner SG20 / SG60 / SG300
NOTICE
Adding, replacing or removing single slides to or from a rack that is already placed inside the
store, can lead to errors.
NOTICE
Use only racks that are compatible with the scanner, see chapter “Glass slide racks” on page
103.
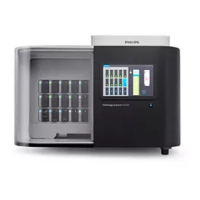
For the Pathology Scanner SG20 model
►
Place the rack in the empty slot in the store.
⇨
The store is filled.
For the Pathology Scanner SG60 and SG300 models
►
Place the rack in an empty slot in the store.
► Repeat this step until all racks to be scanned have been placed into the store.
⇨
The store is filled with racks to be scanned. The Pathology Scanner SG60 can contain up to 3
racks. The Pathology Scanner SG300 can contain up to 15 racks.
All racks placed in the store are considered to be new racks that need to be scanned. Re-
inserting an already scanned rack will result in re-scanning all slides present in the rack.
NOTICE
The handler could collide with slides that stick out too far from the racks in the store.
Make sure that all slides are placed in the racks as far as possible.
Closing the store door
►
Close the store door by sliding it to the right.
⇨
The door is closed. In a few seconds the scanner starts automatically or continues with the
scanning process.
Initiating the scanning process
No operator action is necessary to start or to continue with the scanning process, when the
door has been closed.
By default, the racks are scanned in the order of placement in the store. See chapter “Changing
the scan order” on page 38 to adjust the scan order. The default scan order of slides is from
the bottom position till the top position in a rack. This order cannot be changed.