Checking the scan results Operation
41
4522 207 12671 * 2021-06-17
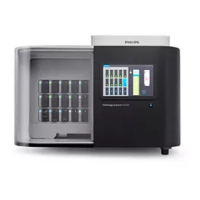
Pathology Scanner SG20 / SG60 / SG300
► Check the calibration icon in the top bar to check that calibration of the scanner is running
or calibration failed.
► Check the status of each rack, see chapter “Store (with racks)” on page 22 for more
information.
► Check the status of all slides in the racks, see chapter “Selected rack” on page 23 for more
information.
►
Select all slides for the scan status of the slide and a preview of the macro image and slide
label. See chapter “Skipped slides” on page 67 and chapter “Barcode issues” on page 69
for recommendations on how to proceed if a slide has been marked with an exclamation
mark or cross.
NOTICE
If the scanner has finished the scan job an acoustic alert is audible (one beep only).
Checking the scan results
WARNING
Check the tissue completeness of every acquired digital slide image to make sure that all
tissue on the glass slide has been detected and scanned.
WARNING
Due to the characteristics of the scanner, some tissue on the glass slide might not be shown
in the macro image and can be located outside the indicated scan regions.
Take appropriate actions, when you think the shown tissue might be incomplete.
NOTICE
The image information sent to the IMS can be affected in the case of a skipped slide, causing
the digital images and digital cases to be incomplete. The user should check the completeness
of the digital image in the IMS and should take appropriate actions to minimize the impact of
an incomplete digital case.
Checking the scan area
►
On the user interface, select the rack that has been scanned.
► Select a particular slide.