Do you have a question about the Raymarine e7 and is the answer not in the manual?
Provides critical safety warnings for product installation, operation, high voltages, radar, and sonar.
Explains normal color variations and potential pixel behavior in TFT displays.
Disclaimer regarding the product's waterproof rating and high-pressure washing.
Details product's intended use as an aid to navigation and data accuracy.
Information on compatible memory card types and maximum supported capacity.
States conformity with Electromagnetic Compatibility regulations for marine environments.
Lists third-party software licenses and where to find agreements.
Explains the importance of suppression ferrites for EMC performance.
Requirement for ferrites on non-Raymarine cables connected to the unit.
Declares product compliance with EMC directive 2004/108/EC.
Guidance on disposing of the product in accordance with WEEE Directive.
Instructions for registering product ownership online for warranty benefits.
Specifies intended use on leisure boats, not covered by IMO/SOLAS Carriage Regulations.
Disclaimer regarding information accuracy and potential product improvements.
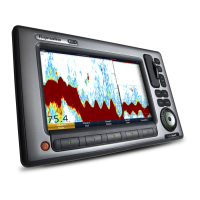
Details the e7/e7D multifunction display, its models, and about the handbook.
Explains conventions used for icons and menus throughout the handbook.
Overview of connecting the multifunction display with various marine electronics devices.
Details limitations for networking e7/e7D displays with other devices.
Instructions for powering the display on and off, including notes on cancellation.
Description of the display's physical controls and their functions.
Explains the Hybridtouch feature combining touchscreen and physical key operation.
Details functions operable via the touchscreen and recommends practice.
Describes the homescreen as a central access point to applications and data.
Explains how pages are used to display applications and how they can be customized.
Overview of available applications like Chart, Fishfinder, Radar, Data, and Weather.
Identifies key screen elements like Home, Databar, Menu, and Pop-up menus.
Instructions for editing data fields using the on-screen keyboard and saving changes.
Explains how to edit numerical values using the rotary control or on-screen keypad.
Covers placing/moving cursor, selecting windows, and touchscreen lock functionality.
Explains status symbols for Radar, AIS, Sonar, GPS, and Autopilot in the databar.
Guides through initial setup wizard, additional settings, and system configuration.
Explains using memory cards for archiving and backing up data like waypoints, routes, tracks.
Step-by-step instructions for inserting memory or chart cards into the unit.
Procedure for safely ejecting and removing memory or chart cards.
Details on saving waypoints, routes, tracks, and settings to a memory card.
Instructions for performing system resets, including settings and data reset options.
Explains waypoints, their display examples, context menus, and placement methods.
Describes routes, route features, building, and navigating routes.
Explains tracks as trails of passage, how to create, and manage them.
Details the storage limits for waypoints, routes, and tracks on the display.
Introduces the chart application's features for passage planning and navigation.
Explains how vessel position and chart orientation (North-Up, Head-Up, Course-Up) are displayed.
Describes switching between 2D and 3D chart views and their information display.
Details accessing and using the chart context menu for positional data and options.
Explains options for managing waypoints, routes, tracks, and display settings.
Covers navigation features like Goto Cursor, Goto Waypoint, Follow Route, and Create Track.
Instructions for measuring distances and bearings using the cursor or range rings.
Explains chart vectors (heading, COG, wind, tide) and how to enable/disable them.
Details animated current information, symbols, and viewing current graphs.
Explains animated tide information, symbols, tide graphs, and viewing tide station details.
How to display and search for additional information on cartographic objects, ports, and marinas.
Covers chart presentation options like detail, layers, view, orientation, motion mode, and data overlay.
Accessing the chart set-up menu to configure context menu, vessel size, and easy view.
Guide to controlling the autopilot using the multifunction display and pilot control dialog.
Description of symbols indicating autopilot status like Standby, Track, Auto, and alarms.
Explains autopilot alarms, how to silence them, and disengage the autopilot.
Details the Man Overboard (MOB) function for marking position and activating/canceling alarms.
Overview of setting up and configuring various alarms for system and external equipment.
Introduction to radar usage, HD/SuperHD features, and radar scanner compatibility.
Explains setting digital radar scan speed (24 RPM, 48 RPM, Auto).
Details radar scanner power mode status symbols like Transmit, Standby, Off, and Timed Transmit.
Covers maximum radar range calculation and factors affecting radar image quality.
Identifies elements on the radar display like range, targets, SHM, and additional features.
Explains viewing two radar ranges simultaneously and its compatibility.
Describes radar orientation modes (Head-Up, North-Up, Course-Up) and motion modes.
Covers adjustments like Auto Gain Mode, Rain, Adjust Gain, Color Gain, and Antenna Boost.
Details adjustments for non-HD radomes: Rain, Adjust Gain, FTC function, and Sea Mode.
Lists presentation options including Dual Range, Orientation & Motion Mode, and Enhance Echoes.
Explains how to measure distances and bearings using range rings, cursor, VRM/EBL.
Details Guard Zone setup, MARPA overview, and risk assessment for target tracking.
Covers scanner set-up options like Timed Transmit, Tune Adjust, and EBL Reference.
Instructions for resetting radar settings to their default values.
Introduces AIS features for receiving vessel information and how AIS works.
Lists requirements for AIS functionality, including hardware and GPS.
Explains the AIS context menu for viewing target data and accessing options.
Instructions for enabling AIS overlay in chart and radar applications.
Details how to display AIS vectors indicating target movement and heading.
Shows AIS status symbols indicating unit operation, availability, and silent mode.
Explains how to enable/disable AIS transmissions for privacy.
Illustrates various symbols representing different AIS target types.
Guide to viewing detailed AIS target information like type, status, ETA, and position.
Instructions for viewing the AIS list and filtering targets.
Explains using AIS Safe Zones and Safety Messages for collision avoidance.
Details AIS options like Vector Length, Display AIS, Buddy Tracking, and AIS Unit Set-up.
Describes AIS alarms for dangerous or lost targets and how to acknowledge them.
Explains adding AIS contacts to a Buddy List and how the buddy icon changes.
Provides warnings for sonar operation and an overview of fishfinder functions and screen elements.
Explains how to interpret the sonar image, seabed conditions, and factors influencing the display.
Describes four preset configurations (Single, Dual, Shallow, Deep) and display modes.
Explains dual frequency operation and selecting views for single or dual frequency.
Covers sonar frequency, adjusting presets, display modes, and naming presets.
Details selecting display modes like Zoom, Bottom Lock, A-Scope, and adjusting zoom features.
Explains changing depth range, range shift, and how to change the fishfinder depth range.
Covers sensitivity adjustments like Gain Mode, Auto Adjust, Color Gain, TVG, and Power Mode.
Details presentation options including Target Depth ID, Depth Lines, White Lines, Color Palette, Ping Rate.
Explains using VRM markers and depth lines to determine depths and distances.
Covers adjusting scroll speed, pausing the image, and adjusting scrolling speed.
Instructions for placing waypoints on the fishfinder display and using the waypoint menu.
Details setting up fish alarms, deep and shallow alarms, and sensitivity adjustments.
Describes sounder set-up options like Internal Sounder, Ping Rate Limit, Interference rejection, 2nd Echo IR.
Covers transducer set-up, including selecting transducer type, speed, and offsets.
Instructions for resetting the sonar unit to its factory default values.
Introduces the data application for viewing system and instrument data.
Lists default datapages like Navigation, Environmental, Fishing, Sailing, and Engine panels.
Guides on customizing datapages, changing order, content, renaming, adding, and deleting.
Describes the weather application for overlaying graphics and determining conditions.
Steps required before using the weather app, including receiver connection and subscription.
Explains display features like range, animation, wave heights, marine zones, and weather symbols.
Instructions for moving around the weather map, locating vessel, and placing waypoints.
Details the weather context menu for viewing reports and positional data for cursor location.
Viewing weather details for specific locations, stations, and cities.
Covers viewing Tropical statements, Marine warnings, Zone forecasts, and Watchbox warnings.
Explains viewing animated graphics for NOWRad, Wind, Waves, and Pressure.
Lists weather application menu options including Find Ship and Display Graphics.
Provides definitions for various weather terms like Cold front, Cyclone, Hurricane, and Isobar.
Describes viewing video or camera sources and adjusting image settings like brightness and contrast.
Explains using iPhone/iPad as a wireless repeat display via WiFi connection.
Steps to enable WiFi on the multifunction display and connect to a network.
Instructions for enabling display streaming to iPad/iPhone and launching the viewer app.
Guides on encrypting WiFi connection using WPA2 for security.
How to manually specify a WiFi channel if experiencing streaming difficulties.
Explains wirelessly controlling a Bluetooth media player using the display.
Steps to enable Bluetooth on the multifunction display for media player connection.
Procedure for pairing a Bluetooth media player device with the multifunction display.
Instructions for enabling audio control for a paired media player.
Describes on-screen media player controls for track playback and navigation.
Steps to unpair a Bluetooth device if experiencing connection problems.
Introduces the thermal camera application for controlling and displaying thermal imaging.
Explains camera standby, enabling/disabling, panning, tilting, zooming, and home position.
Details thermal and visible-light operation, switching lenses, and adjusting image settings.
Accessing the thermal camera set-up menu for camera controls.
Explains connecting DSC VHF radio for distress messages and position data.
Instructions for enabling DSC Alerts in System Settings for VHF radio integration.
Details wireless control of the multifunction display using a Raymarine remote control unit.
Steps for pairing the remote control unit and configuring arrow buttons.
Explains remote control operating principles, button functions, and customization.
Instructions for customizing the SHORTCUT button to assign a specific function.
Overview of remote control functions for range, pairing, select, and default/customizable buttons.
Describes how to select the system language from a list of available languages.
Allows customization of vessel appearance in chart and setting minimum safe depth.
Specifies preferences for units of measurement for distance, speed, depth, temperature, and volume.
Allows specification of preferred formats for time and date display, including UTC offset.
Covers display preferences like Key Beep, Cursor Autohide, and Shared Brightness settings.
Guides on customizing on-screen data cells and the databar with various data items.
Accesses menus for Alarms, Pilot Controls, Ground Trip Resets, System Settings, and Maintenance.
States that the product has no user-serviceable components and requires authorized dealer repair.
Recommends regular checks for cable damage, wear, and secure connections.
Provides best practices for cleaning, advising against dry cloths or abrasive products.
Basic procedure for cleaning the sealed display unit using a soft cloth and optional IPA.
Procedure for cleaning the screen coating to maintain water repellency and prevent glare.
Provides contact details for Raymarine support via website, telephone, and email.
Information on contacting third-party suppliers like Navionics and Sirius.
| Display Size | 7 inches |
|---|---|
| Display Resolution | 800 x 480 pixels |
| Display Type | LCD |
| Touchscreen | Yes |
| Power Supply | 12V DC |
| Waterproof Rating | IPX6 |
| GPS | Integrated 50 channel GPS |
| Networking | NMEA 2000, Wi-Fi, Bluetooth |
| Cartography | Navionics, C-MAP |
| Operating Temperature | -25°C to +55°C (-13°F to +131°F) |
| Storage Temperature | -30°C to +70°C (-22°F to +158°F) |
| Weight | 1.25 kg (2.75 lbs) |