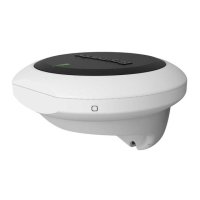
1.UsetheMountingbrack
ettemplate(87170)todrill3pilotholesintheverticalmountingsurface.
Securethemountingbrackettothesurfaceusingthesuppliedscrews.
2.PlacethesmallsealingringinthegroovelocatedonthebottomoftheMountingtray.
3.Securethetraytothebracketusing3ofthesuppliedscrews,inthepositionsindicatedinthe
illustrationabove.
4.PlacethelargesealingringintothegrooveontheuppersideoftheMountingtray.
5.PulltheSeaTalkng®andDeviceNetcablesthroughthemountingsurfaceholeandtheMounting
tray.Pluginthecableconnectorsontheundersideoftheunitandsecureasfollows:
•SeaTalkng®cable—securebyrotatingthelockingcollarclockwise2clicks.
•DeviceNetcable—securebyturningthecableconnector’scollarclockwiseuntiltight.
6.Inserttheunitintothemountingtray,ensuringthetabsintheMountingtrayareslottedintothe
groovesaroundtheedgeoftheunit.
Important:
TheunitmustbemountedwiththeLED‘arrow’inparallelalignmentwiththelongitudinalaxis
(centerline)ofthevesselandbepointingtowardsthevessel’ sbow.
7 .PlacetheMountingtrimovertheunitslightlyoffset,andthentwisttheMountingtrimclockwise
untilitlocksintoposition.
Installation
41