Do you have a question about the Robertshaw SENSE SMART 2000 and is the answer not in the manual?
Warning about turning off power before installation, removal, or cleaning to prevent electrical shock.
Warning that device should be installed by a qualified technician to avoid fire and electric shock hazards.
Warning against installing this 24V AC low-voltage thermostat on voltages higher than 30V AC.
List of safety rules including not switching to cool below 50°F, not shorting terminals, not connecting ground, and adhering to codes.
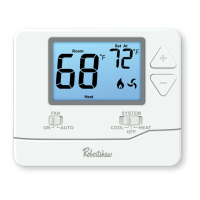
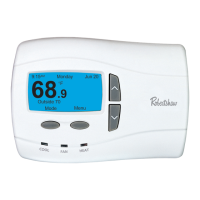
How to check the thermostat display to determine if it's Programmable or Manual, Commercial or Residential.
Explains display indicators for Programmable Commercial, Programmable Residential, dual setpoint, and single setpoint Manual modes.
How to determine if Manual mode is Residential or Commercial using the MODE button and temperature settings.
Steps to program the thermostat, including determining type, writing down settings, reviewing common functions, and following specific mode instructions.
Note on heat setpoint not being higher than cool setpoint, and cool setpoint not being lower than heat setpoint.
How the MODE button cycles through heating, cooling, auto, emergency heat, and OFF modes, affecting fan operation.
Initiates a 2-hour after hours run timer by replacing stop program temperatures with start program temperatures.
Overrides current program schedule and holds the set temperature indefinitely until the button is pressed again.
Increase/decrease temperature or programming values; used for 2-hour temperature overrides.
Used to set clock or program daily events in programmable modes, and switch Day/Night modes in manual mode.
Controls fan modes for single and three-speed systems, and operation when thermostat is OFF.
Thermostat activates heating when room temp falls below heat setpoint; cooling is ignored. Displays HEAT/HEATING.
Indicates the thermostat is performing a safety anti-cycle delay before restarting heating.
Uses emergency heating device to maintain temperature; can be expensive. Displays E.HEAT/E.HEATING.
Thermostat activates cooling when room temp rises above cool setpoint; heating is ignored. Displays COOL/COOLING.
Turns on heating below heat setpoint and cooling above cool setpoint. Recommended mode; displays HEAT and COOL.
Indicates a safety anti-cycle delay before restarting the air conditioning system.
Fan turns ON with heating/cooling and OFF when they turn off; may run momentarily to extract remaining conditioned air.
Fan runs continuously in Manual mode; in Programmable mode, can run continuously between programmed events.
Note that installers may activate advanced fan management capabilities affecting fan operation.
When system has one fan speed, thermostat displays fan info (no HIGH, MED, LOW). FAN button selects Fan On or Auto Fan.
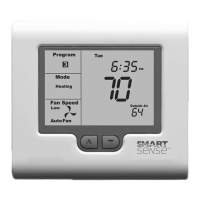
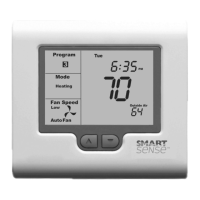
When system has three fan speeds, thermostat displays speeds as shown in Figure 2.
Diagram showing various indicators and information displayed on the thermostat screen, like Program, System Mode, Fan Speed, Set Temp, etc.
Note that flashing display parts indicate safety, energy management, or program delay/override in progress.
Indicates a control limit has been reached and a button or function is locked out.
Flashing wrench symbol means thermostat is in Commissioning Mode; safety/conservation delays are disabled.
Indicates the thermostat is receiving information from a building management system (BMS) which can change settings.
Outside air temperature can prevent functions; word LOCKED appears and functions unlock when temp becomes favorable.
Reminder to clean/replace filter; press/hold MODE+FAN for 5s to reset counter.
Indicates thermostat is pre-warming or pre-cooling building to meet scheduled start times.
Indicates residential program is on HOLD (inactive) with a permanent set temperature; time-based changes suspended.
Indicates thermostat shut down HVAC due to external command, sensor, or interlock; requires service call.
Thermostat communicates with BMS for centralized control; satellite symbol indicates communication.
Thermostat uses remote sensors for accurate room temperature if ideal placement is not possible. Commercial sensors may have an after hours button.
How to cycle through HEAT, COOL, AUTO, EMERGENCY HEAT, and OFF modes using the MODE button.
When OFF mode is selected, Fan mode automatically changes to FAN AUTO if set to FAN ON.
Details on fan control functions are found on page 15 of this manual.
Instructions to set the real-time clock using the PROG, UP, and DOWN buttons for hours, minutes, and day.
7-day programmable thermostat allows four timed set temp changes/events per day, named 1, 2, 3, 4.
Details the purpose of Events 1 (awakening), 2 (away), 3 (return home), and 4 (sleep) and how temperatures are held between events.
Use Tables 1 and 2 on pages 9 and 10 to record your events.
Press and hold PROG for three seconds to enter programming mode, starting with event 1 and the day.
Instructions to set event hours, minutes, heating temperature, and cooling temperature using PROG and UP/DOWN buttons.
Note: Heating set temp must be at least 2°F (1°C) lower than cooling set temp.
Continue setting times and temperatures for events 2, 3, and 4 for the selected day.
After programming a day, press PROG to show COPY. Use UP/DOWN to TAG days to copy the program to.
Press PROG to initiate copy; COPY flashes to confirm. Normal programming resumes.
Temporarily change current event set temperatures for a fixed period or until next programmed event.
Press and hold UP/DOWN for three seconds to show SET; use UP/DOWN to change setpoint.
In Auto mode, adjust Heat setpoint, wait, then adjust Cool setpoint. Exits after three seconds of inactivity.
LCD flashes the current Program indicator to remind you an override is in progress.
Press O/RIDE to override programmed schedule and hold current temp indefinitely. HOLD is displayed.
While program is held, press and hold UP/DOWN for three seconds to change the setpoint.
Press UP/DOWN to turn on backlight, press again to display current set temperature(s).
Cycle through HEAT, COOL, AUTO, EMERGENCY HEAT, and OFF modes using the MODE button.
Details on fan control functions are found on page 15 of this manual.
Instructions to set the real-time clock using PROG, UP, DOWN buttons for hours, minutes, and day.
Program a Start time and Stop time for the HVAC system each day of the week.
Press and hold PROG for three seconds to enter programming mode, starting with the day and then START time.
Press PROG again, use UP/DOWN to set the minute for the START time.
Press PROG to advance, use UP/DOWN to set hours and minutes for the STOP time. LCD shows COPY.
After programming a day, press PROG to show COPY. Use UP/DOWN to TAG days to copy the program to.
Note that if BMS controls thermostat, START/STOP will blink in LCD, overriding user programs.
Installer-set function to temporarily turn SMART 2000 ON for a preset period when the STOP program is running.
Press O/RIDE button to activate. OVERRIDE will flash; press again to cancel.
Press UP/DOWN to turn on backlight, press again to display current set temperature(s).
Cycle through HEAT, COOL, AUTO, EMERGENCY HEAT, and OFF modes using the MODE button.
Details on fan control functions are found on page 15 of this manual.
Real-time clock displays current time only. Set using PROG, UP, DOWN for hours, minutes, and day.
Press and hold UP/DOWN for three seconds to show SET; use UP/DOWN to change setpoint.
In Auto mode, adjust Heat setpoint, wait, then adjust Cool setpoint. Exits after three seconds of inactivity.
If enabled, allows quick switching between day and night temperature setpoints.
Press PROG to switch between Day and Night modes and set temperatures.
Press UP/DOWN to turn on backlight, press again to display current set temperature(s).
Problems: wall cavity air leaks, external heat sources, incorrect calibration, remote sensor in use. Solutions provided.
Problem: Outside temp too high/low. Solution: Heating/cooling disabled for energy conservation. Fan changes: thermostat chooses efficient speed.
Problem: Check AC main fuse, faulty wiring, fuse or thermostat. Solution: Reset fuse, call Technical Services.
Problem: Unachievable temps, Heat Pump mode, Fan ON. Solution: Adjust temps, change fan mode, or call service.
Problem: Installer left thermostat in Commissioning mode. Solution: Contact installer to disable.
Problem: E.HEAT shown without manual selection. Solution: Installer set for auto Emergency/Auxiliary Heating at low outside air temp.
Problem: Keyboard lock is ON. Solution: Buttons may be locked to prevent unauthorized tampering.
Problem: Thermostat set for Heating or Cooling only modes. Solution: Mode not available on system.
Problem: Installer set control limits. Solution: Contact installer to remove/adjust limits.
Problem: Sensor failed or no sensor fitted. Solution: Check wiring, replace sensor, or call service.
Problem: Not a fault; anti-cycle delay is active for energy conservation. Contact installer to disable (not recommended).
Problem: Not a fault; Fan ON is flashing. Fan Purge function keeps fan running. Contact installer to disable (not recommended).
Thermostat operates in F or C mode, set by installer. See page 16 for CF=XX value.
Problem: Thermostat set for single fan speed (Sw1=OFF). Contact installer for display type info.
| Type | Programmable |
|---|---|
| Stages | 1 Heat/1 Cool |
| Power Source | Battery |
| Backlight | Yes |
| Hold Feature | Yes |
| Filter Change Indicator | Yes |
| System Switch | Heat/Cool/Off |
| Fan Control | Auto/On |
| Compatibility | Conventional systems |
| Temperature Range | 45°F to 90°F (7°C to 32°C) |