121
Camera
Shooting screen layout
Still picture
Video
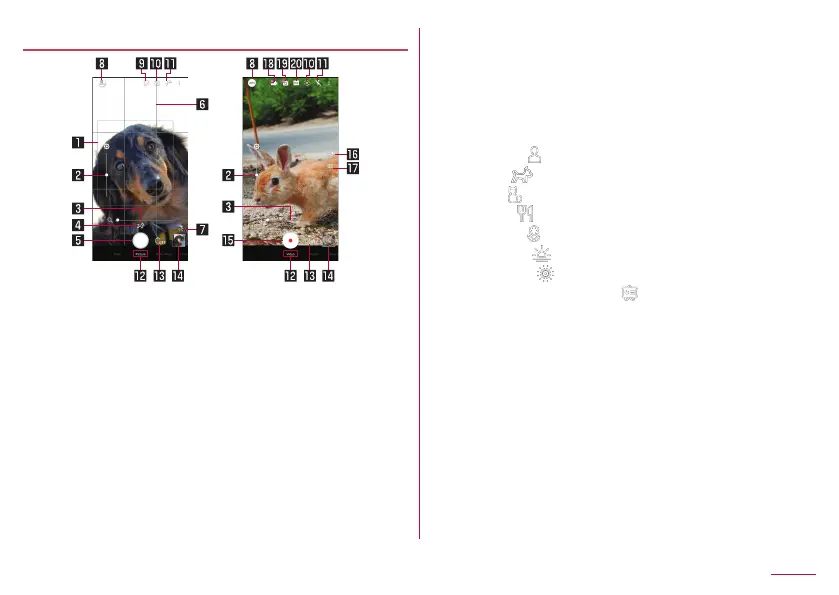
1 Focus mark
z
In [Auto] mode or when the shooting menu is set to [Manual]
and [Focus Setting] is set to [Face AF], focus marks are
displayed by detecting faces.
z
Multi AutoFocus (multiple yellow points) is displayed when
subjects other than people, dogs, and cats are focused on
automatically.
2 Brightness adjust
z
Adjust brightness. Slide the screen up/down to display/set it.
3 Zoom
z
Enlarge/Reduce the object. Pinch out/in the screen to display/
set it. You can also make adjustments by sliding the displayed
adjustment bar left or right.
4 Recognition icon
z
When the shooting menu is set to [AI Auto] and AI recognizes
the next shot and object, its icon is displayed.
y
Person: [
]
y
Dog: [
]
y
Cat: [
]
y
Food: [
]
y
Flower: [
]
y
Sunrise: [
]
y
Firework: [
]
y
Whiteboard/Blackboard: [
]
z
Shoot with the suitable quality mode and shutter speed
according to the recognized scene and objects. When
shooting objects with the whiteboard/blackboard recognized,
the confirmation screen is displayed and it is revised to the
picture looks like when it faces you by touching [YES].
5 Shooting still pictures
z
Shoot still pictures.
6 Guide line
z
Displayed when [Guide Line] is set (
☞
P. 128 “Settings on
shooting still pictures”).
7 Remaining number for shooting
z
Displayed when the remaining number for shooting decreases
to 99 or less.
8 Shooting menu

 Loading...