7 Transmission Repair
7D Hydro-Gear 0750 / 0800
7 - 94
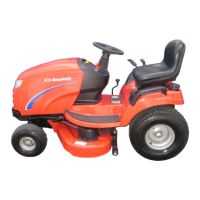
Figure D–39. Install Brake Components
22. To install brake disks, first install a stator, then a rotor
(hub to inside), then a stator, then a rotor (hub to
inside), then two stators. See Figure D–43
23. Install the brake bolt (with nut) into the upper housing.
At this time make sure the pump and motor rotate
freely.
Rotor
Stator
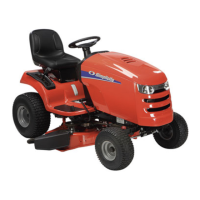
24. Apply sealant as shown in the example.
NOTE: The drawing may not be the same as the original
factory sealant application, but is the currently recom-
mended pattern. Apply sparingly.
NOTE: Sealant must be of good quality, oil and heat
resistant such as RTV or silicon.
Figure D–40. Sealant Application
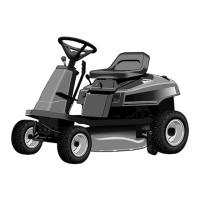
Figure D–41. Bolt Torque Sequence
1
2
12
11
10
9
8
8
8
8
8
8
8
7
6
5
4
3
25. Position the lower housing on the upper housing and
secure with capscrews. Torque capscrews to 135-
165 in-lbs. in the sequence shown in Figure D–45.
26. Wipe off all excess sealant from the seam of the
housings.
27. Check the bypass actuator and axle shafts for free-
dom of movement. The axle shafts should not lock up
but may be tight. The bypass actuator shaft must
rotate freely.
 Loading...