Do you have a question about the Singer 6021 and is the answer not in the manual?
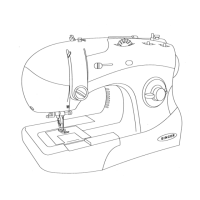
Lists and identifies the main physical components of the sewing machine.
Lists essential safety precautions to follow before operating the machine.
Explains how to plug in the sewing machine to power and the socket outlet.
Details how to turn the machine on, off, and control speed with the foot pedal.
Explains how to adjust the stitch width for straight stitching.
Details how to adjust stitch length, relating numbers to stitch size.
Describes the function and operation of the reverse stitch button.
Explains how to position fabric under the presser foot, including high-rise option.
Describes methods for pin and hand basting before machine sewing.
Advises using needle plate guidelines to maintain straight seams.
Lists recommended settings for Darning stitch.
Lists recommended settings for Quilting stitch.
Lists recommended settings for inserting a zipper.
Explains how to select stitch patterns using the machine's knob.
Lists recommended settings for Zig-Zag Stitch No. 4.
Explains how to use Zig-Zag stitch for finishing fabric edges.
Describes Satin Stitching using Zig-Zag stitch.
Details how to perform block monogramming with Zig-Zag stitch.
Lists recommended settings for Multi-Stitch Zig-Zag No. 10.
Explains how to mend tears using Multi-Stitch Zig-Zag.
Describes using Multi-Stitch Zig-Zag for bar tacks.
Lists recommended settings for Bar Tacks.
Lists recommended settings for Blindstitch No. 6.
Lists recommended settings for Ladder Seams.
Refers to Zig-Zag stitch procedures on page 38.
Describes Crescent Stitch and its uses.
Describes Blind Right Stitch and its uses.
Describes Domino Stitch and its uses.
Describes Rampart Stitch and its uses.
Describes Sand Castle Stitch and its uses.
Refers to Flexi-stitch procedures on the following page.
Explains Flexi stitches are for knits/stretch fabrics, using needle and feed movement.
Details how to select Flexi-stitch pattern groups using the knob.
Explains the need to adjust the stitch balance for correct pattern appearance.
Guides on performing a test sample before adjusting stitch balance.
Lists required settings for Straight Stretch Stitch No. 3.
Lists required settings for Ric-Rac Stitch No. 5.
Lists required settings for Slant Overedge Stitch No. 15.
Explains how to gather fabric for smocking.
Details the process of smocking fabric.
Lists required settings for Honeycomb Stitch No. 11.
Explains how to do patchwork quilting.
Specifies the buttonholer comes in two sizes.
Lists recommended settings for Buttonhole Stitch.
First step in making a four-step buttonhole.
Second step in making a four-step buttonhole.
Explains how fabric type can affect buttonhole stitch density and how to adjust it.
Guides on adjusting balance for open stitches on the right side of the buttonhole.
Guides on adjusting balance for open stitches on the left side of the buttonhole.
Instructs to return the balance dial to neutral after completing buttonholes.
Specifies this feature is available on model 6221.
Explains how free-arm sewing simplifies sewing sleeves.
Explains how free-arm sewing makes sewing buttons easier.
Explains how free-arm sewing helps with bar tacks.
Lists recommended settings for Twin Needle Sewing.
Instructions for removing and reinserting the bobbin case.
Step-by-step guide to removing the bobbin case.
Step-by-step guide to replacing the bobbin case.
Instructions for cleaning specific machine parts using a lint brush.
Provides a general schedule for lubricating moving machine parts.
Explains how to identify parts needing lubrication.
Specifies using only SINGER* oil for lubrication.
Checklist for diagnosing problems with needle movement.
Checklist for diagnosing problems with stitch formation.
Checklist for diagnosing why the needle is breaking.
Checklist for diagnosing bobbin winding problems.
Checklist for diagnosing upper thread breakage.
Checklist for diagnosing lower thread breakage.
Checklist for diagnosing skipped stitches.
Checklist for diagnosing fabric feeding problems.
| Brand | Singer |
|---|---|
| Model | 6021 |
| Category | Sewing Machine |
| Language | English |