5–47
3. AGC Center Level Adjustment (RJ-74 Board) 4. CLK DELAY Adjustment (RJ-74 Board)
Mode
Subject
Signal
Measurement Point
Measuring Instrument
Adjustment Page
Adjustment Address
Camera recording/playback (LP mode)
Arbitrary
Playback signal of recorded tape
CH1: Pin !• of CN9902 (C1ERP)
CH2: Pin 6 of CN9902 (JSWP)
Oscilloscope
Trigger source: CH2
C
47
Mode
Subject
Signal
Measurement Point
Measuring Instrument
Adjustment Page
Adjustment Address
Camera recording/playback (LP mode)
Arbitrary
Playback signal of recorded tape
CH1: Pin !• of CN9902 (C1ERP)
CH2: Pin 6 of CN9902 (JSWP)
Oscilloscope
Trigger source: CH2
C
44
Adjusting method:
1) Record camera images for two minutes on any tape.
2) Set data: 01 to page: 0, address: 01.
3) Write the following data in page: C, addresses: 40 to 43.
To write the data, press the PAUSE button of the adjusting
remote commander each time data is set.
Page: C, address: 40, data: C0
Page: C, address: 41, data: C0
Page: C, address: 42, data: 90
Page: C, address: 43, data: 90
Page: C, address: 47, data: C0
Page: C, address: 4B, data: 80
Page: C, address: 5A, data: 00
4) Playback the part recorded with the camera images.
5) Increase the data of page: C, address: 47, read the data D
1 when
the CH1 pulse is set to the whole audio and video areas.
6) Decrease the data of page: C, address: 47, and read the data D
2
when the CH1 pulse is set to the whole audio and video areas.
7) Obtain the average value of D
1 and D2, and take it as D3.
8) Set D
3 to page: C, address: 47, and press the PAUSE button of
the adjusting remote commander.
9) Set data: 00 to page: C, address: 4B, and press the PAUSE button
of the adjusting remote commander.
10) Set data: 8C to page: C, address: 5A, and press the PAUSE button
of the adjusting remote commander.
11) Set data: 00 to page: 0, address: 01.
12) After completing the adjusting, perform 5. AEQ Adjustment.
Adjusting method:
1) Record camera images for two minutes on any tape.
2) Set data: 01 to page: 0, address: 01.
3) Write the following data in page: C, addresses: 40 to 44, 4B, 5A.
To write the data, press the PAUSE button of the adjusting
remote commander each time data is set.
Page: C, address: 40, data: C0
Page: C, address: 41, data: C0
Page: C, address: 42, data: 90
Page: C, address: 43, data: 90
Page: C, address: 44, data: 90
Page: C, address: 4B, data: 80
Page: C, address: 5A, data: 00
4) Playback the part recorded with the camera images.
5) Increase the data of page: C, address: 44, read the data D1 when
the CH1 pulse is set to the whole audio and video areas.
6) Decrease the data of page: C, address: 44, and read the data D
2
when the CH1 pulse is set to the whole audio and video areas.
7) Obtain the average value of D
1 and D2, and take it as D3.
8) Set D
3 to page: C, address: 44, and press the PAUSE button of
the adjusting remote commander.
9) Set data: 00 to page: C, address: 4B, and press the PAUSE button
of the adjusting remote commander.
10) Set data: 8C to page: C, address: 5A, and press the PAUSE button
of the adjusting remote commander.
11) Set data: 00 to page: 0, address: 01.
12) After completing the adjusting, perform 5. AEQ Adjustment.
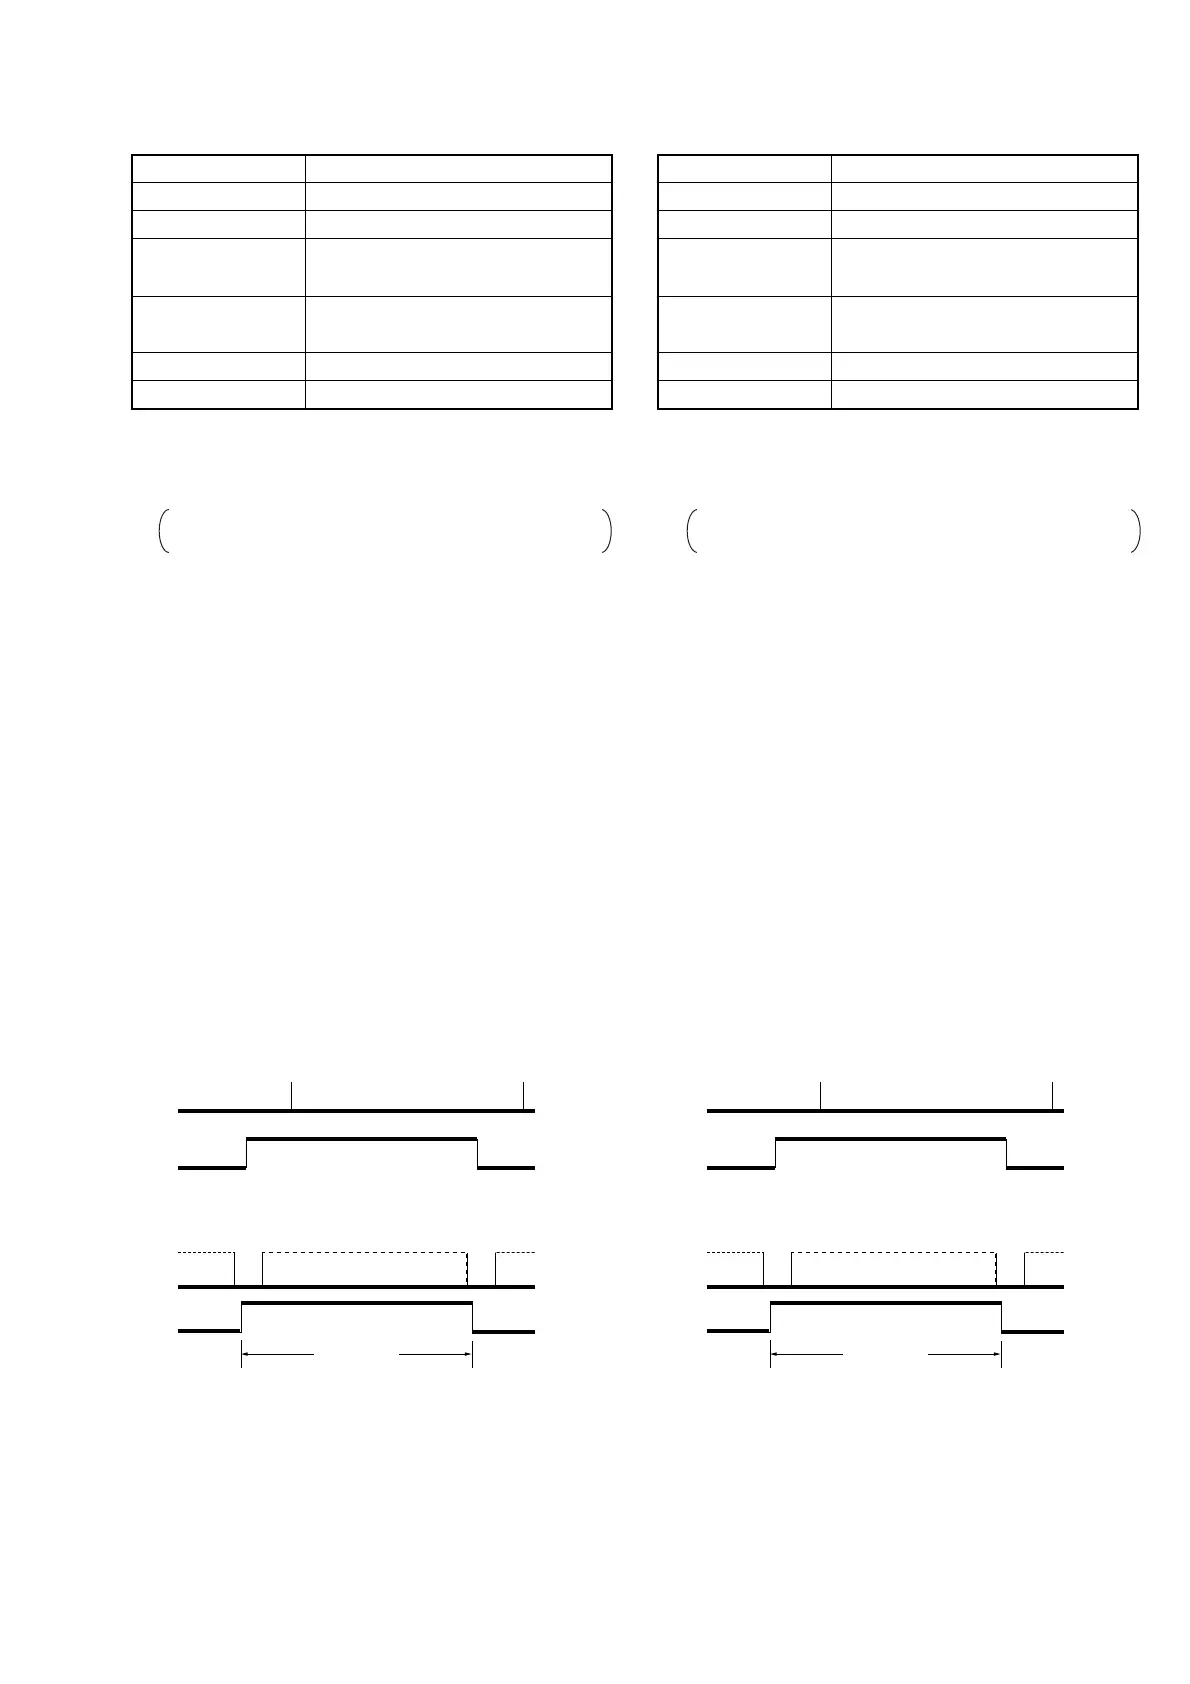
When the CH1 pulse is not set.
CH1
CH2
When the CH1 pulse is set.
CH1
CH2
EVEN ch
EVEN ch
3.33 msec
When the CH1 pulse is not set.
CH1
CH2
When the CH1 pulse is set.
CH1
CH2
EVEN ch
EVEN ch
3.33 msec
Fig. 5-3-6. Fig. 5-3-7.


 To Next Page