1-18
DSR-45/45P
Chapter 6 Adjusting and Setting Through Menus
Chapter 6 Adjusting and Setting Through Menus
77
(GB)
Changing the menu settings
1
Pressing the J/j buttons, select the menu icon
you want to change, then press the EXEC button.
2
Pressing the J/j buttons, select the submenu you
want to change, then press the EXEC button.
3
Pressing the J/j buttons, change the setting.
4
Press the EXEC button to return to the submenu.
5
Repeat steps 1 to 4, as needed.
To return to step 1
Press the J/j buttons to select
RETURN, then
press the EXEC button.
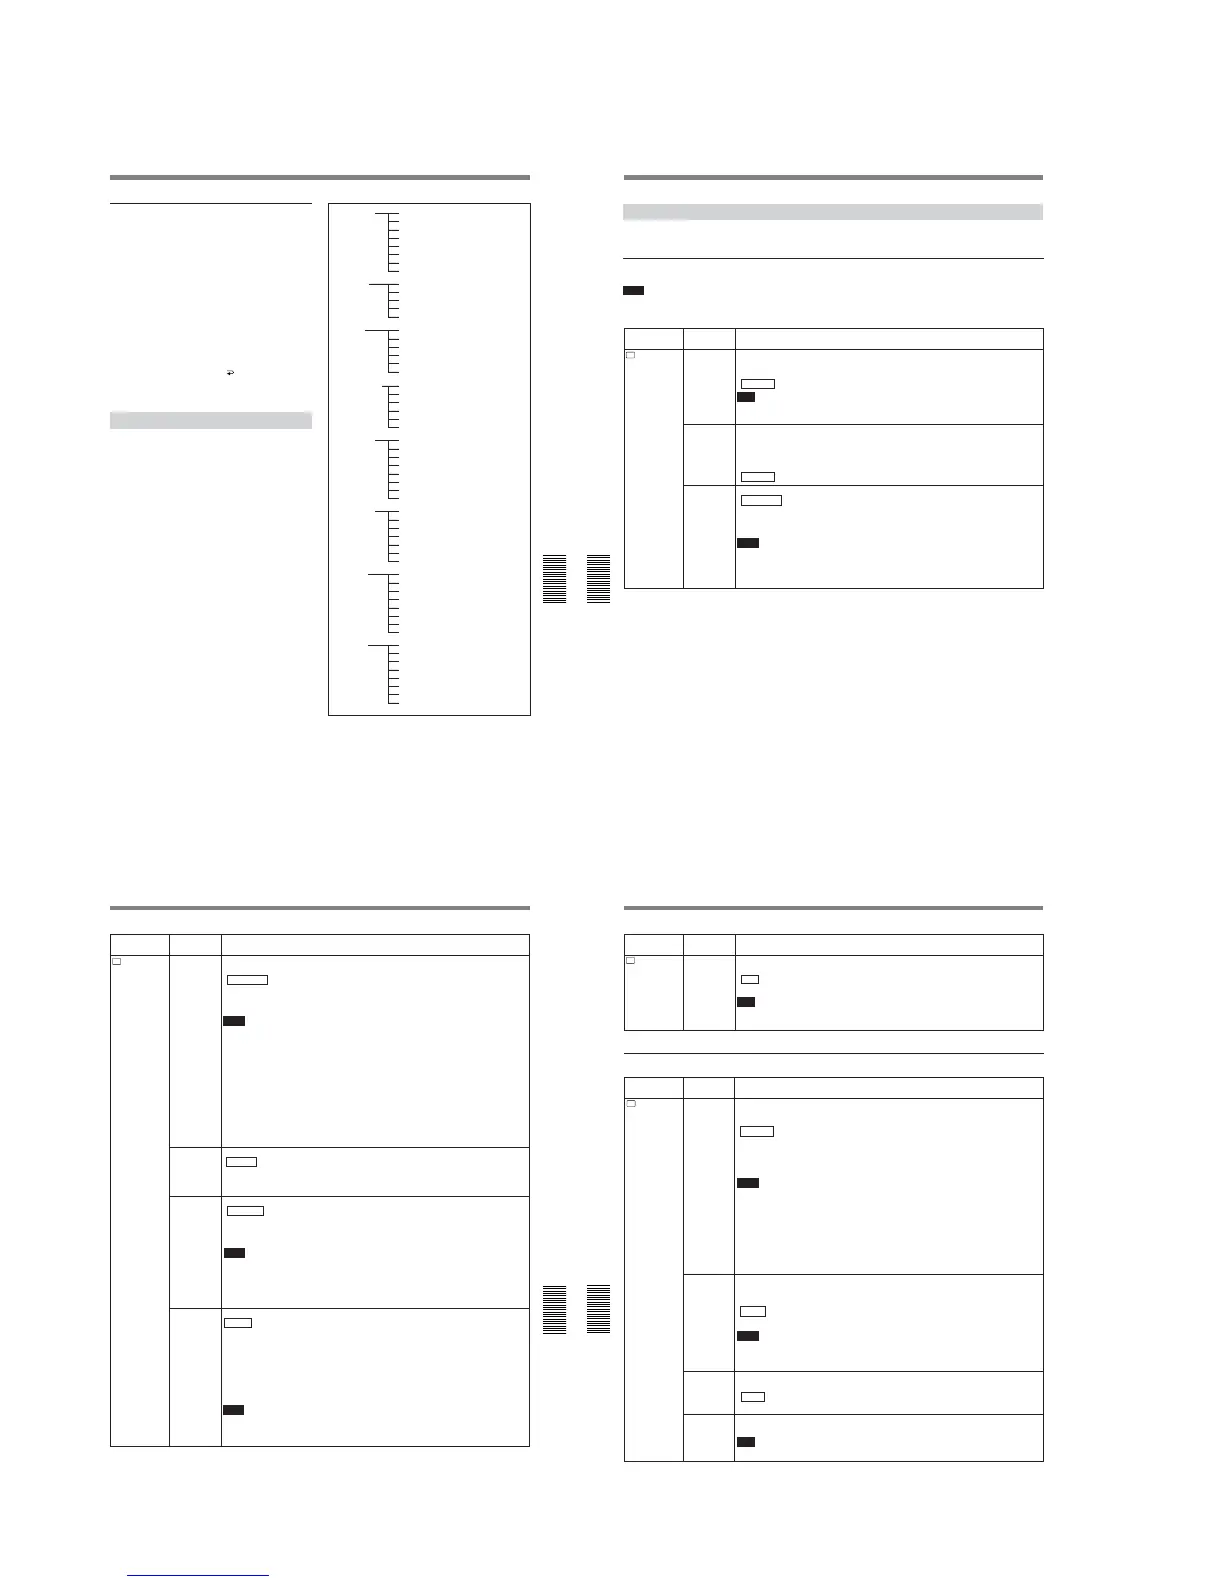
Menu Organization
The menu of this unit consists of the following menus
and submenus.
TC/UB SET TC PRESET
(page 78 (GB))
UB PRESET
(page 78 (GB))
TC/UB IN
(page 78 (GB))
DV IN TC
(page 79 (GB))
TC MAKE
(page 79 (GB))
TC RUN
(page 79 (GB))
TC FORMAT
(page 79 (GB))
a)
JOG TC OUT
(page 80 (GB))
DISPLAY SET DATA CODE
(page 85 (GB))
EE/PB SEL
(page 85 (GB))
LTR SIZE
(page 85 (GB))
COLOR BAR
(page 85 (GB))
b)
DATE DISP
(page 86 (GB))
TIME DISP
(page 86 (GB))
VIDEO SET PB YNR
(page 86 (GB))
PB CNR
(page 86 (GB))
PB LEVEL
(page 87 (GB))
EXT SYNC
(page 87 (GB))
H PHASE
(page 87 (GB))
H PHASE F
(page 87 (GB))
SC PHASE
(page 88 (GB))
SC PHASE F
(page 88 (GB))
REMOTE LOCAL ENBL
(page 80 (GB))
PREROLL
(page 80 (GB))
POST CUEUP
(page 80 (GB))
STILL DLY
(page 80 (GB))
232C RATE
(page 80 (GB))
CM SET CM SEARCH
(page 81 (GB))
TITLE DISP
(page 81 (GB))
LABEL DISP
(page 81 (GB))
TAPE LABEL
(page 82 (GB))
ITEM ERASE
(page 83 (GB))
ERASE ALL
(page 84 (GB))
VTR SET REC MODE
(page 90 (GB))
AUTO INDEX
(page 90 (GB))
STILL PICT
(page 90 (GB))
FF/REW SPD
(page 90 (GB))
DUPLICATE
(page 91 (GB))
DV EE OUT
(page 91 (GB))
STILL TIME
(page 91 (GB))
FROM STILL
(page 91 (GB))
OTHERS COMMANDER
(page 92 (GB))
AC ON MODE
(page 92 (GB))
AUTO STBY
(page 92 (GB))
BEEP
(page 92 (GB))
LCD BRIGHT
(page 92 (GB))
LCD COLOR
(page 92 (GB))
c)
CLOCK SET
(page 92 (GB))
HRS METER
(page 92 (GB))
AUDIO SET AUDIO MODE
(page 88 (GB))
AUDIO DUB
(page 88 (GB))
JOG AUDIO
(page 88 (GB))
REF LEVEL
(page 89 (GB))
AGC CH1,2
(page 89 (GB))
AGC CH3,4
(page 89 (GB))
LIMITER
(page 89 (GB))
a) DSR-45 only
b) COLOUR BAR for DSR-45P
c) LCD COLOUR for DSR-45P
Operating the Menus
Chapter 6 Adjusting and Setting Through Menus
78
(GB) Chapter 6 Adjusting and Setting Through Menus
TC
TC/UB SET
Icon/Menu
Submenu
Setting
(page)
TC PRESET
(page 58 (GB))
Resets/Sets the time code value.
RESET: Resets the time code value to 00:00:00:00.
PRESET: Sets the time code value.
RETURN : Returns to the TC/UB SET menu without changing the time code value.
Note
To set the initial time code value, you need to set TC MAKE to PRESET first. If TC MAKE
has been set to REGEN, you cannot change the time code using this item.
UB PRESET
(page 59 (GB))
Resets/Sets the user bits value.
RESET: Resets the user bits value to 00 00 00 00.
PRESET: Sets the user bits value. (You can set the user bits as eight-digit hexadecimal
values (0 to 9, A to F) (base 16) to have the date, time, scene number, and other
information inserted into the user bits.)
RETURN : Returns to the TC/UB SET menu without changing the user bits value.
TC/UB IN
(page 60 (GB))
Selects the time code and user bits to record on the tape.
INTERNAL : Uses the internal time code/user bits.
TC&UB EXT: Uses external time code/user bits.
TC EXT: Uses an external time code and internal user bits.
UB EXT: Uses the internal time code and external user bits.
Notes
• The time code output from this unit has some restrictions. For details, see pages 64 (GB),
65 (GB).
• Press the EXEC button to change the setting of this item. This will also be carried out the
moment you switch the position of the DISPLAY SELECT selector to DATA or AUDIO.
Menu Contents
Initial settings are indicated with rectangles.
TC/UB SET menu
Note
All items other than JOG TC OUT can be set only
when you record in DVCAM format.
Chapter 6 Adjusting and Setting Through Menus
Chapter 6 Adjusting and Setting Through Menus
79
(GB)
TC
TC/UB SET
Icon/Menu
Submenu
Setting
(page)
DV IN TC
(page 60 (GB))
Selects whether to record internal time code or external time code while the unit records the
signals input via the DV jack in DVCAM format.
INTERNAL : Records the time code generated by the internal time code generator. (The
value of the time code or user bits depends on the settings of other menu items, such as
TC PRESET, UB PRESET, or TC MAKE.)
EXTERNAL: Records the time code with video and audio signals input via the DV jack.
Notes
• When you set REC MODE on the VTR SET menu to DV SP, this item cannot be used.
Even if this item is set to EXTERNAL, when you set REC MODE on the VTR SET menu to
DV SP, the setting becomes invalid and the unit records the internal time code.
• When this item is set to EXTERNAL, the INPUT SELECT selector on the front panel is set
to DV, and no signal is input via the DV jack, or the software of the editing controller does
not output a time code, if you start recording, bars (– –:– –:– –:– –) are recorded as time
code. At the point that the input of a signal begins, the time code of that signal will be
recorded.
• When this item is set to EXTERNAL, if you input time code to the DV jack that is not
continuous or does not advance correctly, the value of the recorded or displayed time
code may not be equal to the actual value of the input one. If you use a tape with this
problem, you may not be able to perform search or edit, depending on the devices you
use.
TC MAKE
(page 61 (GB))
Selects the time code when you start recording.
REGEN : The time code value is set to continuous time code from the one already
recorded on the tape. If no time code is recorded on the tape, it starts from 00:00:00:00.
PRESET: The time code starts from the value set in TC PRESET on the TC/UB SET
menu.
TC RUN
(page 61 (GB))
Selects the advancement mode (counting up).
REC RUN : Time code value advances only while recording.
FREE RUN: Time code value advances even when the unit is not recording. (This mode is
used to set the current time as the initial time code value, or to synchronize the internal
time code to an external time code.)
Notes
• If you set the advancement mode to FREE RUN, the time code will be updated by the
internal clock when the power is off. Therefore, when you turn on the unit again, the time
code may have been delayed or advanced somewhat.
• If the internal backup battery is exhausted, the time code of the FREE RUN setting is
initialized.
TC FORMAT
(page 61 (GB))
Selects the frame mode.
AUTO : Automatically sets the frame mode in accordance with the inserted cassette. (If
nothing is recorded on the tape, the mode is set to the non-drop frame mode. If the unit
cannot read the frame mode correctly in the tape, the unit will use the frame mode that
was set in the last position it was able to read correctly on the tape. If you remove the
cassette, the mode of the last position it was able to read correctly is cleared and the
mode is set to the non-drop frame mode. If TC MAKE is set to PRESET, the mode is
also set to the non-drop frame mode.)
DF: Selects the drop frame mode.
NDF: Selects the non-drop frame mode.
Notes
• This menu is displayed only for the DSR-45.
• Regardless of this item setting, the frame mode is set to drop frame when you record in
DV format.
Operating the Menus
Chapter 6 Adjusting and Setting Through Menus
80
(GB) Chapter 6 Adjusting and Setting Through Menus
TC
TC/UB SET
Icon/Menu
Submenu
Setting
(page)
JOG TC OUT
(page 61 (GB))
Controls the time code output from the TC OUT connector when the tape is played at a
speed other than normal.
OFF : Does not output the time code.
ON: Outputs the time code.
Note
Continuous time code is output only when the tape is played at a normal speed. When the
unit is in the search mode, discontinuous time code is output.
POST
CUEUP
Selects the information which the unit sends to an editing controller to let it know the state
of the unit when the tape reaches a searched for point. (only for an RS-422A connection)
STOP : Informs the editing controller that the unit is in the stop mode.
STILL: Informs the editing controller that the unit is in the playback pause mode.
Icon/Menu
Submenu
Setting
(page)
REMOTE menu
RMT
REMOTE
LOCAL ENBL
(page 12 (GB))
Restricts the functions of the buttons on the front panel, the Remote Commander, and the
Remote Control Unit (not supplied) connected to the CONTROL S IN jack, when the
REMOTE/LOCAL switch is set to REMOTE.
NO KEY : Disables all buttons on the devices described above.
EJECT: Disables all buttons except EJECT on the devices described above.
STOP&EJECT: Disables all buttons except EJECT and STOP on the devices described
above.
ALL KEYS: Enables all buttons on the devices described above.
Notes
• Even if the REMOTE/LOCAL switch is set to REMOTE, the Remote Commander functions
depend on the setting of this item. If you want to disable the Remote Commander, set
COMMANDER on the OTHERS menu to CONTROL S.
• Press the EXEC button to change the setting of this item. This will also be carried out the
moment you switch the position of the DISPLAY SELECT selector to DATA or AUDIO.
• While the REMOTE/LOCAL switch is set to REMOTE, if you change this item from ALL
KEYS to any other setting, the setting is activated at that instant and the J, j, and EXEC
buttons, which are used to adjust the menus, are disabled. To enable those buttons again,
set the REMOTE/LOCAL switch to LOCAL.
PREROLL Sets the duration of the preroll time. (only for an RS-422A connection)
3 SEC: Three seconds
5 SEC: Five seconds
7 SEC : Seven seconds
10 SEC: 10 seconds
Notes
• Depending on the types of editing controller used, the unit may take the preroll time set by
the editing controller, ignoring setting of this item.
• On the editing controller, set the preroll time to five seconds or longer.
STILL DLY
Playback still delay can be set between 0 and 10 frames by 11 steps. You can set the delay
which the unit turns to playback mode from still mode. (only for an RS-422A connection)
Note
The default is 0 frame.


 To Next Page