Assembly & Installation
DOWN AUGER LENGTH EXAMPLES
EX1: An existing 30' bin will have a FASTIR Triple
installed. “L” is measured at 200". There is no
sweep and a 4" clearance between the floor
and the auger will be used.
DA = 200 + 7.5 - 4
DA = 203.5"
EX2: A new Sukup 6-ring, 42' farm bin (265" eve
height) will have a FASTIR Plus Triple
installed during bin assembly. An 8" Sukup
powered sweep will be installed on a floor with
13.25" floor supports.
L = (265" eave height) - (13.5" for floor) - (7.5" for
top of sheet to rail)
L = 265 - 13.5 - 7.5
L = 244"
DA = (244" for L) + (8.0" for H) - (10" for sweep) -
(4" for clearance)
DA = 244 + 8.0 - 10 - 4
DA + 238"
Because a Sukup powered sweep will be installed,
the stationary carriage will need a shorter auger.
OA = (244" for L) + (8.0" for H) - (17" for sweep
wheel) - (4" for clearance)
OA = 244 + 8 - 17 - 4
OA = 231"
Figure 36 - Down Auger Preparation
94 Mark appropriate position on auger for cut.
95 Weld or braze flighting slightly above point
of cut to prevent unraveling.
96 Cut down augers to length.
96.1 Note: Down augers should always be cut
from bottom.
96.2 Note: In some cases, down augers may be
cut after installation on machine.
97 Bolt flinger to auger just above auger flighting
using 5/16” x 1-3/4” U-Bolt and 5/16” nuts and
tighten using 1/2” wrench. Figure 37.
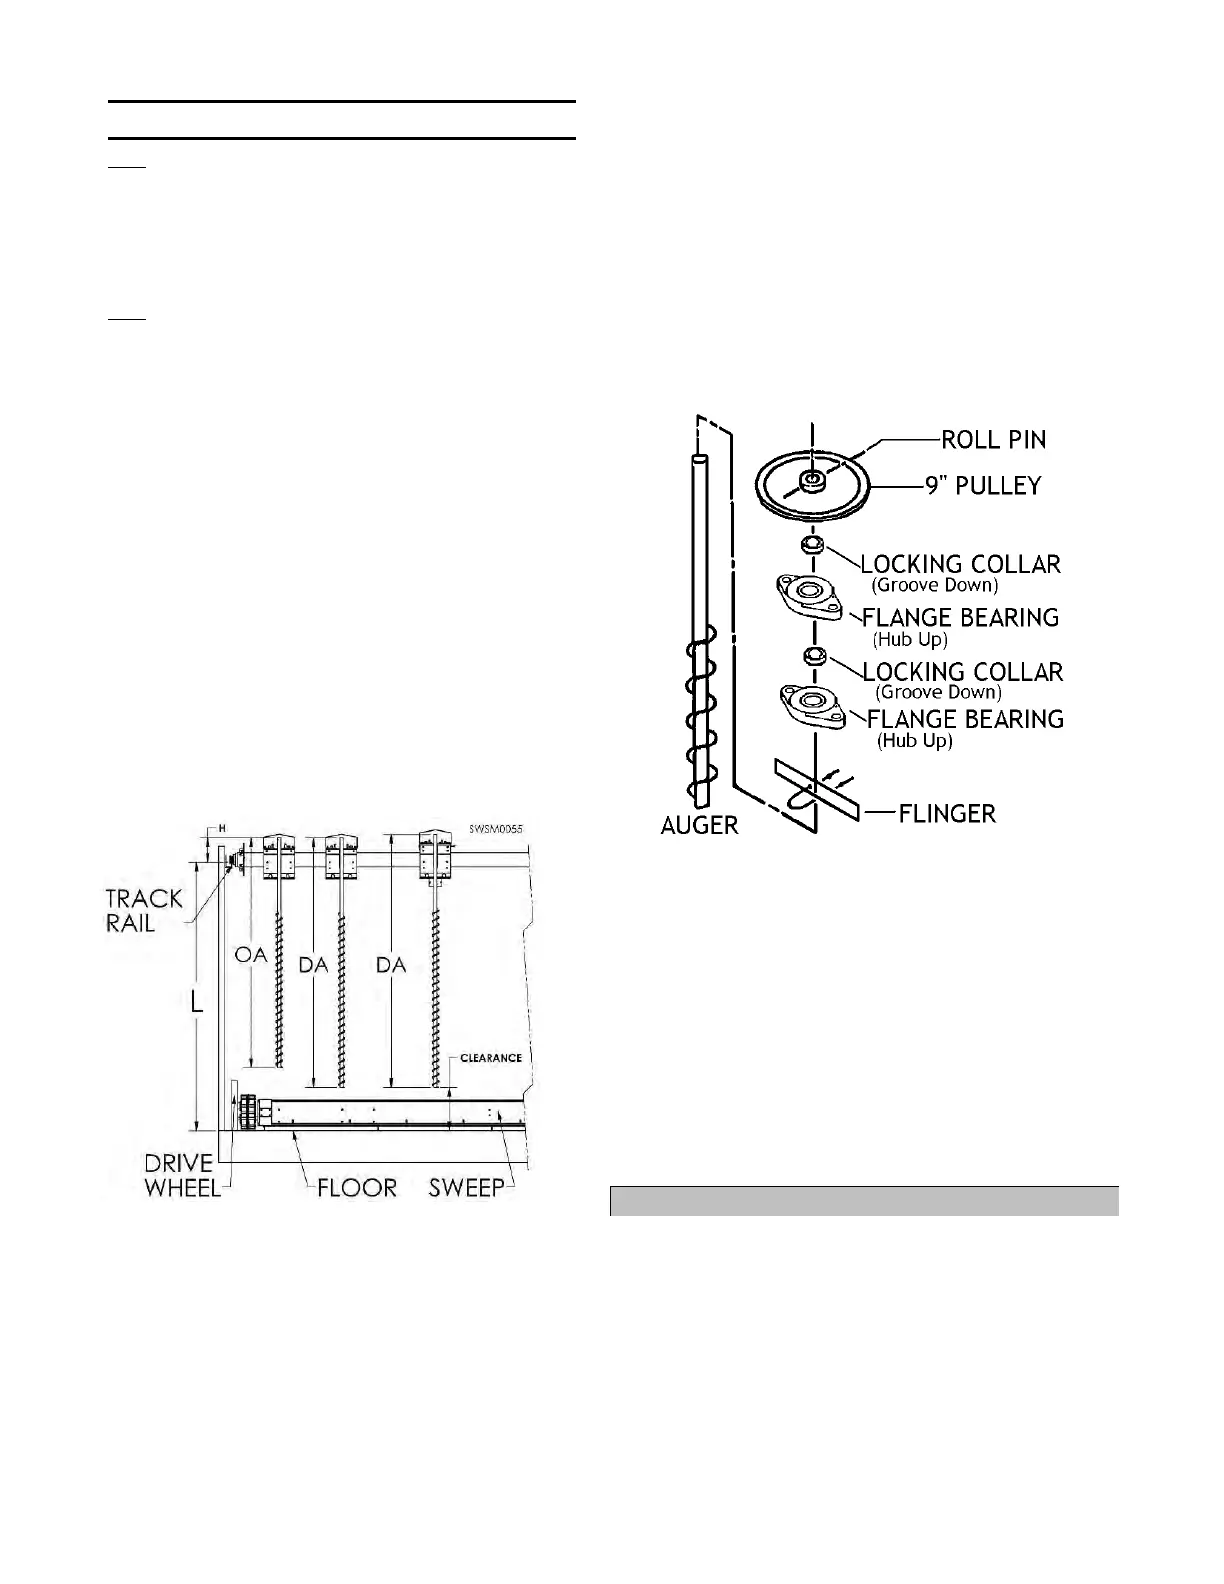
98 Slide the following items over top of each auger
shaft in the order below:
Flange bearing (hub up)
Locking collar for bearing (groove down)
Flange bearing (hub up)
Locking collar for bearing (groove down)
9” pulley (hub up). Figure 37.
98.1 Note: If parts will not slide smoothly over
shaft, use emery cloth or file to clean shaft.
Figure 37 - Down Auger Assembly
99 Attach 9” pulley to top of auger shaft by
inserting 5/16” rollpin in hole provided on shaft.
Figure 37.
100 Slide top locking collar and top flange bearing
up against pulley.
101 Position a punch in unused hole on locking
collar and lightly tap with hammer in direction
of shaft rotation to lock flange bearing in place.
101.1 Note: Do not overtighten collar –
bearing race will crack.
102 Tighten set screw on top locking collar using
hex (Allen) wrench.
XVI. Installing Down Augers
For part numbers and descriptions of parts
referenced in this section, see parts assembly
manual, page 53.
103 Slide auger up through slot in carriage so top
bearing rests on two pre-installed 7/16” x 1-1/2”
bolts, which point up through top of carriage plate
and are secured with push nuts. Figure 38.
104 Add 7/16” lockwashers and nuts to pre-
installed bolts to bolt top bearing to carriage.
Tighten using 11/16” wrench. Figure 38.