MA365 • Rev. A2 21
Tellabs
®
6325 Edge Node 2 Installation Information
2 Installation Information
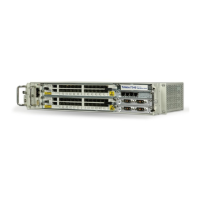
To install the Tellabs
6325 node
To complete the installation of the Tellabs 6325 node, the following steps must
be performed.
2.1 Optical Safety Considerations
General The Tellabs 6325 node is classified as a Class 1 laser product in accordance
with IEC 825, that is exposure to hazardous laser radiation is impossible dur-
ing normal operation and maintenance. When the system has been installed,
the laser radiation is effectively enclosed in the optical fiber path between op-
tical modules at each end.
The applied lasers are embedded 1300 and 1550 nm wavelength semiconduc-
tor lasers.
In case of an interruption of the optical fiber path by accident (for instance ca-
ble rupture) an automatic safety mechanism will result in a periodic shut-
down of the transmitter laser. Hence, the laser radiation from any fiber end is
restricted to a 2 second period, which is repeated every 70 seconds. With less
than 0 dBm (L-1.1 and L-1.2) or 2 dBm (L-4.1 and L-4.2) radiated optical power
during the 2 second period, the time averaged power is less than -13 dBm,
which is harmless at relevant wavelengths.
Step Action
1
Read the information in ‘2.1 Optical Safety Considerations’ on page
21, ‘2.2 Labels on Equipment’ on page 22 and ‘2.3 Physical Place-
ment’ on page 23.
2 Install the subrack for the Tellabs 6325 node as described in
‘2.4 Installing the Subrack’ on page 24.
3 Install the modules for the Tellabs 6325 node as described in
‘2.5 Installing the Modules’ on page 25.
Note: If you need to remove a module from a working Tellabs 6325
node then follow the instructions in ‘2.8 Removing a Module from the
Subrack’ on page 37.
4 Install the transceivers for the Tellabs 6325 node as described in
‘2.6 Installing the Transceivers’ on page 27.
5 Connect the cables as described in ‘2.7 Connecting the Cables’ on
page 28.
6 Configure the Tellabs 6325 node by following the instructions in the
network manager manual [1].
Note: The rack ID and subrack ID are software settings. If you have
defined a rack ID and a subrack ID for the Tellabs 6325 node then
these have to be entered when you configure the Tellabs 6325 node
using the craft terminal or network manager.