18
Sidekick
®
Plus Test Set
Measuring Voltage
AC
The first test available on the rotary knob is the VOLTS
test. This position allows the technician to test both AC
and DC volts. The Volts menu allows the technician to
jump between AC and DC.
1. Connect the black lead to tip, the red lead to ring,
and the green lead to ground.
2. Move the rotary knob to the VOLTS position and
press F4 AC.
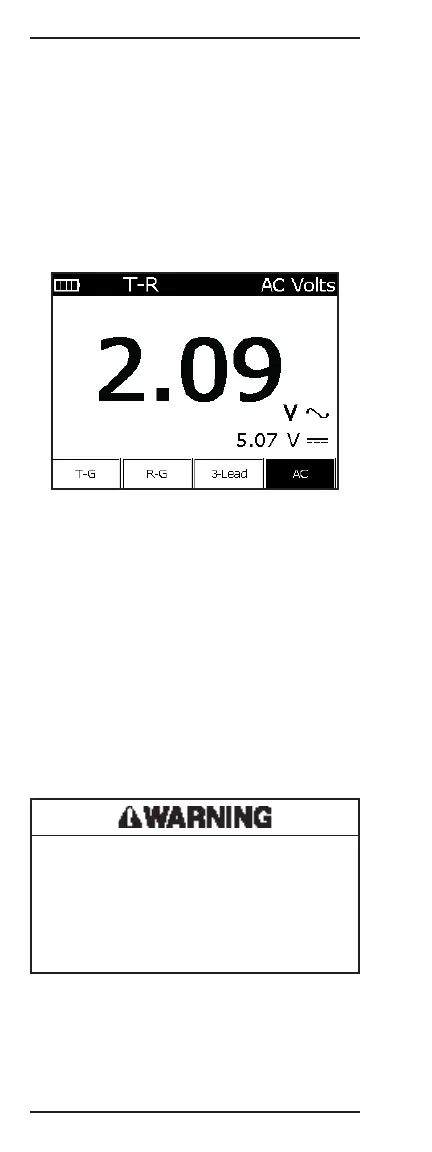
The LCD screen displays the AC voltage on a single pair
tip-to-ring. “T-R” is displayed in the upper left corner.
• F1 T-G displays tip-to-ground; “T-G” now in the
upper left corner and “T-G” button is highlighted.
To return to tip-to-ring, press F1 again.
• F2 R-G displays ring-to-ground; “R-G” now in the
upper left corner and “R-G” button is highlighted.
To return to tip-to-ring, press F2 again.
• F3 3-Lead displays three readings, T-G, R-G, and T-R.
(Only AC will be displayed.)
• F4 AC toggles between AC and DC. “AC” is high-
lighted when the AC measurement is primary.
To exit the voltage function, move the rotary knob to
another position.
Electric shock hazard:
If more than 25 volts of AC is detected on R-T, T-G,
or R-G, check the company’s safety procedures for
working with hazardous voltage levels.
Failure to observe this warning could result in severe
injury or death.