Do you have a question about the Weber Markoprint integra Vivid and is the answer not in the manual?
Provides congratulations and recommends professional installation for optimal system use.
Outlines manufacturer's non-liability for damages and states warranty conforms to General Trading Conditions.
Defines personal use for copying and forbids reproduction for third-party circulation without written permission.
Explains the manual's role in enabling safe use and its relation to other system manuals.
Details actions during emergencies and explains safety regulations provided in written and symbol form.
Defines symbols (DANGER, WARNING, CAUTION, NOTICE) indicating hazard levels and potential consequences.
Lists required PPE (shoes, clothing, goggles, gloves) and specifies their use for different tasks.
Provides general specifications including dimensions, weight, environmental conditions, and protection class.
Specifies input voltage requirements and details available connectors and optional cables for system integration.
Describes the Markoprint integra Vivid's role in presenting functions and settings for other print systems.
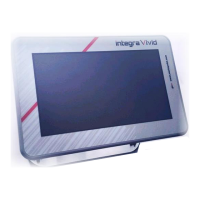
Details the system unit, comprising a 7-inch touch display and an installation bracket for easy mounting.
Highlights safety warnings related to electric shock and stumbling hazards from objects and connecting lines.
Warns about potential abrasions from sharp edges, advising caution and use of protective gloves.
Specifies requirements for installation position, fastener security, and cable length considerations.
Provides instructions and notices for installing the integra Vivid, emphasizing power off and proper mounting.
Details the connection procedure using an optional 15-pin cable and firmware requirements for operation.
Explains the process of activating the integra Vivid HMI on the X1JET or PP 108 system.
Presents an overview of the user interface elements and their functions on the touch display.
Details pressing the [Start], [Pause], and [Stop] buttons for print system control.
Explains menu navigation, status light meanings (Red, Yellow, Green), and Home screen access.
Describes automatic system startup with the print system and that separate switching off is not necessary.
Illustrates the menu structure including Home Screen, Status, and Print Image selection.
Explains the 3-second delay for pause and stop buttons to prevent accidental activation.
Details how to activate a print start and select print images, including those without variable fields.
Describes how to input variable data using the on-screen keyboard and navigation keys.
Explains options for entering counter start values, either in the print image or at the control unit.
Defines printing position as the distance from sensor detection to the start of the printing process.
Provides step-by-step instructions to set the print start delay or print position.
Discusses setting print speed to match conveyor belt speed via internal or external methods.
Details setting print density (DPI) and adjusting image size (zoom) for print quality.
Describes setting the print direction relative to the conveyor belt movement (left-to-right or right-to-left).
Explains nozzle row settings (A, B, A~B, A+B) for print heads and their impact on print quality.
Provides step-by-step instructions to select the nozzle row setting on the device.
Details the 'Upside down' setting which causes the print image to be printed overhead.
Provides step-by-step instructions to set the 'Upside down' print orientation.
Explains specifying the number of print images and the distance between them on a product.
Allows setting the desired menu language for the device, with options like Deutsch and English.
Covers settings for display mode (Color/Dark, Rotate) and screen brightness adjustment.
Explains how to display and set the date and time of the printing system.
Allows changing the status display and setting the maximum value for the right-side item.
Used to set which sensor input is utilized, selecting between internal or external sensors.
Provides step-by-step instructions to select the sensor input (Internal or External).
Explains setting print speed correspondence to conveyor belt speed via internal or external encoder and resolution.
Describes displaying and setting the IP address of the network connection.
Details setting the IP mask and gateway address for network communication.
Presents a table comparing software features across different Markoprint models.
Details maximum print speed and resolution specifications for various print heads.
Provides technical drawings and dimensions for the integra Vivid touch in a table mount configuration.
Offers technical drawings and dimensions for the integra Vivid touch in a wall mount configuration.