5-1
Chapter 5 - Operational Procedures
Section 5-1 - Operator Instructions
The SAFEPATH
®
Panel provides an operator console for manually activating the panel. The operator
console includes a microphone, a green NORMAL LED, a yellow TROUBLE LED, a “RESET” momentary
switch, a TROUBLE ACKNOWLEDGE momentary switch, and a MANUAL/AUTOMATIC switch. The
operator interface allows the operator to manually override automatically playing pre-recorded messages
with live announcements or an evacuation tone, to silence internal and external trouble audibles, and to
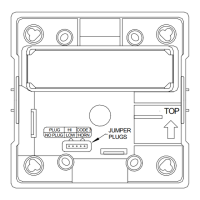
ascertain if the panel has detected a trouble condition. The operator instructions on the dead front panel
are shown in Figure 5-1 on Page 5-3.
The TROUBLE and NORMAL LEDs identify to the operator the condition of the SAFEPATH
®
Panel. The
yellow TROUBLE LED will be illuminated whenever there is a trouble detected by the Panel. If no
troubles are detected, the green NORMAL LED will be illuminated.
The TROUBLE ACKNOWLEDGE push-button allows the operator to silence the trouble audibles, both
internal and external. When a trouble condition is detected, both the internal and external trouble
audibles are sounded. When the ACKNOWLEDGE push-button is depressed, the internal and external
trouble audibles will be silenced. The trouble audibles will resound for subsequent trouble conditions.
The Form C trouble output contact will remain in the trouble condition and the TROUBLE LED will remain
illuminated until all trouble conditions have been corrected.
The AUTOMATIC/MANUAL switch has two positions, manual (down) and automatic (up). When the
AUTOMATIC/MANUAL toggle switch is in the automatic position, pre-recorded messages may be
selected to play via dry contact inputs. When the AUTOMATIC/MANUAL switch is in the manual position,
pre-recorded messages will not play, the visual notification appliances are energized, and the evacuation
tone sounds.
Section 5-2 - To Make Live Announcements
From Panel
1. Hold the microphone within 2 inches of your mouth, press the push-to-talk switch and begin speaking.
From Optional Remote Microphone Station (RMS-2)
1. Turn the key switch from the OFF position to the ON position.
2. Hold the microphone within 2 inches of your mouth, press the push-to-talk switch and begin speaking.
See the Remote Microphone Station instruction sheet P83270 for additional information.
Section 5-3 - To Sound Evacuation Tone
From Panel
1. Slide the AUTOMATIC/MANUAL switch on the panel down to the MANUAL position. The selected
tone will play. Turn off the tone by returning the AUTOMATIC/MANUAL Switch to the UP position.
See Figure 5-1 on Page 5-3 for switch location.
From Optional Remote Microphone Station (RMS-2)
1. Turn the key switch from the “OFF” position to the “ON” position.
 Loading...