VESDA ECO Detector by Xtralis
78 Service and Maintenance
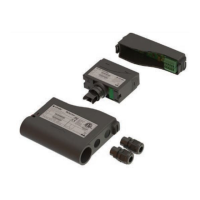
Sensor cartridge removal
To remove the Sensor Cartridge sub-assembly from the
these instructions.
Removing the lid of the Sensor cartridge sub-
product warranty.
1. Isolate the power connection to the ECO Detector
2.
Depress the Cover latch on the side of the main body, then lift the cover
away from the detector body. This will reveal the ECO power and
Lay these to the side of the Detector body to
provide access to the Sensor Cartridge.
3. Place index finger and thumb on each end of
textured positions provided. Support the body of the
other hand whilst carefully pulling the sensor cartridge
serviced and or replaced as is necessary
4. If the Cartridge is being replaced, ensure
in its place.
5. When refitting the cartridge
in the ECO detector body, remember that the
two parts are keyed such that they cannot b
e fitted in the incorrect
orientation without excessive use of force.
Filter cartridge removal and replacement
Depending on site conditions the ECO filter cartridge can become contaminated
and eventually block. This will reduce the ECO’s ability to detect
particularly dirty environments the
filter cartridge must be inspected regularly
Having removed the Sensor cartridge
from the body of the ECO detector as
Gently pull the filter cartridge assembly away from the bottom of the
cartridge. Be careful not to damage the exposed flow circuit sensors
2. Inspect, Service or replace the filter cartridge as required.
3. To replace the filter cartridge within
ensure that the filter cartridge is correct
ly orientated as indicated in
47 below.
4. With the filter correctly orientated and re-
positioned carefully over the flow
, gently push the filter assembly into the Sensor Cartridge
click should be felt to indicate that the filter is firmly in position
VESDA ECO Detector by Xtralis
Depress the Cover latch on the side of the main body, then lift the cover
away from the detector body. This will reveal the ECO power and
Lay these to the side of the Detector body to
serviced and or replaced as is necessary
in the ECO detector body, remember that the
e fitted in the incorrect
Depending on site conditions the ECO filter cartridge can become contaminated
and eventually block. This will reduce the ECO’s ability to detect
filter cartridge must be inspected regularly
from the body of the ECO detector as
Gently pull the filter cartridge assembly away from the bottom of the
cartridge. Be careful not to damage the exposed flow circuit sensors
ly orientated as indicated in
positioned carefully over the flow
, gently push the filter assembly into the Sensor Cartridge
click should be felt to indicate that the filter is firmly in position