EasyManuals Logo

Yale Assure Lock 2 User Manual

Yale Assure Lock 2
68 pages
To Next Page IconTo Next Page
To Previous Page IconTo Previous Page
Page #24 background imageLoading...
Page #24 background image
22
P/N YRD604-KD-BLE-0047 Rev A
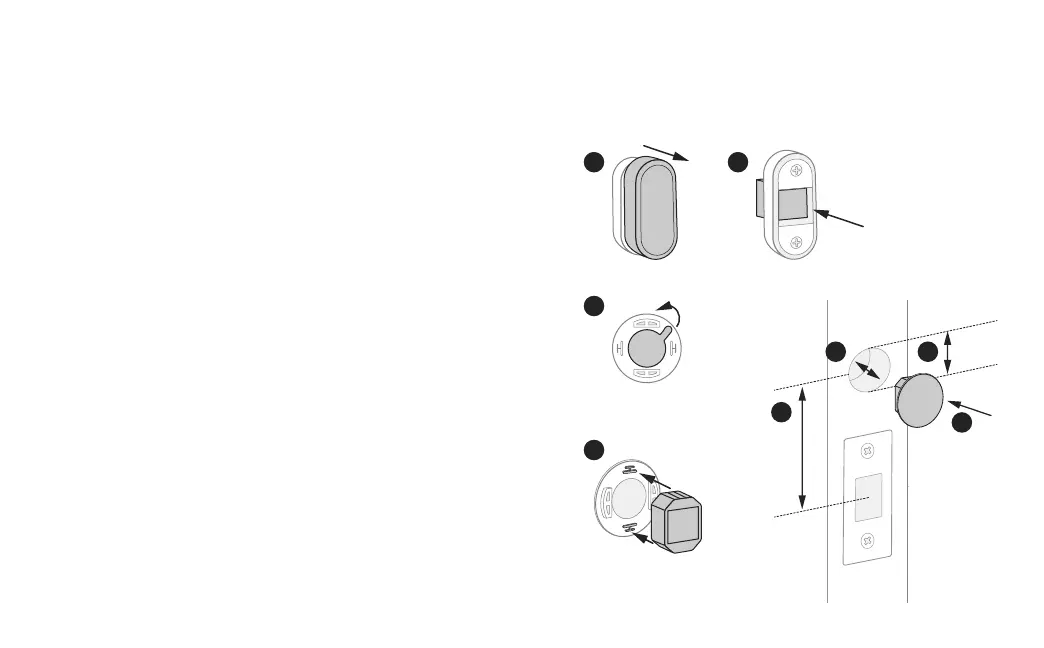
1. Take off DoorSense cover.
2. Push the magnet out of the housing.
3. Expose the adhesive on the magnet cap by removing the blue backing.
4. Press the magnet onto the cap so that the notches interlock.
5. Determine mounting location on the door frame. The distance from the
center of the strike plate to the center of the DoorSense should be 2”,
making it in line with the logo on the battery cover of the lock.
6. Mark a hole that’s horizontally centered on the door frame and is 5/8” in
diameter.
7. Drill a 1/2” deep hole where marked.
8. Insert DoorSense into the hole.
Note: If it is too snug to push in by hand, protect the frame with a piece of scrap
wood and use light blows with a hammer or mallet.
1
3
4
5
8
67
2
2”
5/8”
1/2”
9c
DoorSense Flush Mount
Frame

Table of Contents

Questions and Answers:

Question and Answer IconNeed help?

Do you have a question about the Yale Assure Lock 2 and is the answer not in the manual?

Yale Assure Lock 2 Specifications

General IconGeneral
Lock TypeDeadbolt
ConnectivityBluetooth, Wi-Fi (with module)
Power Source4 AA Batteries
Battery LifeUp to 1 year
Auto-LockYes
WeightVaries by model
Keypad TypeTouchscreen
CompatibilityAmazon Alexa, Google Assistant, Apple HomeKit
InstallationDIY, fits standard doors
Door Thickness Compatibility1-3/8" to 2-1/4"
User CodesUp to 25
Weather ResistanceWeather resistant
BacksetAdjustable 2 3/8" or 2 3/4"
Warranty1-year on electronic parts
FinishSatin Nickel, Oil Rubbed Bronze, Black Suede
Backup Power9V battery terminal

Related product manuals