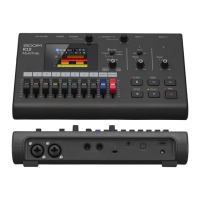
Audio interface/control surface
Connect the R16 by USB to a computer to use it as a controller and as an audio interface with DAW
software.
NOTE
• Before you unplug the USB cable when
disconnecting from a computer, follow the proper
procedures for the computer OS to disconnect
the device first.
• After step 2 of "Disconnecting" above, unplug
the USB cable only after “AUDIO INTERFACE”
disappears from the R16 display.
• Even without power from the R16 (adapter or
batteries), you can start-up with just USB bus
power when using the audio interface/control
surface functions.
• We strongly recommend that you always keep
the R16 system software up-to-date. If you use
an R16 running an old system, a computer might
not recognize it.
NOTE
• To use the R16 as an audio interface for DAW
software (for example, Cubase LE 4) it is
necessary to install the ZOOM R16 USB audio
driver. Install it correctly according the included
installation guide.
• Please download the latest version of the ZOOM
R16 USB audio driver from our home page, http://
www.zoom.co.jp.
Disconnecting
Connecting the R16 as an audio
interface/control surface
Connecting the R16 with a
computer for the first time
1. Audio interface mode
By using the R16 as an interface between a
computer and other audio equipment and
instruments, you can record and edit audio signals
with DAW software.
You can also connect instruments that require Hi-Z
or phantom power.
2. Control surface mode
Using the faders and keys on the R16, you can
control transport and mixer operations in your DAW
software.
1
Install ZOOM R16 USB Audio
drivers on the computer.
2
Connect the R16 to the computer.
Set and connect the R16
3
Set DAW software.
Device settings
Control surface settings
1
Press [USB].
1
Press [USB].
USB
>AUDIO INTERFACE
Change
menu
Press [ENTER].
Select .
2
SETTING?
[CONTINUE] RESET
Change
menu
Press [ENTER].
Select whether to use previous settings.
4
AUDIO INTERFACE
Enter?
Change
menu
Press [ENTER].
Confirm.
3
AUDIO INTERFACE
Terminate?
Press [ENTER].
Disconnect.
2
Unplug the USB cable.
3
[DEVICE] USB indicator lights
Sample Rate=48.0kHz
s :Solo
Connect USB cable to R16.
5
Connect USB cable to the
computer.
6
AUDIO INTERFACE
icon blinks.
AUDIO INTERFACE icon lights after connection
Connection complete
Install DAW software
Install driver
ZOOM R16 audio driver
AUDIO INTERFACE
Connect R16 to computer
Set device
Control surface settings
ZOOM R16 audio driver
Mackie Control
Set DAW software
1 2
Connecting and setting the R16
Follow these procedures from the second time connecting
USB
NOTE
You can use the settings and values of the last
project in a new one or reset them to the defaults
Data transferred with CONTINUE
• INSERT EFFECT settings
• SEND RETURN EFFECT settings
• Track parameter settings
• TUNER settings
RESET
Default settings for each item
>AUDIO INTERFACE