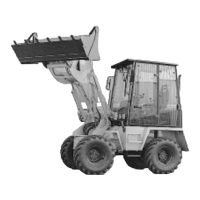
S04C S04C 6-66-6
DANGER
Both the bolts of the quick-change
device must be found on both sides
in the location bores of the suspen-
sion for the bucket. The bolts must
distinctly protrude at the sides.
(6) Stop the engine.
(7) Remove the pressure from the
hydraulic lines by moving the hand
lever for auxiliary hydraulics (4-7/8)
back and forth.
(8) Shift the ball block valve
(6-11/1).
(9) Remove the protective caps
from the quick couplings on the quick
change device (6-11/2) and from
the multi-purpose bucket’s hose
lines (6-12/1).
(10) Connect the multi-purpose
bucket’s hydraulic hose lines with
the quick couplings on the quick
change device (6-12) and turn
the coupling’s sliding sleeve 90°
(6-12/2).
CAUTION
When connecting, make sure that
the couplings are clean and con-
nections complete.
Dismounting
(1) Place the multi-purpose
bucket firmly on the ground.
(2) Stop the engine.
(3) Remove the pressure from the
hydraulic lines by moving the hand
lever for auxiliary hydraulics (4-7/8)
back and forth.
(4) Dismounting takes place in
reverse order of mounting.
NOTE
The type plate is on the back of the
bucket, on the right hand side
underneath the transverse girder
(6-8/arrow).
VARNING
De båda bultarna på snabbfästet
måste sitta i fästhålen på båda
sidor i skopupphängningen och
sticka ut tydligt på sidorna (6-10/
pil).
(6) Stäng av motorn.
(7) Tryckavlasta hydraulled-
ningarna genom att ricka fram och
tillbaka på spaken för extrahydraul-
systemet (4-7/8).
(8) Ställ om kulblocksventilen
(6-11/1).
(9) Dra av skyddslocken från
snabbkopplingarna på snabbfästet
(6-11/2) och från slangarna på
universalskopan (6-12/1).
(10) Anslut hydraulledningarna på
universalskopan till snabbfästets
snabbkopplingar (6-12) och vrid
kopplingens skjutmuff (6-12/2) 90°.
OBSERVERA
Se till att hydraulanslutningarna är
rena och täta.
Demontering
(1) Ställ universalskopan på ett
stabilt underlag.
(2) Stäng av motorn.
(3) Tryckavlasta hydraulled-
ningarna genom att ricka fram och
tillbaka på spaken för extrahydraul-
systemet (4-7/8).
(4) Demonteringen utförs i omvänd
ordning.
ANMÄRKNING
Typskylten sitter på baksidan av
skopan under tvärbalken (6-8/pil).
 Loading...