Appendix
Optional 19” Rackmount Kit for One Device (RM ENC 1201)
ENC 1201 Version 1.0 Page 47
5 Appendix
5.1 Optional 19”RackmountKitforOneDevice(RMENC 1201)
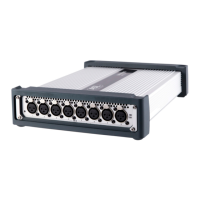
An optional 19” rackmount kit is available for the ENC 1201.
It oers the added convenience of providing separate XLR sockets for the four line out-
puts (assigned to an RJ45 socket on the unit itself). Here is how to install it:
1 RJ45 patch cable
2 Reinforcement brace
3 Long front blind
4 Short front blind
5 Connector unit with 4 XLR sockets and 2 countersunk-head screws M4x8mm TX20
8 oval head screws 2.9x13mm TX10
1. Install component (5) in the long front blind (3) and tighten the eight oval head
screws.
2. Loosen the four cylinder-head screws at the front of the ENC 1201 and remove
them.
1
2
3 4
5