Solution 6000
10 Bosch Security Systems 12/14 BLCC610U
User Guide
Silencing Alarms
When the control panel has registered an alarm, the keypad
(s) and sirens will sound to alert personnel that an alarm
occurred. The keypad will scroll in the display all alarms on
the keypad display for visual feedback. If you enter your
PIN before the system dials your security company, the
alarm report is cancelled (if programmed).
1. Enter your PIN + [OFF] to silence any alarm and turn
the system o.
The keypad will continue to scroll all alarm events that
caused the alarm. This is called alarm memory.
2. To clear alarm memory, turn the area on and o
again (eg. PIN + [ON] + PIN + [OFF]).
Automatic Arming
Your system may have been programmed to automatically
arm itself at a certain time of the day.
If for some reason you are still in the building when the
auto arming is taking place then it is possible to extend
or delay the auto-on time (automatic arming time) by
one hour simply by entering your PIN + [OFF] during
the auto-on pre-alert time. The auto-on pre-alert time
sounds the keypad buzzer to warn you that the system will
automatically turn All On.
Example:
If the control panel is programmed to automatically turn
All On at 6:00pm and the auto-on pre-alert time starts
beeping the keypad at 5:55pm, entering your PIN between
5:55pm and 6:00pm will delay the auto-on time by one
hour and the auto-on pre-alert time will again commence
at 6:55pm. Therefore the system will automatically turn All
On at 7:00pm.
Remote Arming - Quick Arm
If you forget to arm your system it may be possible for
you to remotely arm it using a touch tone telephone if the
remote arm option has been enabled by your installer.
To arm the system call the number which the panel is
connected to and when the panel answer you will here
3 beeps in accending frequency if the panel is in the
disarmed condition. Press [0] + [#] to arm. You will hear 3
beeps in decending order when the panel arms.
All areas on the system will be armed regardless of there
condition when using the DTMF quick arm function.
DTMF Control Functions
Your system includes comprehensive DTMF control
of individual areas and outputs with full user PIN and
timezone access verication. Some features like DTMF
disarming and output control need to be enabled by your
installer.
How to Use DTMF Control
1. Once the panel answers the incoming call, the panel
will play a short welcome jingle. You now have
approximately 5 seconds to enter a valid PIN and log
onto the panel.
2. Enter PIN followed by the [#] key on your phone. If
the PIN is valid the system will respond with two
short beeps. If the PIN is invalid then a single long
beep will be heard.
If a valid PIN is not entered in time, the panel will attempt
to establish a modem connection as if connecting to
the Solution Link software.
If this happens you will need to hang up for
approximately 60 seconds before trying again.
3. Once validated, the following commands can be
performed.
If no keys are pressed for 20 seconds or the user presses
[#] [#], the control panel will play the exit jingle and
terminate the session.
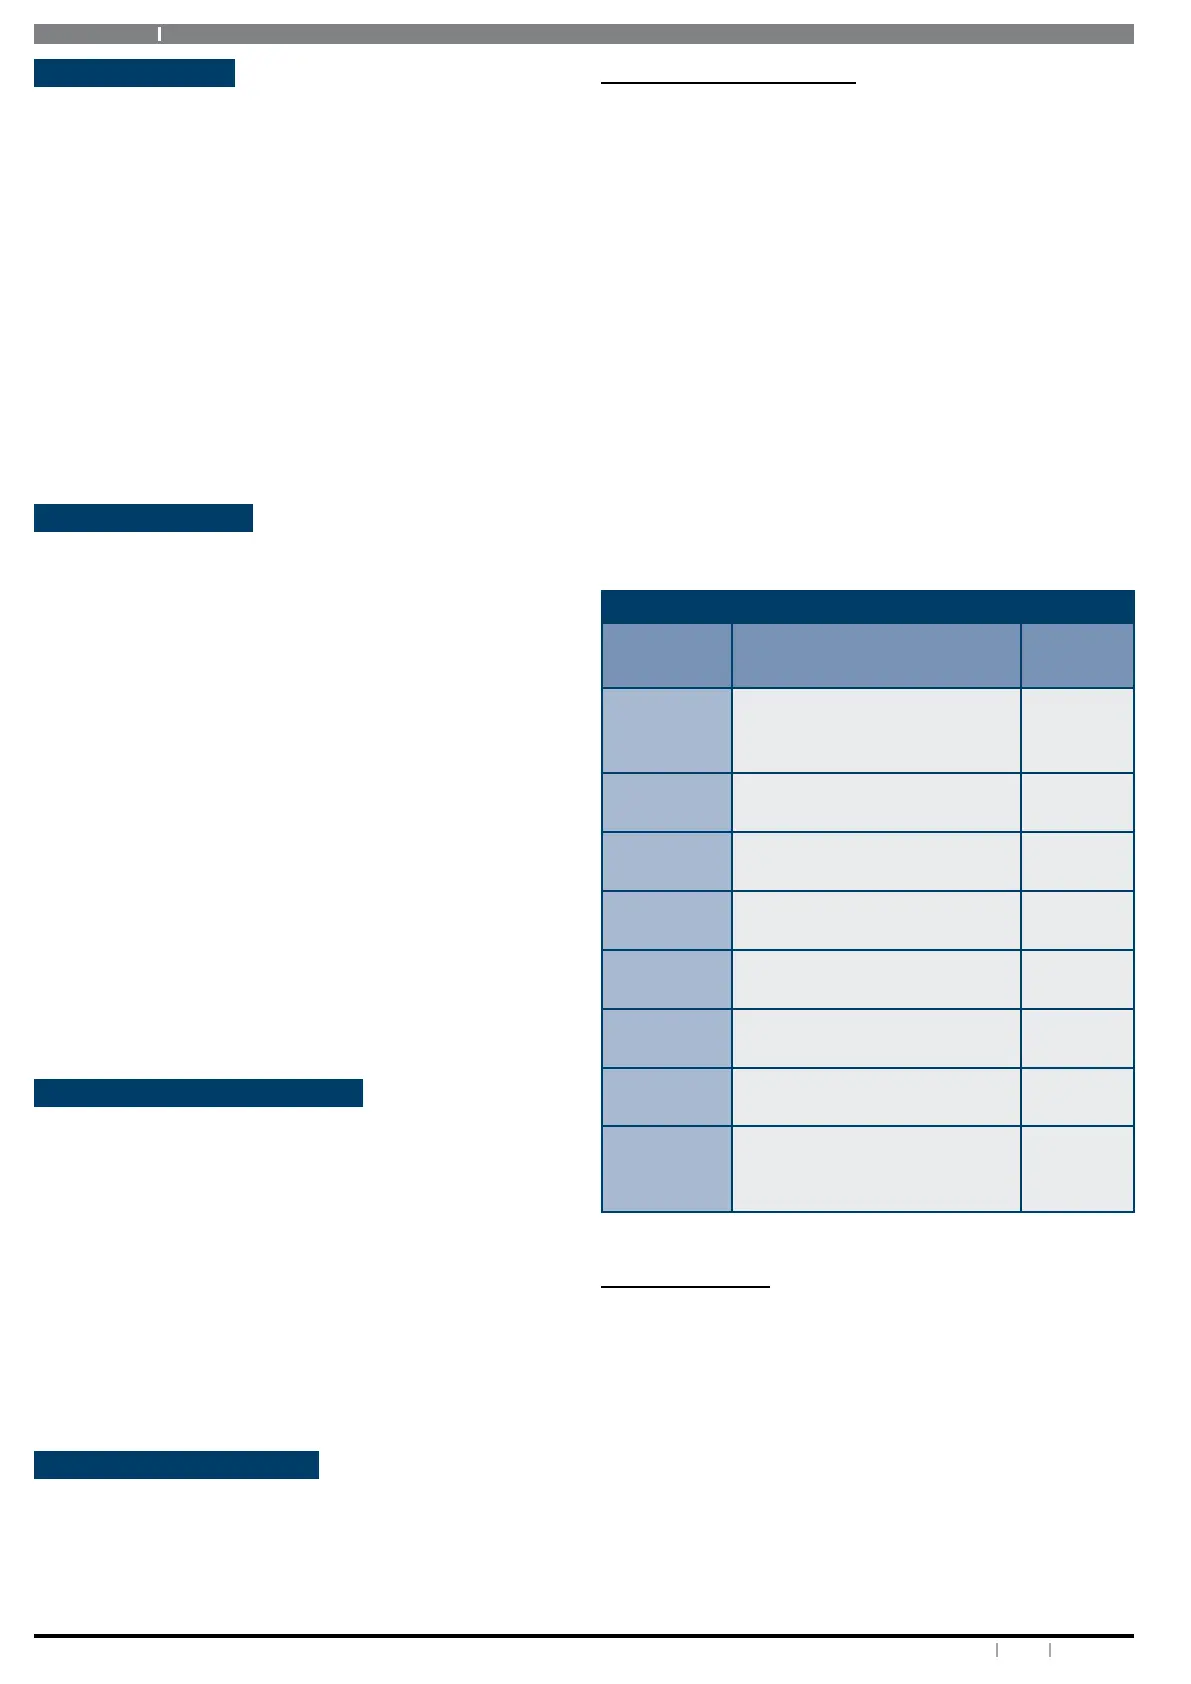
DTMF CONTROL FUNCTIONS
Operation Command
Tone
Response
Quick Arm
All Areas [0] + [#]
High,
Medium,
Low
Log In
OK
[PIN] + [#] Low, High
Error
Incorrect Entry
Long
Beep
Turn Area
All On
[1] + [Area Nº] + [#] + [1] Low, High
Turn Area
O
[1] + [Area Nº] + [#] + [2] High, Low
Turn
Output On
[2] + [Output Nº] + [#] + [1] Low, High
Turn
Output O
[2] + [Output Nº] + [#] + [2] High, Low
End
Session [#] + [#]
High,
Medium,
Low
Table 5: DTMF Remote Control Functions
DTMF EXAMPLES
Each example below shows the log on step for clarity. In
practise is only necessary to log on once per DTMF control
session.
To log on and turn Area 1 All On, enter the following:
[2] [5] [8] [0] + [#] = Log ON
[1] + [1] + [#] + [1] = Arm Area 1
To log on and turn Output 8 on, enter the following:
[2] [5] [8] [0] + [#] = Log ON
[2] + [8] + [#] + [1] = Turn Output 8 ON
To log on and turn Output 6 o, enter the following: