17
ENG
“SmartCella manual” +0300084EN - rel. 1.2 - 28.03.2017
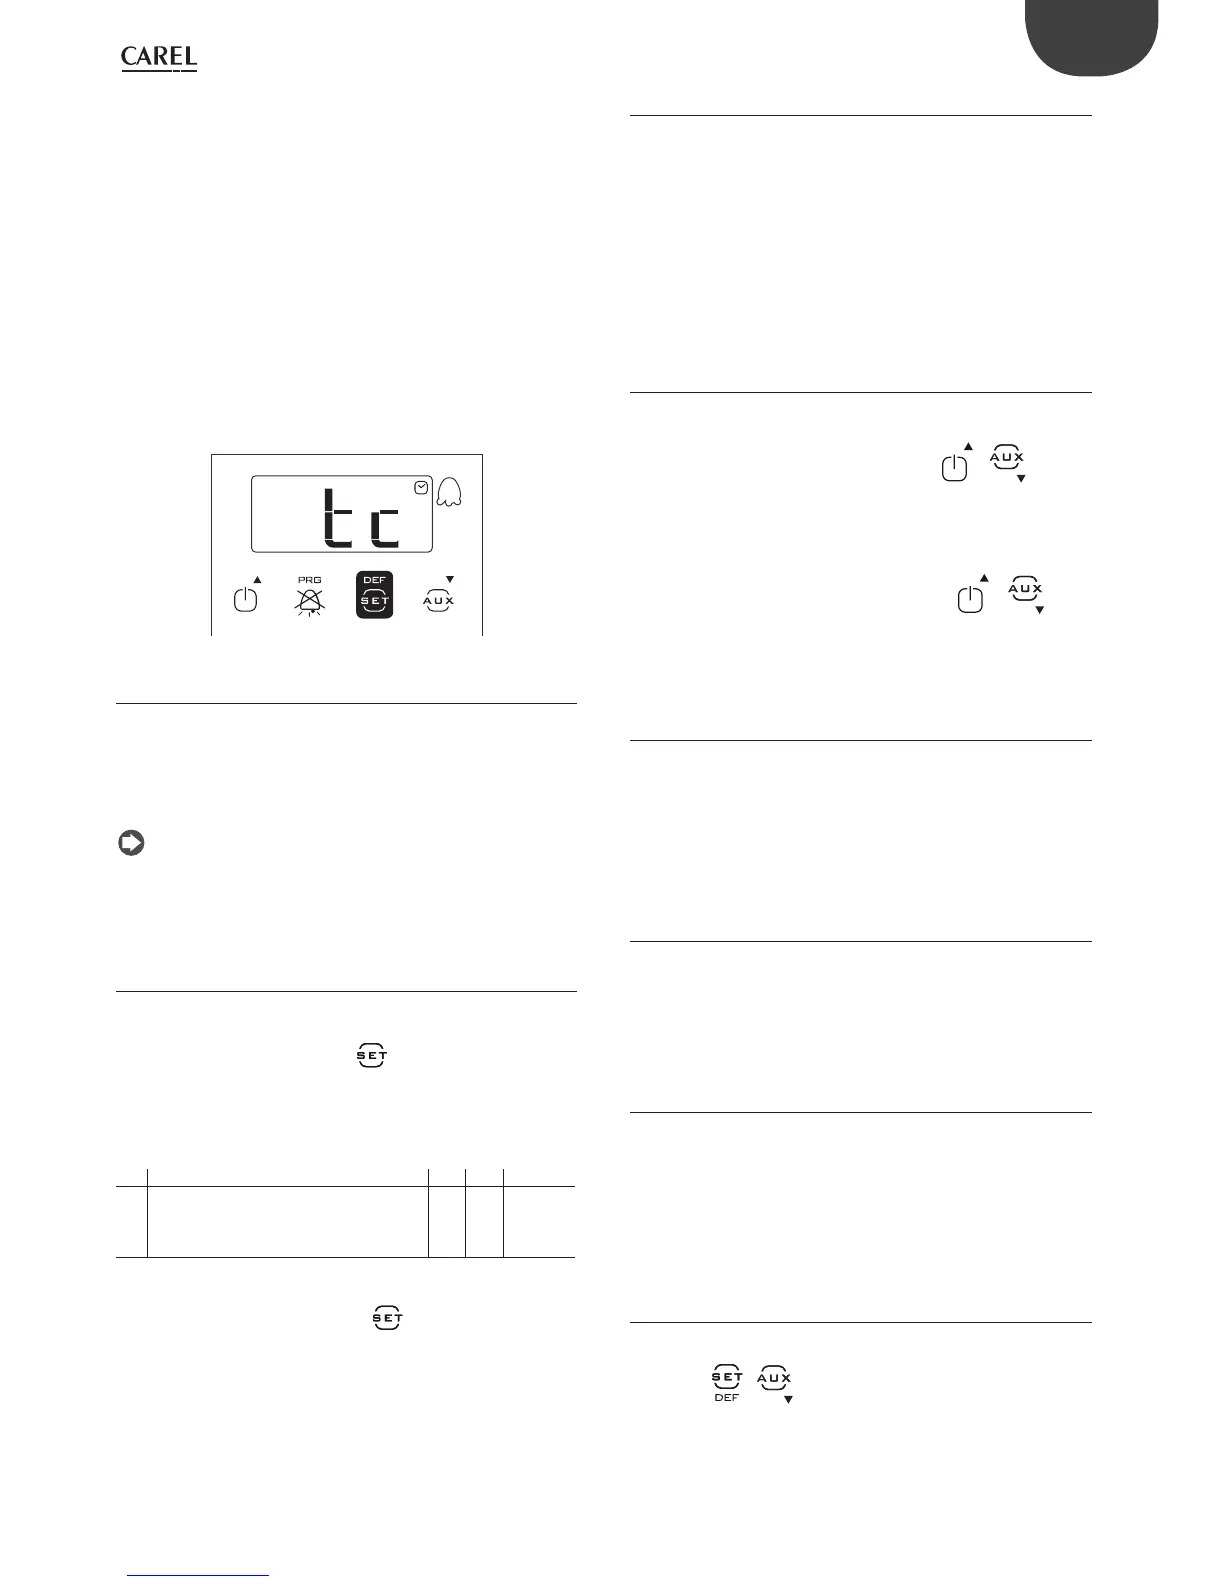
Example 1: setting the current time/date (for models with RTC))
1. Access the type C parameters as described in the corresponding
paragraph;
2. Press UP/DOWN and select the parent parameter tc, or press the PRG
button to select the “rtc” parameter category and then parameter tc;
3. Press Set: parameter y is displayed following by two digits that
indicate the current year;
4. Press Set and set the value of the current year (e.g.: 17=2017), press
Set again to confi rm;
5. Press UP to select the next parameter - month, and repeat steps 3
and 4 for the following parameters:
6. M=month, d=day of the month, u=day of the week h=hours,
m=minutes;
7. To return to the list of main parameters press Prg/mute and then
set parameters ton and toF (see the following paragraph), or
alternatively:
8. To save the settings, press Prg/mute for 5 seconds and exit the
parameter setting procedure.
3.4.4 Setting the default parameters
To set the parameters to the default values:
• Power down the controller;
• Press Prg/mute;
• Power up the controller holding the Prg/mute button, until the
message “Std” or “Bn0“ (on SmartCella 3PH) are shown on the display,
after 5 s.
Note: this will cancel any changes made and restore the original
values set by the manufacturer, i.e. the default values shown in the
parameter table.
3.4.5 Defrost
To activate a defrost, the defrost probe must measure a temperature less
than the end defrost temperature (par. dP1).
ACTIVATION: Press SET for 5 seconds:
After 5 seconds, the display shows the start defrost signal (dFb) for 3 s.
The controller enters defrost mode, with the corresponding icon shown
on the display, together with the message “dEF” if set accordingly by
parameter d6. The defrost relay is also activated.
Par. Description Def Min Max UoM
d6 Terminal display during defrost
0 = Temperature alternating with dEF
1 = Display disabled
2 = dEF
102-
Tab. 3.g
DEACTIVATION: Press SET for 5 seconds :
After 5 seconds, the display shows the end defrost signal (dFE). The
controller exits defrost mode, returning to the standard display.
3.4.6 On/O
To switch the controller off from the keypad:
• press On-Off for 3 seconds.
The display shows the text Off fl ashing for 3 seconds, and then on steady.
Finally, the text Off alternates with the standard display. Any active output
relays are deactivated.
To switch the controller on from the keypad:
• press On-Off for 1 s.
The display shows the text On for 1 s and then returns to the standard
display. Any output relays are activated again.
3.4.7 Continuous cycle
For the explanation of the continuous cycle function, see chapter 6.
To activate the continuous cycle, the value of parameter cc must be >0.
ACTIVATION: Press ON/OFF + AUX for 5 seconds
+
The message “cc” fl ashes on the display for 3 seconds, and subsequently,
if the conditions are suitable, the controller shows the start continuous
cycle message “ccb” and the corresponding icon on the display.
DEACTIVATION: Press ON/OFF + AUX for 5 seconds
+ :
The message “cc” fl ashes on the display for 3 seconds, and subsequently
the controller shows the end continuous cycle message, “ccE”.
3.4.8 Display defrost probe
To display the value measured by the defrost probe:
• press Set and UP together for 3 s;
• the code of parameter d/1 is displayed fl ashing;
• continue holding the buttons until the value measured by the defrost
probe is displayed;
• release the buttons;
• the standard display is shown again after 10 s.
3.4.9 Auxiliary/light output activation
To activate the auxiliary (H1 = 2) and/or light output (H1 = 3) from the
keypad:
• press AUX;
• the message AUX fl ashes on the display for 1 s:
• press and hold until activating the output and the corresponding icon
on the display, which then shows the standard display.
3.4.10 Probe calibration
Parameters /c1 to /c4 are used are used to calibrate the fi rst, second, third
and fourth temperature probe respectively. Access the parameters and
then set the required values. When pressing Set, after having entered the
value, the display does not show the parameter, but rather immediately
shows the new value of the probe reading being calibrated. This means
the result of the setting can be checked immediately and any adjustments
made as a consequence. Finally, press Prg for 5 seconds to save the value
of the parameter.
3.4.11 HACCP menu
The controller must be fi tted with RTC (real time clock).
To enter the HACCP menu:
• press the + buttons together for 1 s;
• press UP/DOWN to display the HACCP parameters;
• press PRG for 5 seconds to return to the standard display.