16
ENG
“SmartCella manual” +0300084EN - rel. 1.2 - 28.03.2017
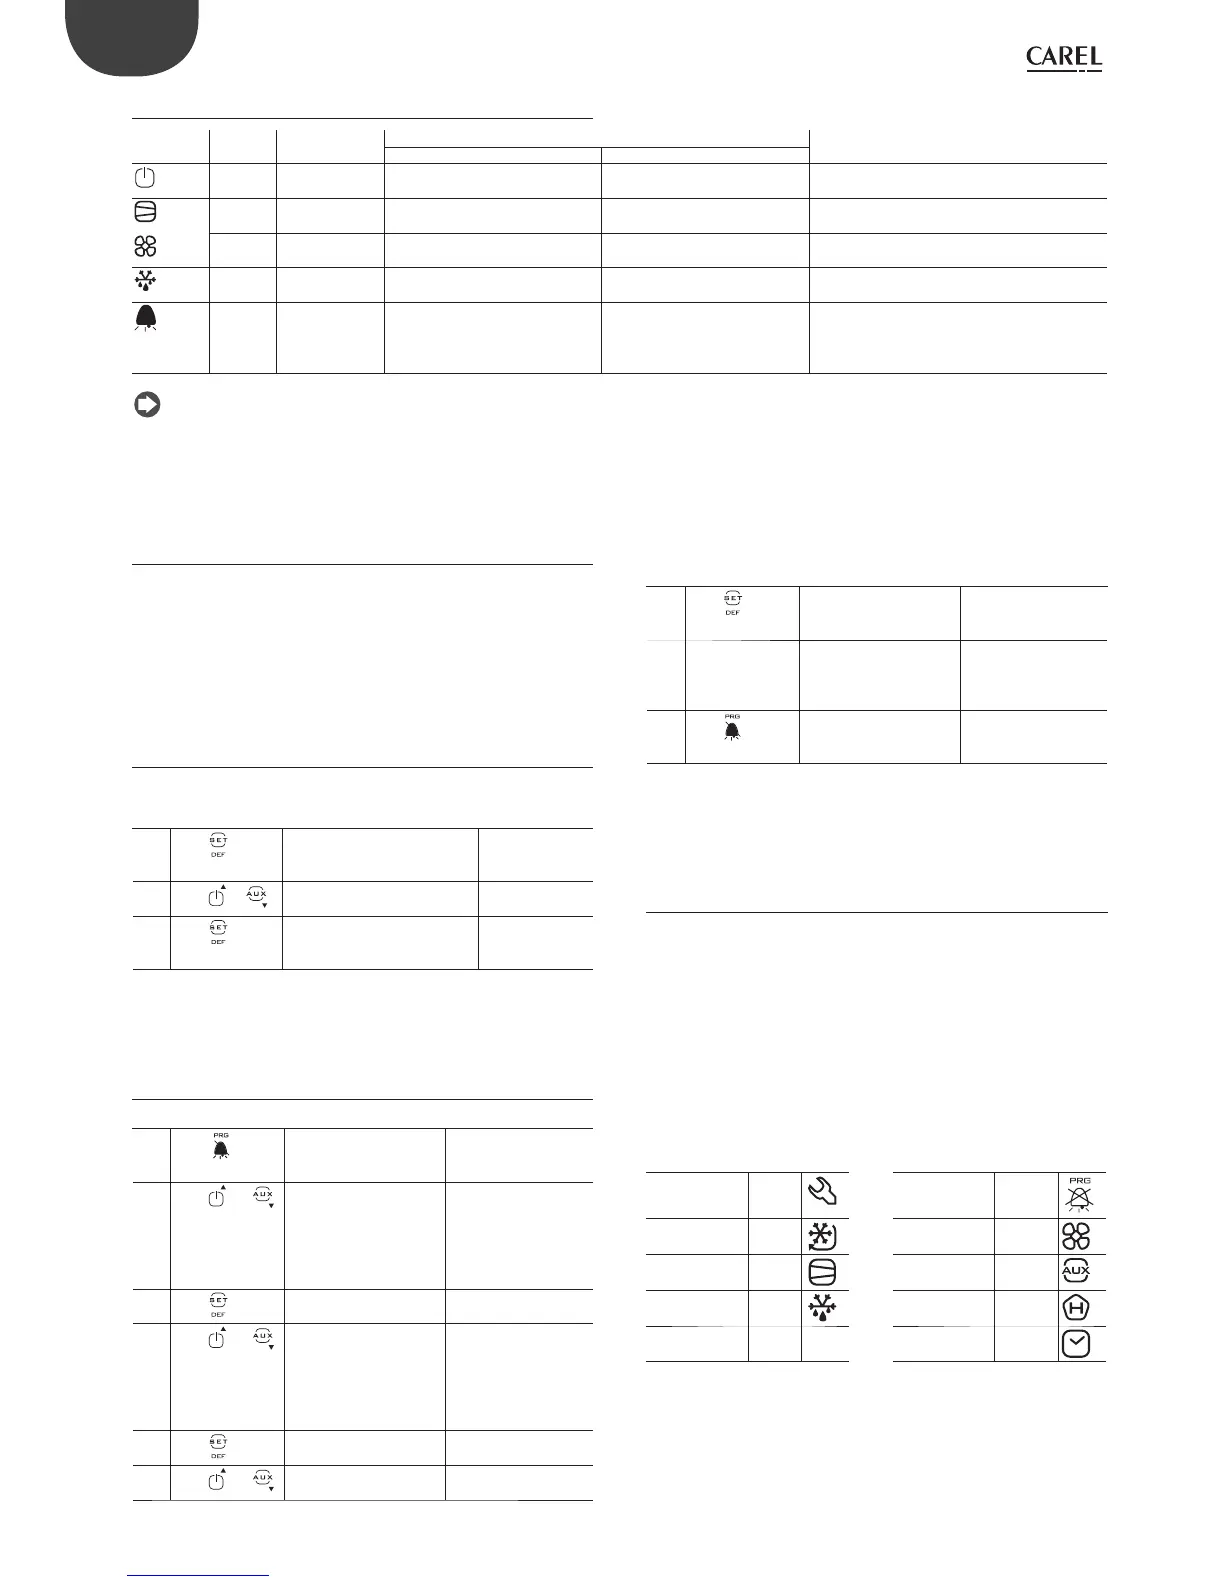
3.3 Signal LEDs
Icon Colour Function Status Notes
ON OFF
Green POWER Auxiliary circuit powered Auxiliary circuit not powered LED on depending on the status (ON) of circuit
breaker QF2 and disconnect switch QS1
Yellow COMPRESSOR Power available at compressor
power terminals
No power at compressor power
terminals
LED on depending on the status (ON) of motor
protector QM1 and whether power is available
Yellow EVAPORATOR
FAN
Power available at evaporator fan
power terminals
No power at evaporator fan
power terminals
LED on depending on the status (ON) of circuit
breaker QF1 and whether power is available
Yellow DEFROST Power available at defrost power
terminals
No power at defrost power
terminals
LED on depending on the status (ON) of circuit
breaker QF1 and whether power is available
Red ALARM Alarm activated Normal operation LED on depending on: activation of circuit
breaker QF1 and/or motor protector QM1
and/or alarm input (high pressure switch or
compressor Kriwan)
Tab. 3.c
Note: the status of the LED (On/Off ) obviously depends on the
operating logic of the panel (e.g. if the temperature reaches the set point,
the compressor and the corresponding LED will be switched off by the
electronic controller, without generating alarms)
3.4 Programming
The operating parameters can be modifi ed using the front keypad. Access
diff ers depending on the type: set point, frequently-used parameters (F)
and confi guration parameters (C). The type of parameter is specifi ed in the
table of parameters. Access to the confi guration parameters is protected
by a password for the confi guration parameters that prevents unwanted
modifi cations or access by unauthorised persons. The password can be
used to access and set all the control parameters.
3.4.1 Setting the set point
How to set the set point (desired temperature value)
Step Action E ect Meaning
1
Press for 1
second
After 1 second the display will
show the current set point
This the currently
active control set
point
2
Press
or
The value on the display will
increase or decrease
Set the desired
value
3
Press
The controller will show the
temp.read by the probes again
The set point is
modifi ed and
saved
Tab. 3.d
Another way of changing the set point is to set parameter “St” (see the
tables below)
3.4.2 Setting type “F” and “C” parameters
Step Action E ect Meaning
1
Press
for 3
seconds
After 3 seconds the
display will show the 1st
parameter, “0” (Password)
Access to type “F”
parameters is direct
without password
2
Press
or
The value on the display
will increase or decrease.
Enter the password
“22” to access the
type “C” parameters
or whatever diff erent
value for the type “F”
parameters.
3
Press
The display will show “St”
(Setpoint)
This is the current value
of the Setpoint
4
Press
or
If the password set is 22
the display will scroll the
list of type “C” parameters
(CONFIGURATION)
otherwise the list of type “F”
parameters (FREQUENT)
Set the desired value
5
Press
The display will show the
parameter name
This is the current value
of the parameter
6
Press
or
The value on the display
will increase or decrease
Set the desired value
Step Action E ect Meaning
7
Press
The display will show the
parameter name again
IMPORTANT:
parameters not yet
saved
8 Repeat steps
2, 3, 4 & 5 for
all parameters
required
9
Press
for 5 seconds
The controller will display
the temperature read by
the probes again
IMPORTANT: only now
have all the parameters
been updated
Tab. 3.e
For both types of access (type “F” and type “C”) there is a timeout (no
button on the keypad pressed for 1 min), the procedure is ended without
saving the parameter.
3.4.3 Parameter categories
• To move from the parameters in one category to another, when
displaying the parameter code, press Prg to show the category and UP
and DOWN to move from one category to another;
• if no button is pressed for 10s, the display starts fl ashing, and after 1
minute automatically returns to the standard display;
• to increase the scrolling speed, press and hold the UP/DOWN button
for at least 5 seconds;
• all the changes made to the parameters, temporarily stored in the
RAM, can be cancelled, by not pressing any button for 60 seconds, thus
returning to the standard display.
Parameter categories
Category Text Icon Category Text Icon
Probes Pro
Alarms ALM
Control CtL
Fan FAn
Compressor CMP
Confi guration CnF
Defrost dEF
HACCP HcP
Clock rtc
Tab. 3.f