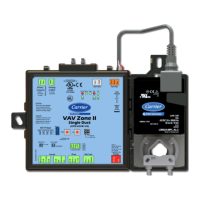
Installing the Zone Ctrl II
Zone Ctrl II and
VAV Zone II Secondary Duct Installation and Start-up Guide CARRIER CORPORATION ©2019
Error! No text of specified style in document.
12 All rights reserved
Addressing the Zone Ctrl II
You must give the Zone Ctrl II an address that is unique on the network. You can address the Zone Ctrl II before or
after you wire it for power.
1 If the Zone Ctrl II has been wired for power, pull the screw terminal connector from the controller's power
terminals labeled
and
. The controller reads the address each time you apply power to it.
2 Using the rotary switches, set the controller's address. Set the
(
) switch to the tens digit of the
address, and set the
(
) switch to the ones digit.
If the controller’s address is 25, point the arrow on the
(
) switch to 2 and the arrow on
the
(
) switch to 5.
10's 1's
1
3
4
5
2
7
8
9
6
0
1
3
4
5
2
7
8
9
6
0
The factory default setting is
and must be changed to successfully install your Zone Ctrl II.
In a single duct system, the Zone Ctrl II controls airflow using the built-in flow sensor and separate actuator.
In a dual duct system, the Zone Ctrl II controls airflow for one duct using the built-in flow sensor and separate
actuator. For the other duct, the Zone Ctrl II uses a VAV Zone II Secondary Duct, which has its own flow sensors
and actuator. Connect both the Zone Ctrl II actuator and the VAV Zone II Secondary Duct actuator to the Zone Ctrl
II
port.