EasyManua.ls Logo

CipherLab 1000 User Manual

CipherLab 1000
140 pages
To Next Page IconTo Next Page
To Previous Page IconTo Previous Page
Page #51 background imageLoading...
Page #51 background image
41
Update
Chapter 2
Selecting Output Interface
2.2.5 FLOW CONTROL
By default, there is no flow control in use. Select the flow control (handshake) method.
Options
Description
No No flow control
Scanner Ready The scanner will activate the RTS signal upon powering on. After each good
read, the scanner will then wait for the CTS signal to become active. Data
will not be sent until the CTS signal becomes active.
Data Ready The RTS signal will be activated after each good read. The scanner will
then wait for the CTS signal to become active. Data will not be sent until
the CTS signal becomes active.
Inverted Data Ready It works the same as the Data Ready flow control except that the RTS
signal level is inverted.
*None
Scanner Ready
Data Ready
Invert Data Ready
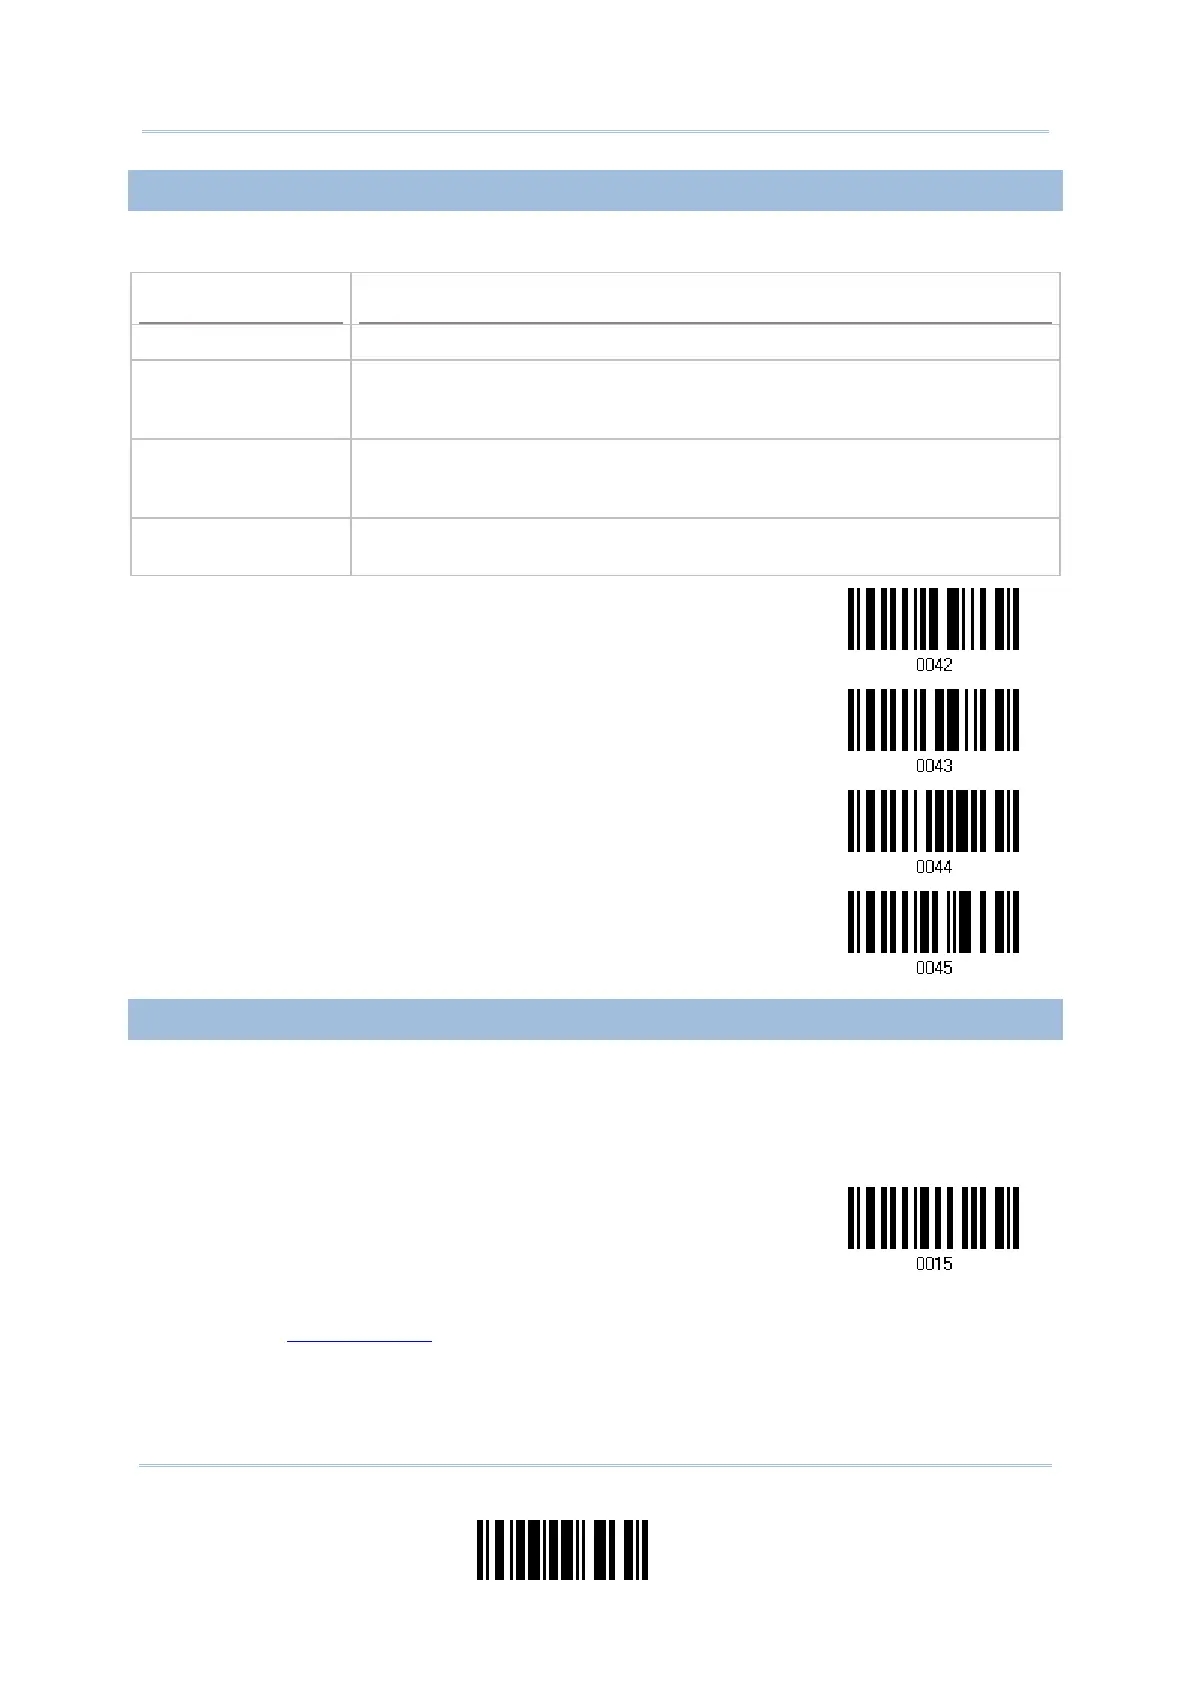
2.2.6 INTER-CHARACTER DELAY
By default, the inter-character delay is zero. Specify a value, ranging from 0 to 255 in
units of millisecond, to match the computer response time. Such delay time is inserted
between every character being transmitted. The longer the delay time is, the slower the
transmission speed will be.
Inter-Character
Delay… (*0~255)
1) Read the barcode above to specify the inter-character delay.
2) Read the “
Decimal Value” barcode on page 127 for the desired inter-character delay
(millisecond).
3) Read the “Validate” barcode on the same page to complete this setting.

Table of Contents

Question and Answer IconNeed help?

Do you have a question about the CipherLab 1000 and is the answer not in the manual?

CipherLab 1000 Specifications

General IconGeneral
BrandCipherLab
Model1000
CategoryBarcode Reader
LanguageEnglish

Summary

IMPORTANT NOTICES

Introduction

Symbologies Supported

Lists all supported barcode symbologies and their default enable/disable status.

Quick Start

Enter Configuration Mode

Procedure for entering the scanner's configuration mode using the 'Enter Setup' barcode.

Exit Configuration Mode

Instructions for saving settings and exiting configuration mode using 'Update' or 'Abort' barcodes.

Default Settings

Explains how to restore the scanner to its factory default settings using a specific barcode.

Restore System Defaults

Details the process of resetting all scanner parameters to their original factory default values.

Read a Setup Barcode

Describes the process of reading setup barcodes to configure scanner parameters.

Configure Parameters

Explains how to set scanner parameters using single or multiple barcode reads.

Understanding the Barcode Scanner

Selecting Output Interface

2.1 Keyboard Wedge

Details on connecting the scanner using the Keyboard Wedge interface.

2.1.1 Activate Keyboard Wedge & Select Keyboard Type

Steps to activate Keyboard Wedge and select the appropriate keyboard type.

2.2 RS-232

Instructions for connecting the scanner via the RS-232 serial interface.

Changing Symbology Settings

Defining Output Format

4.1 Character Substitution

Setting up character substitution rules to modify scanned data.

Applying Formats for Data Editing

5.2 How to Configure Editing Formats

Overview of the process for configuring data editing formats.

5.3 Configuring Format — Define Data Criteria

Setting conditions (like code type) for data processing by editing formats.

5.4 Configuring Format — Define Data Field

Dividing scanned data into fields based on user-defined rules.

5.5 Configuring Format — Define Transmission Sequence

Programming the order in which configured fields are transmitted.

Specifications

Host Serial Commands

Related product manuals