Caterpillar Enclosed CVT Addendum
82
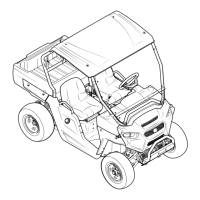
6j. Seat the opening at the transfer case end
of the back plate over the boss that sur-
rounds the input shaft. See Figure 2b.22.
• If the opening in the back plate sill not align with
the boss on the transfer case, DO NOT attempt
to draw the two together by tightening the
screws.
• If necessary, loosen the screws that hold the
transfer case brackets to the engine and transfer
case tray using a pair of 1/2” wrenches.
6k. Once the back plate is properly aligned on
engine and transfer case, tighten all the
screws. See Figure 2b.23.
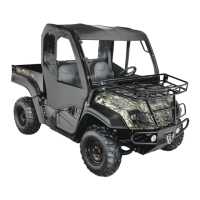
6l. Re-mount the starter motor.
See Figure 2b.24.
• Apply releasable thread-locking compound such
as Loctite 242® (blue) to the screws.
• Install the screws and lock-washers that hold the
starter to the engine plate, tightening the screws
to a torque of 22-25 ft-lbs (30-34 N-m).
• Check electrical connections and insulating
boots on the starter motor and solenoid.
7. CVT Installation
7a. Prepare the CVT for installation:
• Clean the shafts and the surrounding area
before installing the CVT.
Figure 2b.22
Transfer case
Back plate
Mounting boss
Figure 2b.23
Figure 2b.24
Screws
Starter motor
 Loading...