EasyManua.ls Logo

Cub Cadet XR2 1000 User Manual

Cub Cadet XR2 1000
86 pages
To Next Page IconTo Next Page
Page #1 background imageLoading...
Page #1 background image
User Guide
Manuel utilisateur
EN FR
P.O. BOX 1386, 97 KENT AVENUE, KITCHNER, ON N2G 4J1
Robotic Mower
XR2 1000
OFFICIAL NEW LOGO 7/28/17
Form No. 769-21313
(April 12, 2019)
Question and Answer IconNeed help?

Do you have a question about the Cub Cadet XR2 1000 and is the answer not in the manual?

Cub Cadet XR2 1000 Specifications

General IconGeneral
BrandCub Cadet
ModelXR2 1000
CategoryLawn Mower
LanguageEnglish

Summary

Safety First

Safe Operation Practices

Detailed instructions for safe operation, including general info, preparations, and warnings.

Symbols Definitions

Explanation of symbols and their meanings, highlighting dangers.

Safety Features

Overview of built-in safety features like Child Lock, Disabling Device, Lift Sensor, and Tilt Sensor.

1 Safe Operation Practices

A. General Information

Essential guidelines for understanding mower instructions, user responsibilities, and safe usage.

B. Preparations Before Operating

Key steps before initial use: charging, area check, managing bystanders.

C. Operation

Critical safety warnings and procedures for operating the robotic mower safely.

D. Children

E. Transportation

F. Using the Remote Control

G. Batteries

H. Slope Operation

I. Maintenance and Special Instructions

J. Product End of Use

2 Symbols Definitions

Symbol Descriptions

Detailed explanations of various symbols and their associated safety warnings and dangers.

3 Safety Features

A. Child Lock

Feature to prevent unintended operation by locking the control panel.

B. Disabling Device

Mechanism to prevent operation when set to OFF, ensuring safety during maintenance.

C. Lift Sensor

Safety feature that stops the blade if the mower is lifted off the ground.

D. Tilt Sensor

Safety feature that stops the blade if the mower is tilted to a vertical position.

E. Obstruction Sensor

F. Emergency Stop Control

G. ON-Off Switch

H. Base Station/Perimeter Switch and Perimeter Wire

Welcome to a friendly home

So where are we headed?

What's in the box

1 Know your lawn

Type A Main Zone only

Describes a lawn with a single continuous zone suitable for mower navigation.

Type B Main Zone + Sub Zone

Describes a lawn with multiple zones connected by narrow passages.

Type C MainZone+SeparatedZone

Type D Main Zone + Sub Zone + Separated Zone

2 Get Started

Choose locations for the Base Station & Power Supply unit

Guidance on selecting the optimal placement for the Base Station and power supply.

Decide which installation type is right for you

Two options for Base Station installation: internal or external.

Follow simple guidelines to place your Base Station

3 Lay the Wire

Obstacles and Slopes

Planning for obstacles and slopes before laying the perimeter wire.

Tools Needed

List of necessary tools for installing the perimeter wire.

A. Make a good start

Slopes along the edge

Slopes within the Lawn

What if you prefer an External Base?

B. Maintain Proper Distance

C. Make Smooth Turns

D. Protect Soft Obstacles

E. How to Wire a Sub Zone

F. How to Wire a Separated Zone

G. Complete Wire Setup

4 Power Up

Install and connect the Base Station

Steps to place and connect the Base Station to its planned location.

A. Connect the Power Supply Unit

5 Ready, Set, Test

A. Start up

Initial setup steps: adjusting mowing height before the mower can start.

B. Set Basic Settings

C. Test Base Station Position

D. Test Wire Position

E. Finish Installing the Perimeter Wire

F. Charge your mower

H. Energy Saver

Adding Sub Zones

Are there any Separated Zones?

Splicing the Perimeter Wire

1 Knowing Your Mower

External Parts

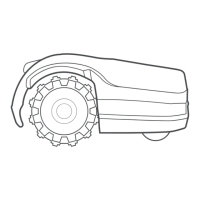
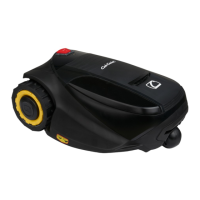
Identification and description of the external parts of the robotic mower.

Operating Panel & Display

2 Menu Structure

Base Station LED indication

Meaning of different LED indications on the Base Station for status monitoring.

Basic Settings

Overview of frequently used menu options for basic mower configuration.

Advanced Settings

3 Automatic Operation

Tell the mower how often to mow

Setting the Mowing Frequency to control how often the mower performs its cycles.

When you need extra mowing time

Decide when you need the lawn for yourself

Pause automatic operation when needed

4 Manual Operation

5 Features - How to

Child Lock

Enabling Child Lock to prevent accidental operation by children.

Anti-Theft feature

6 Periodic Maintenance

Winter Storage

Instructions for storing the mower and Base Station during winter.

Winter service

Recommendations for professional service before winter storage.

7 Troubleshooting

8 Frequently Asked Questions

Rechargeable Battery Disposal

Related product manuals