Installation_-P_Oval_TypeC_Insertion_r1d -P Probe Physical Installation (Rectangular Ducts)Page 3
EBTRON, Inc • 1663 Hwy 701 S., Loris, SC 29569 • Toll Free: 800-2EBTRON (232-8766) • Fax: 843-756-1828 • EBTRON.com
the center-line notches of the plate are aligned with the line drawn in Step 10. Mark the location of
the four terminal mounting plate screws [] that secure each terminal mounting plate []. Repeat
this step for each additional probe center-point, if more than one probe is provided, using the
center-point(s) created in Step 11.
Step 13. Drill a 1-1/8 inch hole at each probe center-point marked in Step 11.
Drilling the larger mounting hole, in lieu of a hole the size of the terminal mounting bolt, facilitates
installation of longer probes.
Step 14. Drill appropriately sized pilot holes for each terminal mounting plate screw location (screws not
provided) marked in Step 12.
Step 15. Make sure the large foam gasket [] is installed on each probe tube [] against the insertion
mounting bracket [].
Probes are labeled Probe X of Y, where Y is the total number of probes provided for a location. It is
recommended (not required) that probes are installed sequentially by probe number top to bottom,
left to right or vice versa.
Step 16. Follow steps 17 to 22 for each probe.
Step 17. Insert the probe tube [] in the duct with the airflow directional arrow pointing in the direction of
airflow (it is ok if the arrow is upside down).
Step 18. Secure the insertion mounting bracket [] to the duct with the four mounting screws [] selected.
Step 19. If the probes are provided with the terminal mounting bracket [], follow Steps 20 to 22, otherwise
skip to Step 23.
Step 20. Place the terminal mounting plate [] over the terminal mounting bolt [] of the probe and secure
the terminal mounting plate [] to the duct with the four mounting screws [] selected. The foam
gasket on the plate should be facing the duct.
Step 21. Place the small foam gasket [], large fender washer [] and lock nut [] on the terminal mounting
bolt [].
Step 22. Tighten the lock nut [] until the small foam gasket [] is compressed to approximately 50% of its
original thickness.
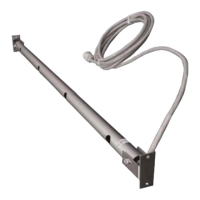
Step 23. Probe installation is complete! Figure “B” shows the completed two probe installation.

 Loading...