40Service Guide: EFI Fiery Central integrated server
Replacing parts
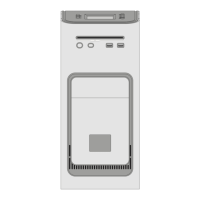
Figure 16: Removing the fan
4 Remove the fan from the chassis.
To replace the fan
1 Align the fan.
An arrow on the side of the fan indicates the airflow direction. Make sure that the fan is positioned so that the
arrow points inside the FC integrated server and the fan cable extends downward toward the motherboard (see
Figure 16).
2 Press the fan into the bracket until it clicks into place.
Make sure that the hooks on the bracket close over the edge of the fan.
3 Connect the fan cable to motherboard connector REAR FAN.
4 Reassemble the FC integrated server and verify its functionality (see page 54).
Power supply
For more information on the power supply, see “Specifications” on page 75.
To remove the power supply
1 Shut down, and then open the FC integrated server (see page 18).
To access the power supply, you must remove the left panel.
1 Hook (1 of 2)
2 Fan bracket
3Fan
4 Air flow direction
5 Fan cable extending downward
Important: Do not open the power supply for service or troubleshooting. Opening the power supply will void
the warranty.