If the newer model pressure sensor cable is currently installed in the SCS, a new cable may not be required. If
no new cable is installed, re-attach the existing cable.
3. Mount the cell to the mounting brackets using a
9
/
64
in Allen wrench with the pressure sensor facing out towards
the cabinet door.
4. Reconnect the cell inlet and cell outlet using a
9
/
16
in wrench.
5. Reconnect the thermistor connector.
6. Connect the new pressure sensor harness and cable to the circular connector.
7. Reconnect the optical cable harness.
8. Close the analyzer enclosure cover.
9. Conduct a leak test to determine that the new pressure sensor is not leaking.
Do not allow cell to exceed 0.7 barg (10 psig) or damage could occur.
For any questions related to leak testing the pressure sensor, refer to Service → .
Power on the system and run validation
1. Turn the system power on. Refer to the Standard documentation → for this analyzer for Powering up the
analyzer.
2. Run a validation on the analyzer. Refer to the Standard documentation → for instructions on Validating the
Analyzer.
a. If the system passes, the pressure sensor replacement is successful.
b. If the system does not pass, refer to Service → for instruction.
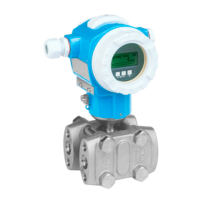
6.6.2 Replacing the pressure sensor on a 0.1 or 0.8 m cell
Use the following instruction to replace a pressure sensor on a 0.1 m or 0.8 m measurement cell. This procedure is
broken into four parts:
• Purge the system and power down
• Disconnect relevant components
• Replace the pressure transducer
• Reconnect components and perform a leak test
Tools and materials
•
9
/
16
in wrench
• ⅞ in wrench
•
9
/
64
in Allen wrench
• Flat-head screwdriver
• Phillips-head screwdriver
• Metal pick
• Military grade stainless steel PTFE tape (or equivalent)
• Dry nitrogen
• Isoproypl alcohol
Isopropyl alcohol can be hazardous.
Follow all safety precautions when in use and thoroughly wash hands prior to eating.
Purge the system and power down
1. Close the external flow of gas to the sample conditioning system at the sample inlet.

 Loading...