Display Self-Test Mode
DISPLAY
SELF·TEST
MODE
When
the KeypadlDisplay is receiving power from the Power Supply but is not in proper
communication with the
Main Board, the K.eypad/Display Board enters Self·test
mode.
In Self-
test mode, the Display remains
blank:
until you press the buttons on the control panel. Pressing
various control panel buttons will cause the Display to print characters, home the cursor, etc.
Using
Self·test
Mode
to
Diagnose
the
Keypad/Display
Assembly
1.
If
the
unit
comes
in
with
a
blank
display,
but
is
in
Self·test
mode
(i.e., the Display
prints
out
characters when control panel buttons are pressed according to the chart below) this
indicates the problem is either the Main Board
or
the communication link between the Main
Board, Keyboard assembly and the KeypadlDisplay
Board
Before replacing anything, check all
connections, particularly the 20-pin cable to the Keyboard assembly.
If
pressing buttons
ca~ses
only the leftmost character
of
the display to change, this usually
indicates a defective cable connection (20-pin ribbon cable) between the
Main Board and
Keyboard
assembly or possibly a bad Keyboard assembly.
2.
If
the
unit
is
in
Self·test
mode
but
the
display
does
not
respond
according
to
the
chart
below, the problem is most likely in the KeypadlDisplay
Board
If
certain buttons
do
not
function properly during normal
EPS-16
PLUS operation, test them while the display is
in
Self-test mode.
If
you
can't isolate a problem that seems related to the display, the display can be forced into Self-test
mode using the follOwing procedure. With the power off, face the front
of
the unit, then:
Jumper the left
(-)
side
of
C19 (located below the MIDI
Out
jack) to pin 13
of
U20
(WD
1772).
On
power
up, the display will stay
in
Self-test as long as the
jumper
is connected, allowing you to check
the Keypad/Display Board independently.
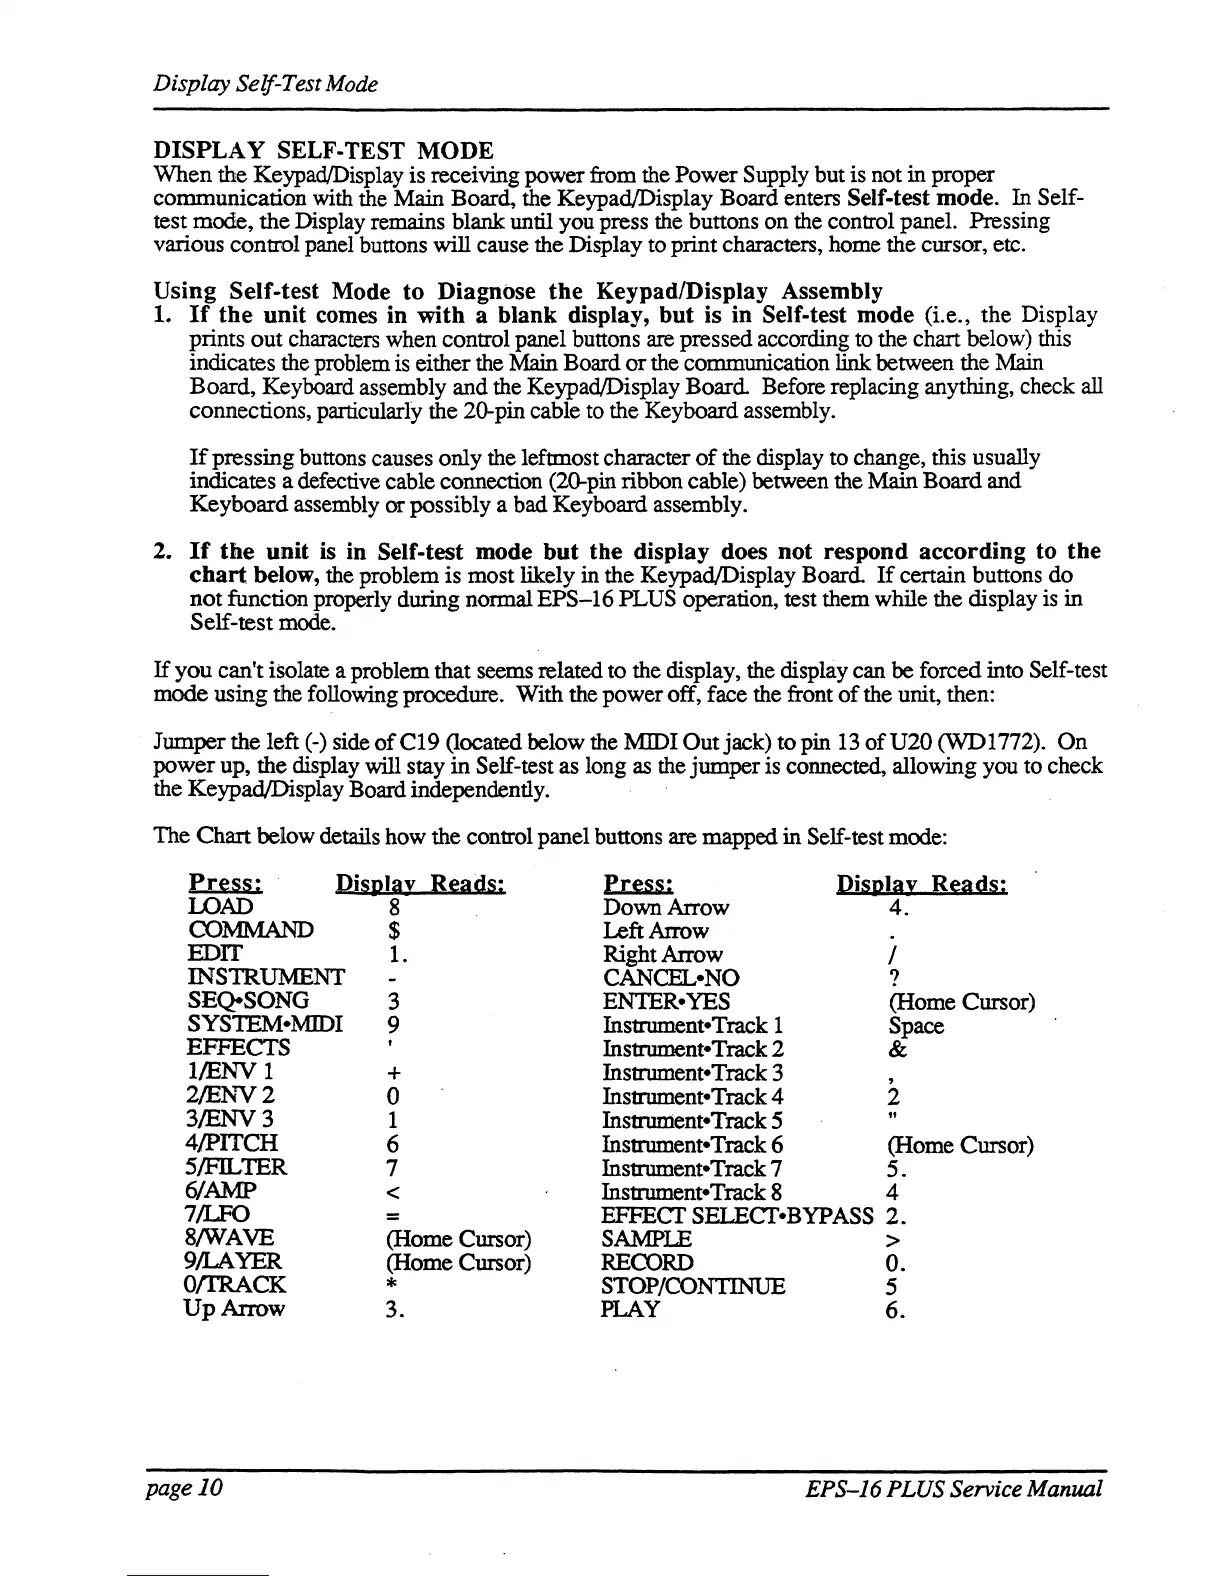
The Chart below details how the control panel buttons are mapped in
Self-test mode:
Eri:ss:
DiSula!
Bi:ads:
Pri:SS:
DiSula!
Ri:ads:
LOAD
8
Down Arrow
4.
COMMAND
$
Left Arrow
.
EDIT
1.
Right Arrow
/
INS1RUMENT
CANCEL-NO
?
SEQ-SONG
3
EIDER-YES
(Home Cursor)
SYSTEM:-M1DI
9
Instrument-Track 1
Space
EFFECTS
Instrument-Track 2
&
l/ENV
1
+
Instrument-Track 3 ,
2/Er:..c"'V2
0 Instrument-Track 4
2
3/ENV3
1
Instrum.ent-Track 5
"
4/PITCH
6 Instrument-Track 6 (Home Cursor)
5lFILTER
7 Instrument-Track 7
5.
61AMP
<
Instrument-Track 8
4
71LFO
=
EFFEcr
SELEcr-BYPASS
2.
8/WAVE
(Home Cursor)
SAMPLE
>
9/LAYER
(Home Cursor)
RECORD
o.
O/I'RACK
*
STOP/CONTINUE
5
UpArrow
3.
PLAY
6.
pageJO
EPS-J6
PLUS Service Manual