EasyManua.ls Logo

ETC Source 4WRD II - User Manual

ETC Source 4WRD II
28 pages
Print Icon
To Next Page IconTo Next Page
Loading...
Source 4WRD II
HPL to LED Retrofit (CE)
Installation and User Manual
Version 1.9.0
Part Number: 7067M1210-1.9.0 Rev A
Released: 2020-10

Other manuals for ETC Source 4WRD II

Question and Answer IconNeed help?

Do you have a question about the ETC Source 4WRD II and is the answer not in the manual?

Summary

Introduction

Help from ETC Technical Services

Americas Contact Information

Contact details for ETC Technical Services in the Americas region.

Asia Contact Information

Contact details for ETC Technical Services in the Asia region.

France Contact Information

Contact details for ETC Technical Services in France.

United Kingdom Contact Information

Contact details for ETC Technical Services in the United Kingdom.

Germany Contact Information

Contact details for ETC Technical Services in Germany.

Safety Warnings

Electrical Installation Safety

Fixture must be installed by a qualified electrician in accordance with all national and local electrical and construction codes.

General Safety Precautions

Warnings regarding fixture mounting, power lead condition, suspension methods, safety cables, cooling, and thermal insulation.

Product Specifications

Electrical Specifications

Details on power input voltage/frequency, draw at full, circuit recommendations, and inrush current characteristics.

Environment Specifications

Specifies ambient operating, minimum storage, and maximum anticipated external surface temperatures for the fixture.

Weight Specifications

Provides the weight of the Source 4WRD II LED retrofit kit and the fixture when installed.

Optical Specifications

Confirms compatibility of the Source 4WRD II LED with all ETC Source Four lens tubes.

Retrofit the Fixture

Wire the Power Connector

Instructions for wiring the power connector for the Source 4WRD II LED retrofit kit according to electrical codes.

Remove Incandescent Lamp Housing

Install the Source 4 WRD II Retrofit

Install the Fixture

Connect Cables

DMX Dimming

Line-dimming Configuration

Configure the Fixture

Set a DMX Address

Steps to set the DMX address for the fixture, ranging from 1 to 512.

Set Fixture to Line-Dimming (AC Mode)

Instructions to configure the fixture for line-dimming operation using the AC mode setting.

Manually Set a Level

Guidance on manually setting the fixture's light output level from 0% to 100% via the user interface.

Focus the Fixture

Set the Z-adjustment

Using the Z-adjustment knob to adjust the LED light field for specific applications.

Adjust the Yoke Position

Change the Height Position

Steps to adjust the fixture's vertical mounting height by manipulating the yoke locking knobs and bolts.

Set the Angle within the Yoke

How to tilt the fixture to the desired angle within the yoke by loosening and tightening the yoke locking knob.

Shape the Beam

Use the Accessory Holder

Instructions for using the accessory holder, including releasing and locking the retaining clip for color frames.

Use a Pattern

Information on selecting and using A-size and B-size patterns in the fixture's pattern holder slot for beam shaping.

Troubleshoot the Source 4 WRD II

Clean and Maintain the Fixture

Clean the Fixture

How to clean LED emitters, fan, and fin stack using oil-free canned air for optimal performance and maintenance.

Store the Retrofit

Guidelines for storing the Source 4WRD II LED retrofit kit, including temperature, packaging, and orientation requirements.

Clean the Lenses

Clean the Reflector

Clean 5° and 10° Polymer Lenses

Overview

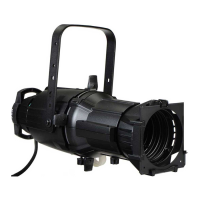
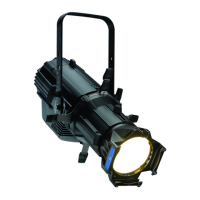
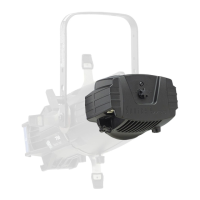
The ETC Source 4WRD II HPL to LED Retrofit (CE) is a kit designed to convert a standard Source Four burner assembly from an HPL source to a white-light LED, significantly reducing power consumption. This retrofit kit is available in 80 CRI, 90 CRI (Gallery), and 90 CRI Daylight (Gallery) variants. It is important to note that this retrofit kit is not compatible with Source Four LED, Fresnel, PAR, PARNel, or jr fixtures.

Important Technical Specifications:

  • Electrical:
    • Power Input: 209–252 VAC, 47–53 Hz.
    • Power Draw (Full Intensity): 175 W.
    • Recommended Fixtures per Dimmed Circuit (ED15 module): 2.
    • Maximum Fixtures per Non-Dimmed Circuit (ER15AFR module): 6.
    • DMX Mode Requirement: Connect fixture to relay, constant power, or dimmer with regulation off and parked at full.
    • Inrush Current: 12 A (first half-cycle).
  • Typical Power Consumption:
    • Idle (DMX Mode): 3.7 W (0.05 A).
    • Idle (AC Mode): 0 W (0 A).
    • Full Intensity: 175 W (0.75 A).
  • Environment:
    • Ambient Operating Temperature: 5°C to 50°C (41°F to 122°F).
    • Minimum Storage Temperature: 5°C (41°F).
    • Maximum Recommended Ambient Operating Temperature: Ta=50°C (122°F).
    • Maximum Anticipated External Surface Temperature: Tmax=63°C (145°F) at Ta=50°C (122°F).
    • External Temperature (Steady State Achieved) at 25°C (77°F) Ambient: 38°C (100°F).
    • Humidity: Use in dry locations only, where humidity does not exceed 90 percent (non-condensing). Not intended for outdoor use.
  • Weight:
    • Source 4WRD II LED retrofit kit only: 1.69 kg (3.73 lb).
    • Source 4WRD II LED installed on 26° fixture with yoke: 5.48 kg (12.1 lb).
  • Optical:
    • Compatibility: Compatible with all ETC Source Four lens tubes.

Usage Features:

  • Installation:
    • The retrofit process involves removing the incandescent lamp housing from a Source Four fixture. This includes unplugging the fixture, loosening a brass thumb screw, sliding the lamp housing away, and disconnecting the earth bond wire. The burner assembly is no longer needed and can be recycled by ETC Technical Services.
    • The Source 4WRD II LED retrofit kit is then installed by attaching a supplied threaded post to the fixture body, securing the earth bond wire, and gently sliding the LED unit onto the fixture body, guiding the LED tower into the lamp housing hole. Care must be taken to prevent contact between the LEDs and the reflector. A #2 Phillips screwdriver is used to tighten a screw above the Z-adjustment knob for secure attachment.
    • The fixture is installed by attaching a hanging clamp to the yoke for mounting to a pipe (ETC recommends 1.5-inch schedule 40 pipe) and connecting a safety cable.
  • Cabling and Control:
    • The fixture can be controlled using either AC power or DMX.
    • For DMX control, RJ45 data cables are used for data-in and data-thru. Strain relief at the bottom of the fixture supports the data cables. A 120 Ohm resistor is required for termination if it's the last fixture in the line. ETC provides RJ45-to-XLR adapters (W6538 for female, W6539 for male).
    • When using DMX over Cat5, Cat5e or better cable is recommended. The maximum cable distance for a full DMX daisy chain is 300 m (1000 ft), supporting up to 32 fixtures. The fixture is not compatible with Ethernet protocols.
    • The fixture uses a single DMX channel for intensity control. If DMX data is lost, the LED emitters turn off.
    • For line-dimming, specific dimmer settings are recommended to ensure the dimmer is out of regulated mode. ETC recommends line-dimming for level-setting or architectural dimming and suggests testing the fixture on all existing dimmers. DMX mode is recommended for high-performance, live, dynamic dimming.
  • Configuration:
    • A two-button, seven-segment display on the user interface allows for configuration.
    • DMX Address: Use up/down arrows to set a DMX address (1-512).
    • AC Mode (Line-Dimming): Navigate one number below DMX address 1 to display "AC".
    • Manual Level Setting: Navigate one number below "AC" to display "L_FL" (Level = Full). Use the down arrow to decrease the level to a percentage (e.g., L_99 for 99%). Levels can be set from 0% to 100% (full).
    • RDM Values: Manufacturer ID (0x6574 - Electronic Theatre Controls), Model ID (0x0801 - ETC Source 4WRD II (230 V)), DMX Start Address (0x00F0, Range 1-512), Personality ID (0x00E0, 1=DMX, 2=AC Dimming, 3=Local Control).
  • Focusing:
    • Z-adjustment: A Z-adjustment knob on the rear of the fixture adjusts the LED light field. Turn on the fixture, aim it at a flat surface, slide the barrel to create a hard-edged beam, then turn the knob toward "PEAK" or "FLAT" for the desired field. "PEAK" blends overlapped beams, "FLAT" improves sharp focus. For Source 4WRD PAR or PARNel Fixture Bodies, turn the knob toward PEAK until loose, then an additional quarter turn.
    • Yoke Position: The height can be adjusted by removing and reinstalling yoke locking knobs, washers, and hex bolts. The angle within the yoke is adjusted by loosening the yoke locking knob, tilting the fixture, and retightening the knob.
  • Beam Shaping:
    • The beam can be shaped using shutters, patterns, an optional drop-in iris, and by rotating the barrel.
    • Accessory Holder: A spring-loaded retaining clip prevents color frames and accessories from falling out. Release the clip, insert the accessory, and lock the clip.
    • Pattern Holder: Located on the top side of the barrel, in front of the shutters. Accommodates A-size, B-size, and glass pattern holders. A-size patterns are recommended for maximum effectiveness due to the 3-inch fixture aperture.

Maintenance Features:

  • Troubleshooting:
    • DEP (OTP): Over-temperature protection. Allow cooling, then reset (DMX mode: DMX control to 0; AC mode: remove power for 5 seconds, then restore).
    • UEP (UTP): Under-temperature protection. Allow warming to a minimum of 5°C (41°F).
    • Flashing DMX address: Loss of DMX.
    • Dark screen: Loss of power or fixture time-out. Press any button to wake the interface. If it fails, check cable seating and power. If a working Source 4WRD II LED is available, swap units to isolate the issue. Contact ETC Technical Services if the fixture still doesn't respond.
  • Cleaning:
    • LED Emitters: Clean with oil-free canned air only. Do not touch.
    • Fan and Fin Stack: Clean with oil-free canned air as part of regular maintenance.
    • Lenses:
      • WARNING: Do not use ammonia-based or harsh commercial cleaners. Clean only as directed. Avoid immersing or soaking glass in cleaning solutions.
      • Remove the lens tube from the barrel, then remove the lenses from the tube using a Phillips screwdriver.
      • Remove dust with oil-free air or wipe with a clean, lint-free cloth. Clean glass surfaces with isopropyl alcohol, distilled water, or a 50%-50% mixture.
      • Reinstall lenses and lens tube.
    • Reflector:
      • WARNING: Unplug and allow to cool before cleaning.
      • Quickly clean dust with oil-free air or a lint-free cloth.
      • For deeper cleaning, remove the LED lamp housing, barrel rotation knob, and the barrel itself.
      • Clean dust with oil-free air or a lint-free cloth. Clean glass surfaces with isopropyl alcohol, distilled water, or a 50%-50% mixture.
      • Reassemble the barrel, ensuring triangles align, then reinstall the barrel rotation knob and LED lamp housing.
    • 5° and 10° Polymer Lenses:
      • CAUTION: Handle by edges only. Never rub dry.
      • Remove the beam focus knob and lens tube, then remove the lenses from the tube.
      • Dip the lens in a clean isopropyl alcohol/water mixture (1 part isopropyl alcohol to 9 parts water).
      • Use a soft moistened nylon bristle brush to wash the smooth side in a linear motion, and the ridged side by following its ridges.
      • Dip again in the mixture.
      • Dry with an air gun, ensuring airflow moves liquid away. Inspect for dirt and repeat if necessary.
      • Reinstall the lens (ridged side facing front) and lens tube.
  • Storage:
    • When not installed, store the Source 4WRD II LED in its original packaging or a dust-resistant plastic bag.
    • Store at temperatures of 5°C (41°F) or higher.
    • If stored below 5°C (41°F), store in an upright position (LEDs facing up) and allow to warm to room temperature for a minimum of one hour before applying power. Applying power to a cold fixture will cause damage and void the warranty.

ETC Source 4WRD II Specifications

General IconGeneral
BrandETC
ModelSource 4WRD II
CategoryLighting Equipment
LanguageEnglish

Related product manuals