IN1804 Seamless Scaling Switchers • Operation 46
Captive Screw IR Signal Insertion
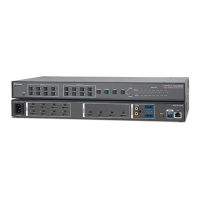
Figure 32 shows an example of a typical captive screw Ethernet insertion, in which an
Extron control system provides IR control of a display via the switcher. Configure this type of
insertion as follows:
21
1
100-240V ~1.0A MAX
50-60 Hz
LIN
R
L OUT
R
Tx Rx G
CT
2
CT
3
CT
4
CT
5
CT
6
CT
7
CT GV+
RS-232
RESET
LAN
3 4 1B
HDMI/CEC
OUTPUTS
REMOTE
AUDIO
CONTACT
/TALLY
INPUTS
Tx Rx G
IR
1A
OVER TP
SIG
OUT
LINK
DTP HDMI 4K 230 Rx
DTP HDMI 230 Rx
OVER DTP
RS-232
IR
Tx Rx Tx RxG
LR
POWER
12V
0.7A MAX
AUDIO
SIG LINK
DTP IN
OUTPUTS
HDMI
1804 DO
IR
1.2A MAX
100-240V ~ 50-60Hz
PWR OUT = 12W
+V +S -S G
1
4
2 3 7
5 6 8
SGSG SGSGTx Rx GTxRxG TxRx GTxRxG
RTSCTS
1 2
1 2 3 41 2 3 4
3214G
Tx Rx GTxRxG TxRx GTxRxG
RTS
CTS
SGSG SGSG
5 6 7 8 5 6 7 8
SWITCHED 12 VDC
40W MAX TOTAL
3 4
COM
eBUS
FLEX I/ORELAYSIR/SERIAL
12 VDC
AV
LAN
LAN
Control
Processo
IR
Front Panel
Rear Panel
IR Emitter
Figure 32. Typical Captive Screw Insertion to an Input Endpoint
1. Connect the control system to the Over TP IR captive screw port (output port 1A in this
example).
2. Connect the TP cable from the IN1804 RJ-45 Out connector to the DTP input of the
endpoint.
3. Connect the endpoint to the device to be controlled.
4. Wire an IR emitter to the IR connector of the twisted pair receiver and place the emitter
on the display device.
32