Flowserve Pump Division - 11
structure's natural frequency may therefore differ significantly from the natural frequency of the pump
alone.
In the absence of any specific information, the pump manufacturer will assume that the piping is installed
rigidly and anchored close to the pump connections. It will also be assumed that the hold-down bolts are
securely embedded in a concrete foundation of infinite mass and rigidity.
The system designer must give this proper consideration and must ensure that the natural frequency of
the vibrating structure, as defined above, does not fall within the pump operating speed range. He must
also be aware of the much lower stiffness of fabricated system structures, relative to concrete, and the
problems associated with calculating stiffness of unconventional and composite structures.
Foundation bolts of the specified size should be embedded in concrete and located according to the
Elevation Drawing.
Grouting
The purpose of grouting is to prevent lateral shifting of the equipment supports and not to take up
irregularities in the foundation. Only non-shrinking grout with a 6000 psi (41.4 MPa) compressive
strength in 72 hours should be used. Flowserve Pump Division recommends the following procedure for
grouting:
1. Build a wooden form around the outside of the base to contain the grout. In some cases
the form is placed tightly against the lower edge of the base and in other cases it is
placed a slight distance from the edge of the pump base.
2. Saturate the top of the rough concrete foundation with water, if required, before grouting.
Add grout until the entire area under the pump base is filled. A stiff wire should be used
to work the grout and release any air pockets.
3. After the grout is poured, the exposed surfaces should be covered with wet burlap to
effect slow curing and prevent cracking. When the grout has set (about 48 hours),
remove the forms and smooth the exposed surface if desired. The grout should be
allowed to cure at lease 72 hours before dynamically loading.
CAUTION: IF LEVELING NUTS ARE USED ON THE FOUNDATION BOLTS TO LEVEL THE
BASE, THEY MUST BE BACKED OFF AS FAR AS POSSIBLE PRIOR TO
GROUTINGTHE BASE IN PLACE. SHIM NEAR THE FOUNDATION BOLTS, BACK
OFF THE LEVELING NUTS AND TIGHTEN THE FOUNDATION BOLTS. TO DO
OTHERWISE WILL SIGNIFICANTLY LOWER THE STRUCTURAL NATURAL
FREQUENCY AND RESULT IN SEPARATION OF THE BASE FROM THE GROUT.
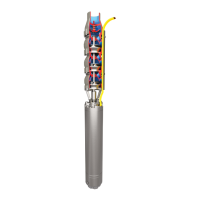
GUIDE RAIL INSTALLATION
A guide rail installation must be a double, round guide rail system; see Figure 1: Guide Rail System.
1. Install anchor bolts in the bottom of the wet well for the discharge elbow/base. Install the
discharge elbow/base – see grouting instructions above. Secure the base with hex nuts
and washers.
2. Cut the guide rail pipe to length. The CUSTOMER SUPPLIED guide rail pipe is
galvanized or stainless steel, 2-inch round, Sch 40 pipe. Install the guide rails over the
tapered plugs on the discharge elbow/base.
3. Place tapered plugs of the upper guide rail bracket in the guide rail pipes and position the
upper guide rail bracket so that the guide rail pipes are plumb. Secure the upper guide
rail bracket to the top of the well.