Installation
Connecting to Line Power
2
2-5
5. If you need to change the line voltage setting, remove the drum and rotate it so that
the desired voltage is facing outward. Replace the drum.
6. Close the line voltage selection module door. Verify that the line voltage you
selected is showing through the window.
Connecting to Line Power 2-4.
Warning
To avoid electric shock while charging or using the standard
with the line cord plugged in, connect the factory supplied,
three-conductor line power cord to a properly grounded power
outlet. Do not use a two-conductor adapter or extension cord to
open the protective ground connection.
Caution
To avoid loss of the state of calibration in case of ac power
interruption, set the BAT switch to A (on). This enables battery
backup power.
After verifying that the line voltage setting and fuse are correct, make sure the battery
switch is in the position. Connect the line cord to the rear panel ac input plug, and
plug the line cord into a properly grounded three-prong outlet. After 2 hours, place the
battery switch in the A position. Verify that the AC PWR indicator is lit. If it is not,
check for an open fuse. In case of further difficulty, refer to Section 5 for
troubleshooting information.
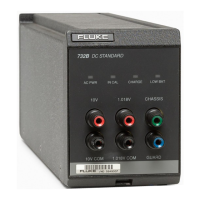
The 732B and 732B-7001 are IEC Safety Class I (grounded enclosure) instruments, and
must be properly connected to earth ground when plugged into ac line power. When the
ac line cord is plugged into a properly grounded three-prong outlet, the safety ground
path for the battery charger is through the line cord ground lead.
Note
Refer to Section 3 for additional information about powering the standard
from the ac line or the internal battery.
Installing a 732B or 732B-7001 in a 734A-7001 Instrument
Enclosure 2-5.
When you slide a 732B or 732B-7001 into one of the instrument bays in the chassis, it
automatically connects to the ac power bus. The 734A-7001 Instrument Enclosure
provides an ac line power bus only. There is no fuse in the 734A-7001. All fusing and
line voltage selection is done in the installed 732Bs and 732B-7001s.
To install a 732B or 732B-7001 in a 734A-7001 Instrument Enclosure, refer to Figure 2-
3 and proceed as follows:
1. Remove the enclosure ac line cord from line power.
2. Verify that the 732B or 732B-7001 BAT switch is set to l and disconnect line power
from the 732B or 732B-7001.
www.valuetronics.com