Maintenance
Access Procedures
5
5-13
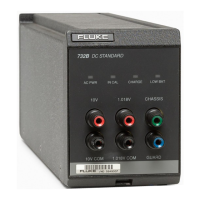
Replacing the Oven Assembly 5-13.
Refer to "Troubleshooting" to confirm the necessity of replacing the oven (reference)
assembly. Assembled and tested reference assemblies are available from Fluke as P/N
869193. To replace the oven assembly, which contains the 10V reference circuitry,
proceed as follows:
1. Do the steps under "Initial Access Procedure."
2. Disconnect the two cables that are attached to the A5 assembly at the oven assembly.
3. Refer to Figure 5-3 and remove the three screws that fasten the front panel and oven
to the chassis (one on each side and one on the bottom).
4. Remove the four screws (two on each side) that fasten the oven to the front panel
bezel.
5. Remove the oven assembly. Refer to the parts list illustration for the 732B Final
Assembly for further breakdown information.
6. Reverse the steps to install a new oven assembly.
Accessing the A5 Battery Charger 5-14.
Proceed as follows to access A5 Battery Charger/Power Supply assembly for
troubleshooting or replacement.
1. Do the steps under "Initial Access Procedure."
2. The component side of the A5 assembly is now accessible for probing if you are
troubleshooting the board.
3. To remove the A5 assembly, disconnect all four cables from the board.
4. Remove the two screws that fasten the U504 and U500 TO-220 packages to the
battery hold-down bracket.
5. Remove the five screws that fasten the A5 assembly to the battery hold-down
bracket.
6. Remove the A5 assembly. Be careful not to lose the four insulators from step 4.
7. When you reinstall the A5 assembly, reinstall the screws through the tabs on U504
and U500 before you reinstall the rest of the screws. Be careful to include the
isolation washers under the tabs.
Removing the Power Transformer Assembly 5-15.
Proceed as follows to remove the power transformer assembly:
1. Do the steps under "Initial Access Procedure."
2. Remove any cable attached to the rear panel.
3. Disconnect the 3-position cable from the power transformer assembly where it plugs
onto the A5 assembly.
4. Remove the three screws that fasten the rear panel and transformer assembly to the
chassis (one on each side and one on the bottom).
5. Slide the rear panel and transformer assembly (still fastened together) slightly back
and out of the way.
www.valuetronics.com