9
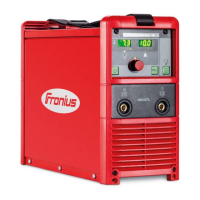
(1) Left digital display
(2) Left unit display
Either CFH or l/min appears in the Setup menu depending on the country setting
(3) Right digital display
(4) Right unit display
Either CFH or l/min appears in the Setup menu depending on the country setting
(5) Parameter unit display
Either % or s appears depending on which parameter is chosen in the Setup menu
(6) Pilot flow LED
lights up when the pilot flow parameter is selected
(7) Pilot arc on LED
lights up when the plasma process is active
(8) Start/Stop button
- to start or end the plasma process manually
- to access the Setup menu
(9) Gas test button
- to test the plasma gas flow
- to access the gas test menu
(10) Pilot flow (-) / plasma gas connection
to connect the pilot flow (-) / plasma gas cable from the plasma welding torch
(11) Pilot flow (+) connection
to connect the pilot flow (+) cable from the plasma welding torch
(12) Store button
- to access the Setup menu
- to access the gas test menu
(13) Adjusting dial (with LED)
for setting parameter values; when the LED on the adjusting dial is lit, the selected
parameter can be set
(14) Plasma gas LED
lights up when the plasma gas parameter is selected
(15) Over-temperature indicator
lights up if the PlasmaModule overheats
(16) Operating instructions symbol
Observe all safety instructions and notes on operation, care and maintenance in the
operating manual
Housing front
panel
(continued)