22
Single Gate
Pull-To-Open
Press S-1
Then S-1
Single Gate
Push-To-Open
Press S-1
Then S-2
Dual Gate
Pull-To-Open
Press S-1
Then S-3
Dual Gate
Push-To-Open
Press S-1
Then S-4
Least Sensitive
Press S-2
Then S-1
Somewhat Sensitive
Press S-2
Then S-2
Medium
Press S-2
Then S-3
More Sensitive
Press S-2
Then S-4
Most Sensitive
Press S-2
Then S-5
OFF
Press S-3
Then S-1
10 Seconds
Press S-3
Then S-2
20 Seconds
Press S-3
Then S-3
40 Seconds
Press S-3
Then S-4
60 Seconds
Press S-3
Then S-5
Both Gates Open
& Close Together
Press S-4
Then S-1
Both Gates Open
Together and #2
Closes First
Press S-4
Then S-2
Both Gates Open
Together and #1
Closes First
Press S-4
Then S-3
#1 Opens First
#2 Closes First
Press S-4
Then S-4
#1 Opens First
#1 Closes First
Press S-4
Then S-5
S1
S1S1 S2
S3
S1
S2 S1
S1
S2S2 S3S2 S4S2 S5S2
S2S3 S3S3 S4S3 S5S3
S2S4 S3S4 S4S4 S5S4
S4 S1
S3S1 S4S1
S2 S3 S4 S5
S1
S2
S3
S4
S5
Type of
Installation
Automatic
Close
Gate
Sequence
Program
Activation
Obstruction
Sensitivity
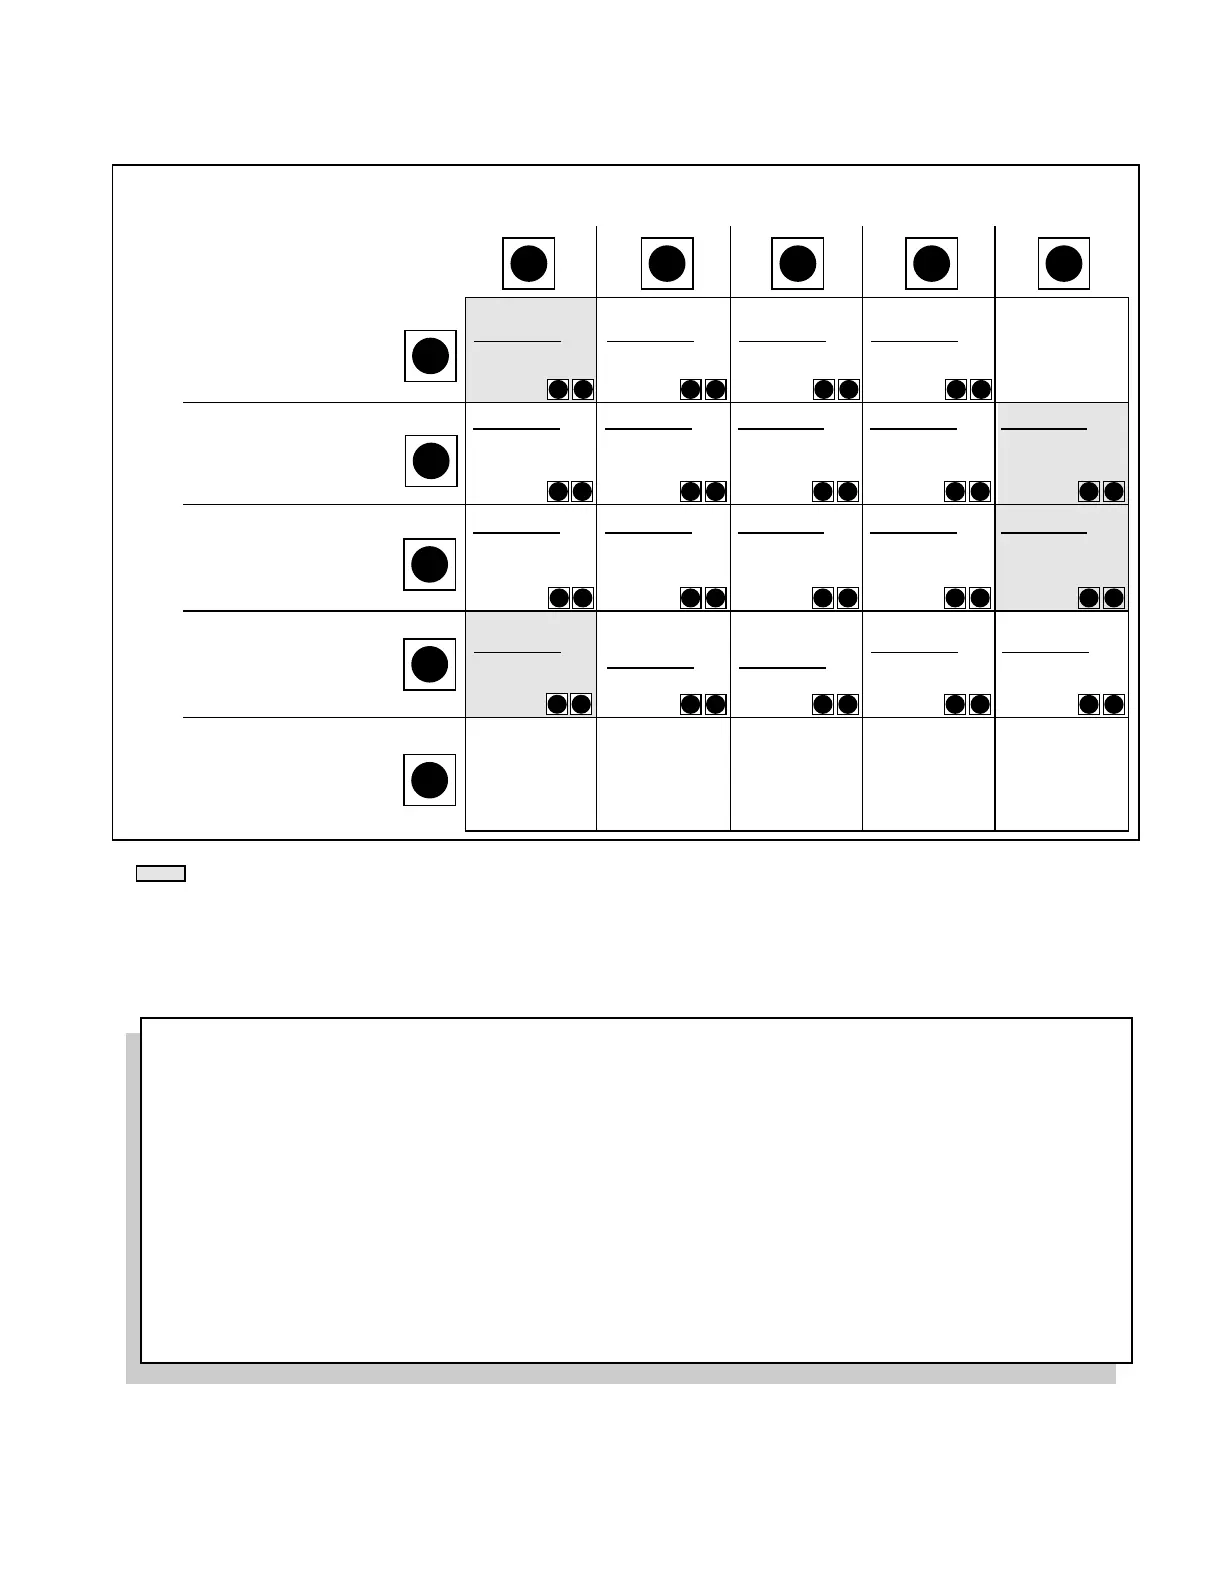
SETTINGS
FEATURES
NOTE: Always wait for the LED light to stop flashing after the first (Feature) button is pushed ... THEN press the second (Setting) button.
Highlighted areas denote factory settings. However, if the control board is rebooted, the Obstruction
Sensitivity Setting will default to "Least Sensitive."
The first button pushed determines the feature. When
the LED light stops flashing, you have four seconds
to press the second button. The second button
pushed determines the setting.
PROGRAMMING THE GTO/PRO 2000 & 2200 AUTOMATIC GATE OPERATOR
(The more sensitive, the more
likely to stop for an obstruction)
(The number of seconds
operator will stay open
before closing automatically)
(For dual gates only ...
Gate #1 is the first operator
Gate #2 is the second operator)
Programming Check
If You Need To Check the Program Settings:
Put the control board in programming mode (see step 1 in Programming Steps). Press the button representing the
feature you want to check. Count the blinks of the red light. The number of blinks represents the setting of the
feature.
CAUTION: If you are checking more than one feature, be sure to wait at least 10 seconds between single presses
to insure you don't alter the setting of a particular feature.