Initial Start-Up of the HGS PassThru Software
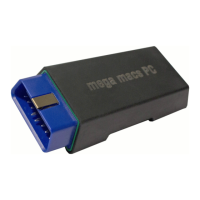
mega macs PC
Preconditions for Initial Start-Up of HGS PassThru
9 Initial Start-Up of the HGS PassThru Software
This section describes how the HGS PassThru software is used.
9.1 Preconditions for Initial Start-Up of HGS PassThru
• Voltage supply of device and laptop or tablet through mains supply and mains cable is ensured.
• Laptop or tablet is booted.
• Laptop or tablet available for connecting vehicle to the Internet
• HGS PassThru file correctly installed on laptop or tablet.
• Admin rights available.
• Latest Java version installed.
• Stable Internet connection
• All processes/programs that have been started or are running in the background are closed.
9.2 Running the HGS PassThru Software
CAUTION
Pay attention that the voltage supply during the entire procedure is no lower than 12 V.
A voltage drop may lead to the abortion of the download and the ECU may be damaged.
The old software version of the ECU cannot be re-established if an update is intended.
Proceed as follows to run the HGS Pass Thru software:
1. Select Applications > PassThru in the main menu.
The disclaimer is displayed.
2. Read the disclaimer and confirm it at the end of the text.
The PassThru function is active.
3. Insert the USB cable into the USB connection of the PC VCI.
CAUTION
Pulling off of the PC VCI when actuating the clutch
Risk of injury or material damage
Proceed as follows before starting:
1. Apply the parking brake.
2. No gear is engaged.
3. Regard the window with infos and instructions.
NOTICE
Short circuit and voltage peaks when connecting the PC VCI
Danger of destruction of automotive electronics
Switch off ignition before connecting the PC VCI to the vehicle.
4. Insert the PC VCI into the vehicle's diagnostic interface.
Both LEDs of the PC VCI flash. The PC VCI is ready for operation.
26