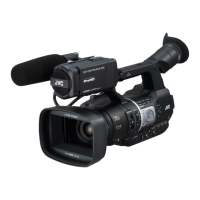
Side Control Panel
.
SCENE SELECT
FOCUS
LOCK
AE LEVEL
MANU
AUTO
MENU/THUMB
FOCUS ASSIST/1 OIS / 2 LOLUX / 3
B
A
OFF
PRESET
IRIS
GAIN
CANCEL
L
M
H
B
A
WHT BAL SHUTTER
FULL AUTO
MODE
POWER
ON
OFF
ON
OFF
AE LOCK/4 ZEBRA/5 MARKER/6
PUSH AUTO
TIME CODE
AUTO
A
B
C
E
S R Q
O
N
MLKJ
T
D
P
H
I
U
F G
A
[FOCUS AUTO / MANU / BAUTO] Focus
Switch
(A P45 [Focus Operation] )
B
[SCENE SELECT
] Scene Selection Switch
(A P48 [Using Scene Select] )
C
[LOCK] Auto Focus Lock Button
D
[IRIS] Iris Auto/Manual Selection Button
(A P50 [Adjusting the Iris] )
E
[PUSH AUTO] Iris Push Auto Button
(A P50 [Adjusting the Iris] )
F
[GAIN] Gain Auto/Manual Selection Button / [L/
M/H] Sensitivity Selection Switch
(A P51 [Setting the Gain] )
G
[WHT BAL] White Balance Auto/Manual
Selection Button / [B/A/PRESET] Selection
Switch
(A P53 [Adjusting the White Balance] )
H
[SHUTTER] Shutter Speed Auto/Manual
Selection Button
(A P52 [Setting the Electronic Shutter] )
I
[y] One Push Auto White Balance Button
J
[FULL AUTO ON/OFF] Full Auto Switch
For switching the Full Auto mode to ON/OFF.
Full Auto mode adjusts the Iris, Gain, Shutter
and White Balance automatically.
(A P50 [Adjusting the Brightness
Automatically] )
(A P50 [Auto Iris (Automatic Adjustment)
Mode] )
(A P51 [Automatic Gain Mode (Automatic
Gain Adjustment)] )
(A P52 [Automatic Shutter Mode (Automatic
Shutter Adjustment)] )
(A P53 [Automatic White Balance Mode
(FAW: Fulltime Auto White balance)] )
K
[AE LOCK/4] AE Lock/User 4 Button
When Gain, Iris, and Shutter are set to “AUTO”,
their respective values and the value of white
balance are locked when the [AE LOCK/4] button
is pressed.
You can also use it as a user button by assigning
a specific feature in the menu setting to this
button.
(A P34 [Assignment of Functions to User
Buttons] )
L
[ZEBRA/5] Zebra/User 5 Button
(A P65 [Setting Zebra Pattern] )
You can also use it as a user button by assigning
a specific feature in the menu setting to this
button.
(A P34 [Assignment of Functions to User
Buttons] )
M
[MARKER/6] Marker/User 6 Button
This button toggles ON/OFF the marker, safety
zone, and center mark displays.
You can also use it as a user button by assigning
a specific feature in the menu setting to this
button.
(A P34 [Assignment of Functions to User
Buttons] )
N
[MODE] Camera/Media Mode Selection Button
(A P14 [Operation Modes] )
O
[POWER ON/OFF] Lock Power ON/OFF Switch
Turns ON/OFF the power.
0
Hold down
the lock button (blue) in the center
to toggle ON/OFF.
0
When the power is turning OFF, “P.OFF”
appears on the LCD monitor and viewfinder.
0
Wait for 5 seconds or more to turn on the
power again.
P
Cross-Shaped Button (JKHI)/Set Button (R)
The function changes according to the
operation status of the camera recorder.
o
During menu operation (all modes)
(A P85 [Basic Operations in Menu Screen] )
Set Button (R)
:
Confirms menu items
and setting values
Cross-shaped Button
(JK)
:
Selects menu items
and setting values
o
During Camera mode
Shutter operation:
Set Button (R)
:
Shutter ON/OFF
Cross-shaped Button
(JK)
:
Switches shutter
speed when shutter
is ON
Cross-Shaped Button
(HI)
:
AE level operation
Q
[LOLUX/3] Low-light Shooting/User 3 Button
For switching the low-light shooting mode ON
or OFF.
You can
also use it as a user button by assigning
a specific feature in the menu setting to this
button.
(A P34 [Assignment of Functions to User
Buttons] )
18
Names of Parts
Introduction