Chapter 2 85
Test Descriptions
Measurement Jitter
Test Procedure
NOTE Throughout the Measurement Jitter Test Procedure the term ‘the
Worksheet’ refers to the Measurement Jitter Test Worksheet on page 87.
The term ‘the Test Record’ refers to the Measurement Jitter Test Record
detailed in the relevant model number Appendix for the being tested.
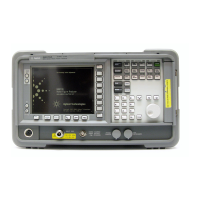
Step 1. Connect the equipment as shown in Figure 2-26.
Step 2. Ensure the preset is set to factory settings (press the
System key, then
More, Power On/Preset, Power On (Preset) and Preset (Factory)).
Step 3. Press the
Preset key on the NFA and wait for the routine to finish.
Step 4. Load the noise source diskette (A:) or from the NFA’s internal memory
(C:). Alternatively, create an ENR file from the data supplied on the noise
source label (refer to the Noise Figure Anaylzers NFA Series User’s
Guide) for more details). Do not calibrate the source. The NFA should
display
Uncorrected in the active window.
Step 5. Set the NFA as follows:
1. Set the measure result to Y-Factor (press the
Result key, then
Y-Factor).
2. Set sweep to single (press the
Sweep key, then Sweep Mode: single).
3. Set the frequency mode to fixed (press the
Frequency/Points key, then
Freq Mode and Fixed).
4. Set the fixed frequency to 1 GHz (press
Frequency/Points, Fixed Freq,
1, GHz.
5. Set measure to Linear mode (press the
Scale key, then Units Linear).
6. Select the display to meter mode (press the
Format key, then Format
and
Meter).
Step 6. Restart the NFA sweep (press the
Restart key).
Step 7. Repeat step 6, recording 100 displayed linear Y-Factor values within the
Worksheet.
Step 8. Calculate the linear standard deviation with the equation given below: