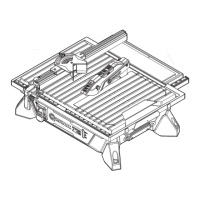
REMOVING AND INSTALLING THE TABLE
INSERTS (FIG. 6)
NOTE: The miter saw comes with the table
inserts already installed. These instructions are
for replacing or adjusting either insert side.
To avoid injury:
●
Always unplug the saw to avoid accidental
starting. Remove all small pieces of
material from the table cavity before
performing any cuts.
The table insert may
be removed for this purpose, but always
reattach the table insert prior to performing
a cutting operation.
● Do not start the sliding compound miter
saw without checking for interference
between the blade and table insert.
Damage could result to the blade, table
insert or turntable if a blade strike occurs
during the cutting operation.
● To remove, loosen and remove the six
screws (1) on the table insert (2) with
a Phillips screwdriver and remove the
inserts.
● To install, reposition the left and right
side inserts on either side of the cut line,
replace the six screws and tighten.
● Check for blade clearance by moving the
slide carriage through the full motion of the
blade in the table slot. If neither side of the
insert hits the saw blade, loosen the three
screws for that side and adjust. Tighten
the screws and check again for blade
clearance.
Also check all bevel angles before use.
ADJUSTMENT INSTRUCTIONS
WARNING
!
6
1
2
 Loading...