Commissioning
75
Fig.
Pos: 40.19.7 /B A/Erstinbetriebn ahme/Rundballe npresse/Ballen auswerfer/2_Ball enauswerfer z wischen Aufn ahmebleche schie ben_Text @ 191\mod_138 1922173572_ 78.docx @ 1 633559 @ @ 1
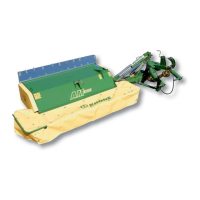
• Slide the bale ejector (1) between the mounting plates (2), inserting the bolts (3) on the bale
ejector into the lower bores in the right and left mounting plates.
• Secure the bolts on the bale ejector on the right and left using a washer (4) and clamping
sleeve (5).
• Securely tighten the screw connections (6) in the mounting plates on the right and left.
Pos: 40.19.8 /B A/Erstinbetriebna hme/Rundballe npresse/Ballen auswerfer/3_L eiste am Ballen auswerfer monti eren_Bild_Co mprima @ 191 \mod_1381922 407943_78. docx @ 16336 46 @ @ 1
Fig.
Pos: 40.19.9 /B A/Erstinbetriebna hme/Rundballe npresse/Ballen auswerfer/3_L eiste am Ballen auswerfer monti eren_Text @ 19 1\mod_13 81922409479_7 8.docx @ 163 3675 @ @ 1
• Fitting the strip (1) on the right and left of the bale ejector:
Secure with a screw (2), washer (3) and locknut (4).
Secure with a screw (5), springs (6), washer (7) and locknut (8).
Pos: 40.19.10 / BA/Erstinbetriebn ahme/Rundball enpresse/Balle nauswerfer/Hin weis - Schra ube muss bündig mit der Mutter abschließen @ 192\mod_1 381934205035_7 8.docx @ 16 34585 @ @ 1
Note
The screw (2) may not be securely tightened, but must be flush with the locknut (4).
Pos: 40.19.11 / Layout Module /---------------Seitenumbruch---------------- @ 0\mod_1196 175311226_0. docx @ 4165 @ @ 1