2DC-2
1-6-2
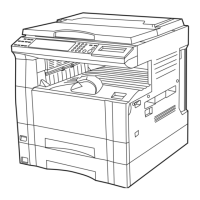
1-6-2 Removing the process unit
1. Open the front top cover.
2. Open the front cover.
3. Lift the process unit together with the toner container out of the copier.
Figure 1-6-1 Removing the process unit
CAUTIONS
• After removing the process unit, seal it in the protective bag and place it on flat surface. Do not place the process unit in
a dusty area.
• Do not give impact to the process unit.
• Do not place floppy disks near the process unit.
• If the process unit is replaced for some reason, the toner installation mode must be run.
While pressing and hold down the Stop/clear key, Zoom (+) key, and Zoom (-) key simultaneously for five seconds, turn
the power switch off and then on to run the toner installation mode. “900” will appear in the copy quantity/magnification
display on the copier's operation panel. Then perform aging for approximately 15 minutes to replenish toner into the
developing section in the process unit and a countdown of the time until the copier will be in a copy-ready state (900
seconds = 15 minutes). Once the copier is in a copy-ready state, “1” will appear in the copy quantity/magnification
display and the Start indicator will light.
* Run the toner installation mode only when you have replaced the process unit with a new one. (Do not run it when
toner remains in the process unit.)
Front top cover
Front cover
Process unit

 Loading...