5. DIAGNOSTIC MODE (Video/Audio (signal) path conrmation mode)
ThismodeisusedforconrmingtheVideoandAudio(signal)paths.(Troubleshooting)
Conrmingtheoperationofunitcanbeeasilydoneafterrepair.
Backup data will not be lost.
5.1. Starting diagnostic mode
Press the "ZONE SELECT" and "BACK" button while simultaneously pressing those two buttons of this unit.
TUNED, STEREO and RDS are lit in FL display.
5.2. Canceling diagnostic mode
Turn off the power by pressing the ON/Standby button.
5.3. Operation
Use the remote control (RC014SR) that is supplied with the SRxx06 model. Press buttons on the remote control in the order indicated in the “Details of how to operate remote control”
a)
columninthefollowingtabletoestablishtheconrmationpath.
Youwillndusinganotherremotecontrolunitwiththemacrofunctionsveryuseful.Tousethemacrofunctions,programamacrofunctiontooutputaremotecontrolcodeinaccordancewiththestepsinthetablebelow.
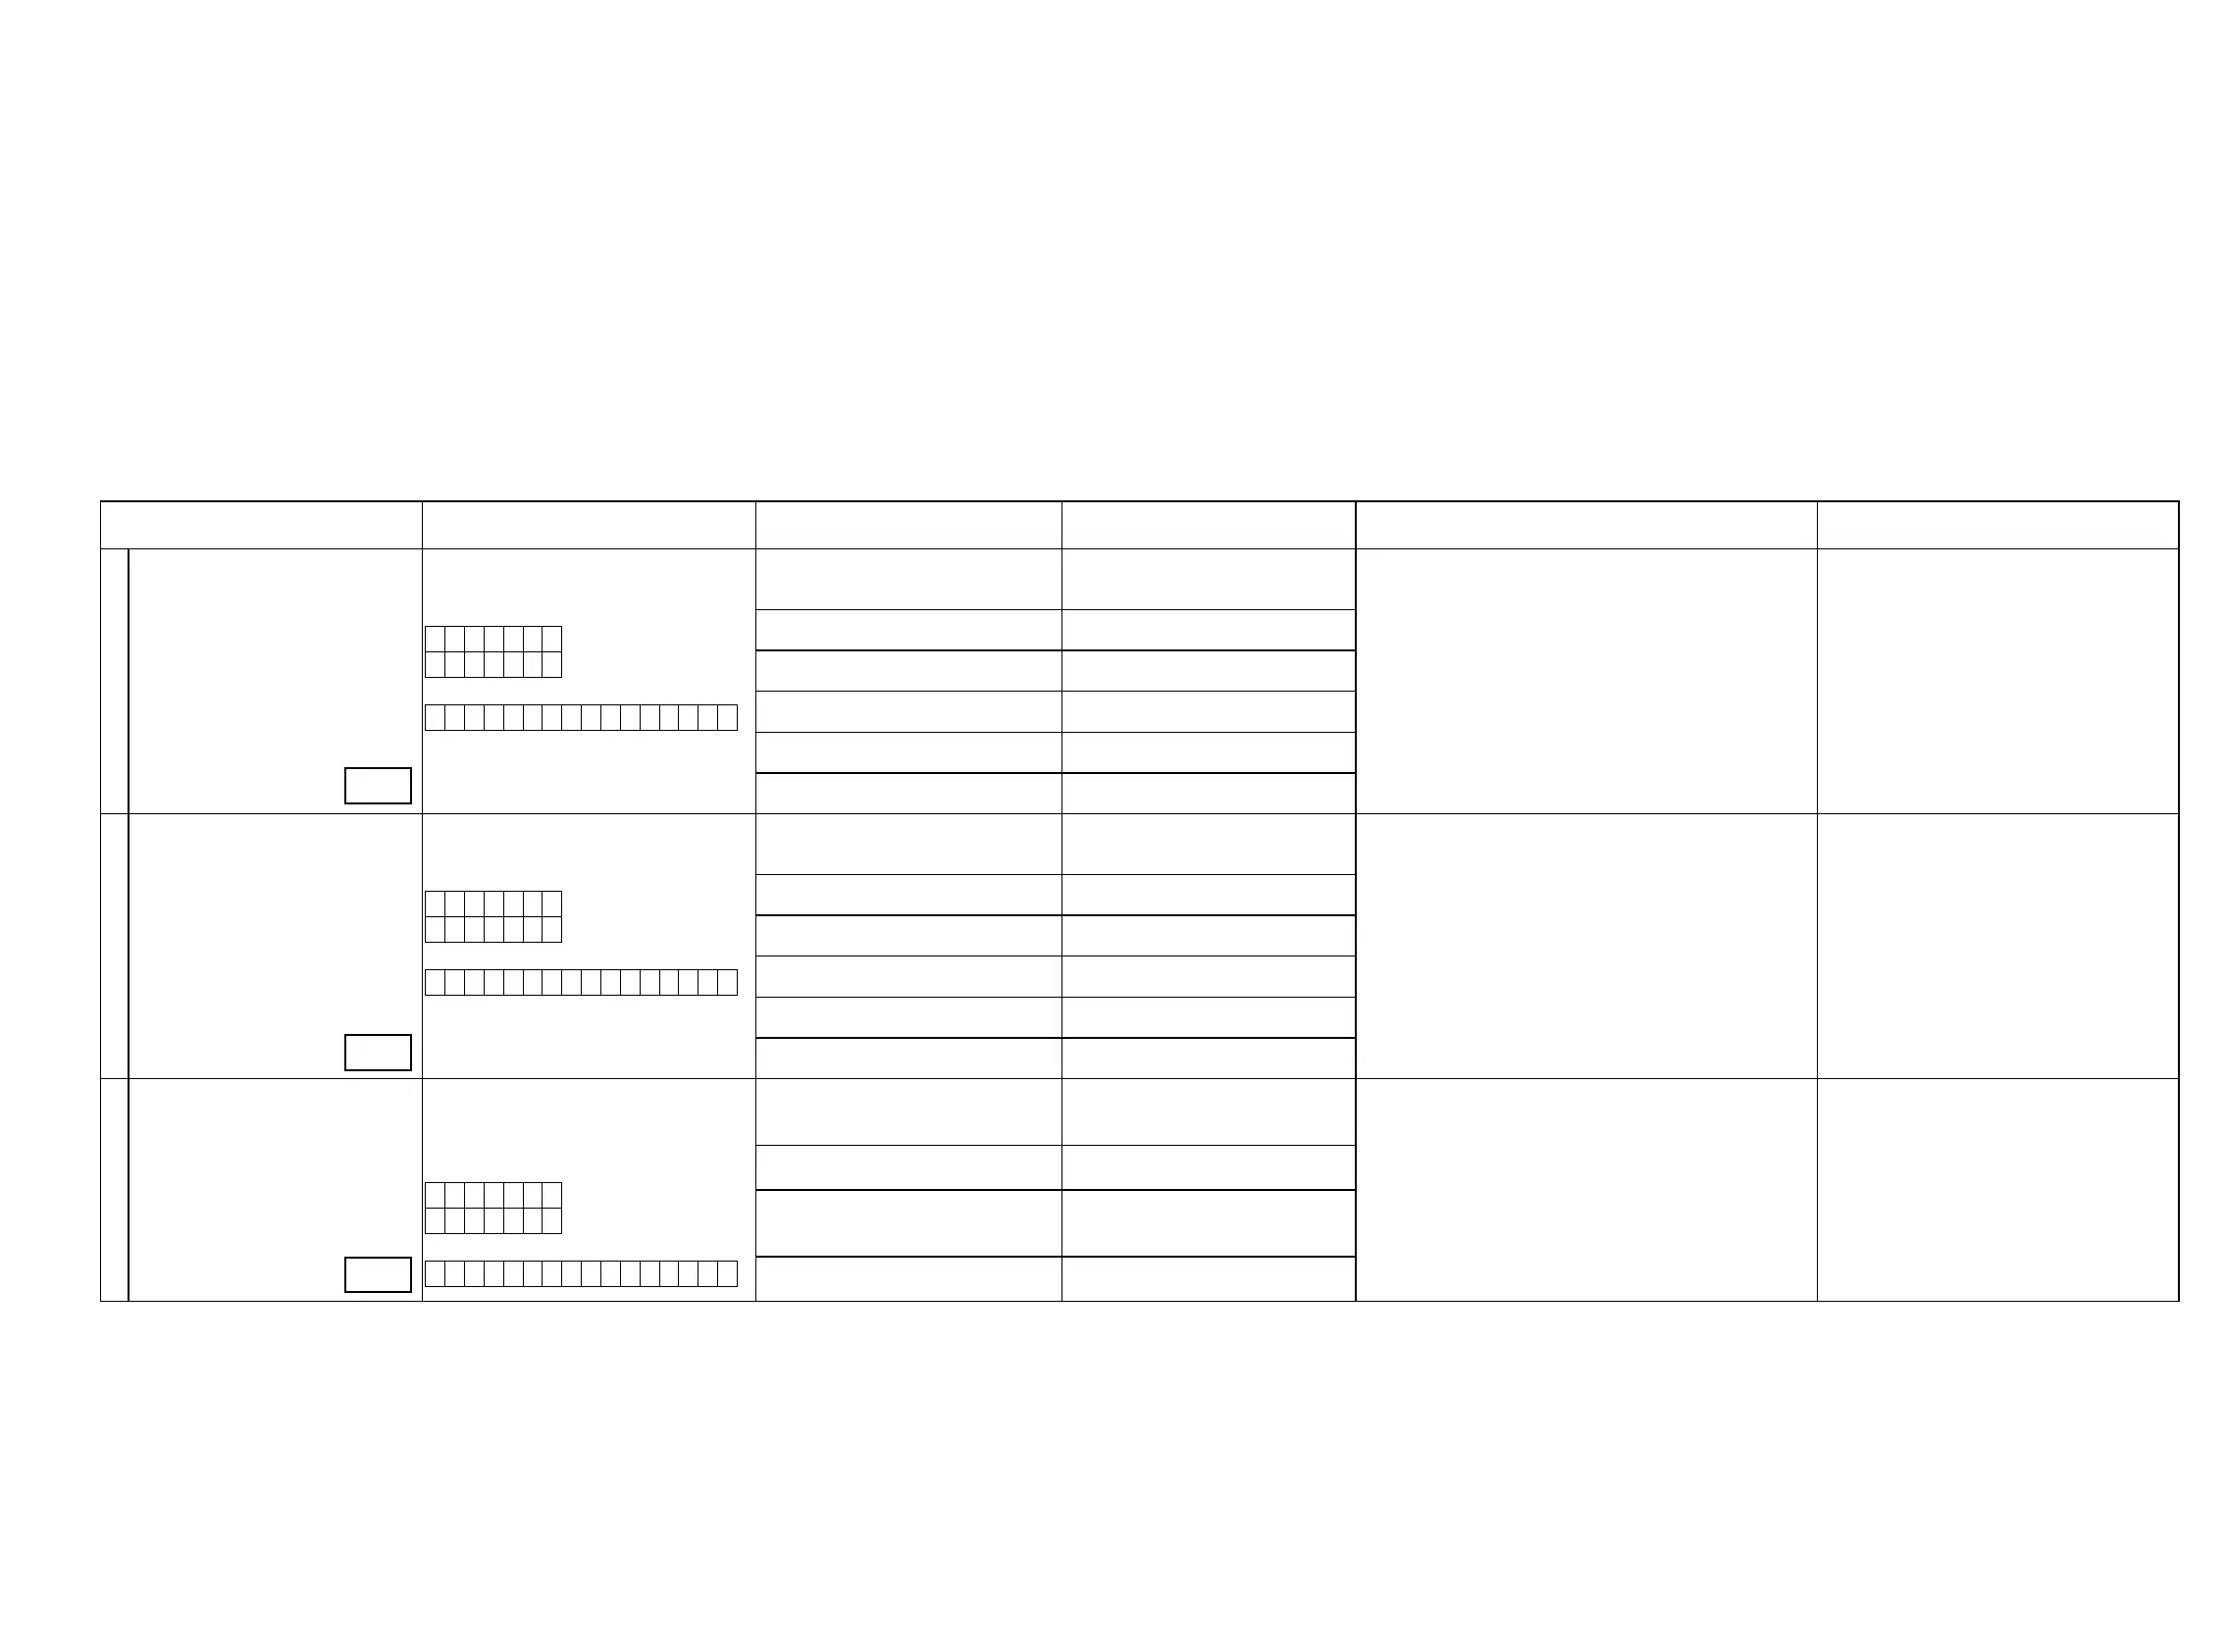
5.4. Video system conrmation items
g.XX:Refertotheblockdiagramoftheg.XXth.
Conrmation item Setting and display
Details of how to operate remote controller
*a)
Output sequence of remote control codes
※
It is useful to form a macro program. *b)
Contents of conrmation Remarks
1
Analog Video (signal) Path Video Convert (IP Scaler) : OFF , All Sources
All ZONE : ON
Main Display:
V D V D
0 1
Sub Display:
V 0 1
1.Press [AMP]
2.Press [Z2]
3.Press [STANDBY]
q
ZONE2 POWER OFF
·Input : CVBS / Output : CVBS
·Input : CVBS / Output : CVBS RECOUT (MEDIA PLAYER)
·Input : CVBS / Output : CVBS ZONE2
·Input : Component / Output : Component
·Input : Component / Output : Component ZONE2
·input ETHERNET (CVBS) / Output :CVBS
(
※
As the input source, you can switch from DVD to other ones.)
4.Press [Z3]
5.Press [STANDBY]
w
ZONE3 POWER OFF
6.Press [AMP]
7.Press [1/AUTO]
e
KEY1/AUTO (Main Zone)
(Initialization & Video Convert All OFF)
8.Press [Z2]
9.Press [POWER ON]
r
ZONE2 POWER ON
10.Press [Z3]
11.Press [POWER ON]
t
ZONE3 POWER ON
12.Press [AMP]
13.Press [DVD] twice
y
DVD (Main Zone)
2
HDMI (signal) Path
(Main Zone)
Video Convert(IP Scaler) : OFF, All Sources
All ZONE:ON
Main Display:
V D V D
0 1
Sub Display:
V 0 1
1.Press [AMP]
2.Press [Z2]
3.Press [STANDBY]
q
ZONE2 POWER OFF
·Input : HDMI / Output : HDMI
(
※
As the input source, you can switch from DVD to other ones.)
4.Press [Z3]
5.Press [STANDBY]
w
ZONE3 POWER OFF
6.Press [AMP]
7.Press [1/AUTO]
e
KEY1/AUTO (Main Zone)
(Initialization & Video Convert All OFF)
8.Press [Z2]
9.Press [POWER ON]
r
ZONE2 POWER ON
10.Press [Z3]
11.Press [POWER ON]
t
ZONE3 POWER ON
12.Press [AMP]
13.Press [DVD] twice
y
DVD (Main Zone)
3
Analog or HDMI to HDMI (signal) Path
Video Convert(IP Scaler) : ON, All Sources
IP Scaler : Analog & HDMI , All Sources
Resolution : "AUTO", All Sources
Main Display:
V D V D
0 2
Sub Display:
V 0 2
1.Press [AMP]
2.Press [Z2]
3.Press [STANDBY]
q
ZONE2 POWER OFF
·Input CVBS / Through : IP Scaler / Output : HDMI
·Input Component / Through : IP Scaler / Output : HDMI
·Input HDMI / Through : IP Scaler / Output : HDMI
·Input ETHERNET (S) / Through : IP Scaler / Output : HDMI
(
※
As the input source, you can switch from DVD to other ones.)
Conrmtheinputpassonebyone.
Because it becomes only the input of the highest input
becomes Convert/IP Scaler (signal) Path if it inputs it at
the same time.
(HDMI input > Component input > CVBS input)
4.Press [Z3]
5.Press [STANDBY]
w
ZONE3 POWER OFF
6.Press [AMP]
7.Press [2/STEREO]
e
KEY2/STEREO (Main Zone)
(Initialization & Video Convert All ON
& IP Scaler "Analog & HDMI")
8.Press [AMP]
9.Press [DVD] twice
r
DVD (Main Zone)
g.1
g.2
g.3
31