11921 Slauson Ave. Santa Fe Springs, CA. 90670 (800) 227-4116 FAX (888) 771-7713
22
STEP 1 - INSTALL EXTENSION PLATES - Continued
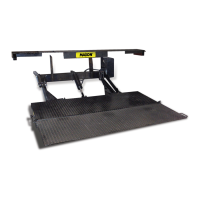
BOLTING EXTENSION PLATE (96” WIDE EXTENSION PLATE SHOWN)
FIG. 22-1
BOLTS
(KIT ITEM)
EXTENSION
PLATE
TEARDROP
LOCK NUTS
(KIT ITEMS)
2. Bolt extension plate to vehicle as shown in FIG. 22-1. If necessary, reposition ex-
tension plate so top surface is fl ush with top surface of sill. Then, torque bolts and
lock nuts to 105 +/-20 lb-ft.
NOTE: Do not tighten extension plate bolts and lock nuts until:
• All the bolts and lock nuts are in place.
• Mating surfaces of extension plate and rear sill are made fl at as possible.
• Top of extension plate is fl ush with top of rear sill.
The mating surface between the bolt-on extension plate and vehicle rear sill
must be as fl at as possible. Interference between the mating surfaces could
result in a distorted top surface of extension plate when all the bolts are
tightened. Distorted extension plate can also make the dual steps diffi cult to
install correctly. Remove interference or shim rear sill to eliminate or reduce
the possibility of a distorted extension plate.
CAUTION
NOTE: Weld the LH and RH ends of the extension plate to vehicle body as shown
in FIG. 22-1 if any of the following conditions apply.
• Bolt holes are not accessible on the corner posts of the vehicle body.
• Liftgate will be used for dock loading applications.
• As required by body/trailer manufacturer
NOTE: An optional 102” wide extension kit is available for 102” wide vehicles.
3/16”
3/16”
WRAP WELD
HORIZONTAL
2” MIN/ 6” MAX
WRAP WELD
HORIZONTAL
2” MIN/ 6” MAX
BOLT EXTENSION PLATE TO VEHICLE - Continued