10
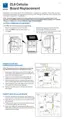
OPERATION
2. Click Test.
3. If the logger fails the test, move to a new location and try again.
Sometimes, moving just a few meters will provide a successful connection.
NOTE: The ZL6 antenna is inside the enclosure. An antenna extension cable can also be used to elevate the
antenna for increased signal strength. Contact Customer Support for more information.
4. Click Close.
2.2.3 INSTANTANEOUS SENSOR MEASUREMENTS SCAN
ZENTRA Utility will automatically scan the sensors attached to the ZL6 every 30 s and
update the readings shown on the main screen (Section4.2.3).
ZENTRA Utility can also take real-time sensor measurements on demand. This is a critical
tool to ensure sensors are installed correctly, to test if a sensor is reading properly, or to
evaluate how sensors react to environmental changes. The ZL6 does not store data that it
measures with the scan function.
To force a new scan at any time, press the Scan button in the Button toolbar (Section4.2.1).
The sensor and measurement area will refresh.
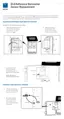
2.2.4 DATA DOWNLOAD
While at the installation site, allow the ZL6 to collect data for one or two measurement
intervals, and download the collected sensor data to ensure the monitoring setup is working
correctly. Periodically return to the site to download the stored data, to check the logger
operation, and to retrieve stored data.
Download saved sensor and status data with ZENTRA Utility using the following steps:
1. Connect the logger to a computer using the micro-USB cable.
2. Open ZENTRA Utility.
3. Choose the appropriate COM port from the dropdown list.
4. Click Connect.
5. Click Download on the Button toolbar. This will download the data stored since the last
successful download.
Alternatively, go to the Data menu in the Menu bar and select either Download New
(downloads the data stored since previous download) or Download All (downloads all the
data currently stored in the ZL6).
6. Edit the File Name in the Save dialog. A suggestion will appear, based on the connected
logger name and the time and date.
7. Select the location on the computer where the file will be saved.
8. Click Save.