EasyManua.ls Logo

Michell Instruments Easidew Online User Manual

Michell Instruments Easidew Online
68 pages
To Next Page IconTo Next Page
To Previous Page IconTo Previous Page
Page #22 background image
Easidew Online User’s Manual
14 97094 Issue 18.5, March 2016
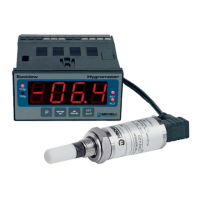
INSTALLATION
2.8.3 Preliminary System Test
Before wiring the external signal outputs and the transmitter (current loop open),
perform a system check as follows:
1. Switch off and disconnect the power supply.
2. Connect to an AC or DC supply and switch the supply
ON. The monitor
display should come on. Depending on the version of the monitor there
are 2 types of sequential messages appearing on the display.
Type 1: - Digits sequentially tested, each in turn displaying the gure
8
followed by
rUO2 then oAor and Sbr
Type 2: - Digits sequentially tested, each in turn displaying the gure
8
followed by
ruOO then oror and alternately ashing ErrL and -129.9
The ºCdp LED will, by default, also be illuminated and it is possible, that
even though no alarms are currently set-up, one of the alarm LED’s may be
illuminated.
NOTE: If the instrument is con gured to read ppm
V
neither of the
temperature LED indicators will be lit.
3. If a loop calibrator is available, set it to Ext loop and connect to terminal
4 (positive) and terminal 3 (negative) of the process indicator.
4. Set the output current of the loop calibrator to 4 mA, the display should
now be reading
-100.0.
5. Set the output current of the loop calibrator to 20 mA, the display should
now be reading
020.0.
6. Switch off and disconnect the loop calibrator.
Before wiring the external signal outputs and the transmitter, perform a system check
as follows:
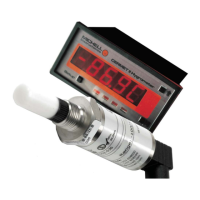
2.9 Mounting the Sample Block and Transmitter
2.9.1 Sample Block Gas Connections
Sample gas connections are made to the Gas In and Gas Out ports on the sample block
see
Figure 12.
Either port on the sample block may be used as the Gas Input port (i.e.
for connection purposes the ports are interchangeable).
Normally, connections are made via stainless steel pipework, in which case the sensor
block/transmitter assembly will be self supporting. If Te on tubing is used it may be
necessary to support the assembly with a body clip.

Table of Contents

Question and Answer IconNeed help?

Do you have a question about the Michell Instruments Easidew Online and is the answer not in the manual?

Michell Instruments Easidew Online Specifications

General IconGeneral
BrandMichell Instruments
ModelEasidew Online
CategoryMeasuring Instruments
LanguageEnglish

Summary

Safety Information

Electrical Safety Precautions

Ensures safe operation and electrical integrity of the instrument and accessories.

Pressure Safety Guidelines

Details safe working pressure limits to prevent instrument damage or failure.

Toxic Materials Handling

Information on minimizing exposure to hazardous substances during maintenance.

Repair and Maintenance Procedures

Guidelines for maintaining the instrument, including authorized service.

Calibration Recommendations

Recommended calibration interval and procedure for maintaining accuracy.

Safety Conformity Standards

States compliance with relevant EU and US safety directives.

1 INTRODUCTION

2 INSTALLATION

2.8 Electrical Connections

Overview of all electrical connections for the Easidew Online system.

2.14 Signal Output Connections

Details connections for alarm outputs and re-transmitted signals on the monitor.

3 OPERATION

3.2 & 3.2.1 Preparation and First Time Operation

Steps to prepare the instrument for operation and conduct the initial start-up.

3.3 & 3.3.1 System Alarms and Default Logic

Describes the two alarm outputs and their default switching logic settings.

3.3.3 Alarm Level Set-Up

Guide for configuring the individual alarm set-point levels for the instrument.

3.4 & 3.4.1 Temperature Range and Defaults

Explains default temperature units (°Cdp) and associated span settings.

3.4.2 Span and Unit Settings

Procedure for changing the span limits and temperature units (°C to °F).

3.4.3 Alarm Set-Point Limit Configuration

Setting alarm limits, particularly after re-configuring the instrument's range.

3.4.4 Scale Units to ppm, Set-Up

Guide to re-configure the monitor to display dew point in parts per million by volume.

4 GOOD MEASUREMENT PRACTICE

4.3 Fault Conditions

Lists common error messages, their causes, and recommended actions.

Appendix A Technical Specifications

Related product manuals